
Tarp howtos and tips (even for tenters)
2010-03-01
I've talked about using a tarp before, hopefully now you're curious. I've attempted to write up how to use a tarp before as well here:
http://www.smalladventures.net/backpacking/advice/tarping.html
. Since I wrote that article though, Jess and I have both learned a lot more about how and when we like to use a tarp.
Even if you use a tent, and will never switch to a tarp, I urge you to read this article. The bottom of your tent is a tarp, if all else fails, you can use it that way. Alternatively an emergency blanket, or sack that's cut open, or a piece of plastic you find will work. Knowing and understanding these tricks is useful in all sorts of situations.
Equipment:
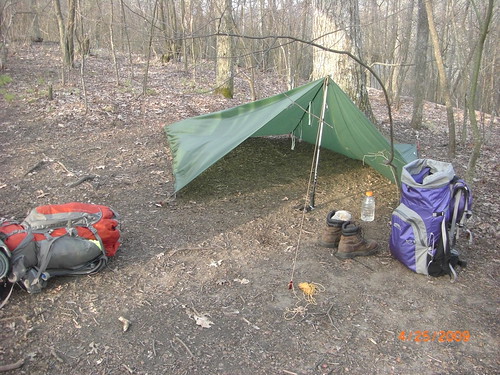
We use an 8x10 silnylon tarp with 6-8 aluminum 3-flanged stakes, 50 ft of trip-tease twine and varying groundcloths (generally a second similar tarp). Our stakes came with tiny strings on them, which we took off and tied into the grommets we use for staking instead. (easiest way is put the string through, line up both ends, tie an overhand knot in the end). We then stake through these small loops of string. We use hiking poles most often for tarp poles. The head-end is adjusted to around 3.5 feet, the foot end between 2 and 3.5 feet.
Basic pitch:
There are tons of ways to pitch a tarp, for some of the basics you can see the article that I linked above. It turns out though that Jess and I basically only use one pitch 90% of the time. Jess learned a second pitch in SAR training as well that I'll also talk about later
Pup Tent:
Use 2 poles. Hiking poles work well, I'll talk about using trees later. uncoil your cord and lay it out along the axis you want your tarp on (this will be parallel to the long axis of your body). Take your tarp and lay it's long axis down this same axis. Lay your poles at the two ends of this axis. Put the left (long) edge of the tarp where you want it and stake both corners down with the edge taught. Now put the pole tip in the center grommet on the short-side adjacent to the staked corner. Hold the pole up with the tarp taught between the stake and pole. Note now where the pole will end up in this configuration. You can put it back down now.
Tie an overhand knot in the end of the cord, and loop this over a second stake, put the stake in the ground around 4 feet from where the pole will be. Now go stand the pole back up with the tarp on it, guess an approximate length for the cord so it'll be taught from the second stake to the top tip of the pole, tie an overhand knot in the middle of the chord again, and loop over the tip of the pole (under or over the tarp, both may work).
Now, by pulling on the tarp opposite your first stake, across the pole, on the narrow side, you can probably keep it upright'ish. Slide down this edge until you reach the grommet on the other side, and stake that corner down. You now have an "A" frame, that wants to flop over. If you futz a bit, you can get it to stand for now though.
Now, go to the other end of the tarp. You have one stake in already, I'm guessing you can figure out what to do from here.
Once you're done, you'll notice that the tarp isn't taught in some places. This is because your initial layout wasn't actually square. You started with 2 stakes, then made it taught to the first pole, if you wrack your brain for a while you'll realize that this put one stake too far from the axis. To fix this just futz with all of your stakes till you get it square. I can't really explain this part, so you're on your own.
Now, pull out your groundcloth and spread it underneath the tarp. Make sure it doesn't stick out the edges, and is a good foot or more from both open ends. If any rain ends up ON the groundcloth it'll flow along it and get you wet. Not BTW, that we did this *after* the tarp was up. In the rain this is great, because the people side of the groundcloth stays dry, unlike the floor of most tents when pitched in rain.
Now that we have the basic pitch out of the way, lets talk about some of the interesting parts:
TIPS:
Knots:
I always use overhand knots for tarping. You tie a half-knot, but don't pull the end through, leaving a loop. This only works well if the end you put tension on is the end you didn't pull through, otherwise the loop won't cinch.
Tension:
How much tension should you use? In the pitch discussed above, about as much as you pull on it, the tarp can take. Jess and I pitched this in something like a 50mph wind and we're simply hauling on the ropes for everything we were worth. If you use silnylon as we do though, you'll find that it stretches or "relaxes" a bit after being pitched, and you'll need to readjust things. If it's raining, often you can fix the tension by just extending the front pole - thus staying dry.
Avoiding the Sides:
One of the biggest problems with tents and tarps is condensation. The underside if your tarp will end up wet, rain or no. In heavy rain it will end up so wet that rain hitting the top will cause it to mist out, so it almost feels like a light sprinkle IN the tarp. Tents do this too, though double-wall tents do it less.
The best thing you can do about this is to avoid touching the sides. If you sleep 2 people under the pup-tent pitch, you'll find this difficult. to make it easier add 2 more stakes pulling the long left and right edges out. You'll find this pulls down the ceiling a bit in the middle, but if you crawl in you'll find it much easier to avoid touching the sides especially in wind as the fabric will be much more taught.
Pulled out or no Grommets:
What if you didn't follow my advice earlier, and your grommets pulled out of your tarp when you tied it to trees? Alternatively, what if you have no grommets (emergency blanket, drop cloth, whatever). Take a rock or other lumpy object. Set it against the tarp near where you want to attach it. Push and wrap the tarp down around the object. Tie your twine at the bottom, making a sack with the object in it. Try pulling on the twine. You should have a pretty solid connection. As for the poles, if you use hiking poles put the handle end up instead, pull the tarp down over the handle, and loop the rope over this.
Side-blown Rain or Strong Wind:
Depending you can either put your tarp sideways (great for wind with no rain), so the side of your tarp takes the wind. This is also good since high-wind often switches in the middle of the night, this can be due to the storm passing over you, or due to a daily differential, such as on a ridge near the ocean. Another option is to pitch the tail end of the tarp into the wind. If you can, lower your pole to as low as possible. If you stake directly to the ground, you'll get pools of water forming on the sides, ON your tarp. You have to keep the slant high-enough that even with sag the water doesn't pool. In my experience, with an 8x10 tarp this requires on the order of a 1-1.5 foot of pole. If you are alone, doing the same pitch but with the short axis in place of the long axis, and staking the back edge to the ground does work quite well due to the steeper angle you end up with (You'll want the front pole to be more like 4-feet for this pitch). You have less space in the tarp where you won't hit the ceiling though.
Mosquitoes:
So, a headnet will help, but you have a problem. Mosquitoes will bite through anything that's thin, penetrable, and close enough to your skin. This means they'll go straight through a thin t-shirt, glove liners, or mosquito netting against your face. When I was in bad mosquito country in hot-weather (so I couldn't be fully in my sleepingbag) I wore my raincoat with the hood up. My hood is fairly close-fitting, so with a head-net I could get the net to billow over my face, not leaving much exposed. The mosquitoes bit through my glove-liners, had I had windproof gloves though it would've been fine. Even as it was, it was only a problem on the worst nights. I never used bug spray for 1500 miles of the AT.
Materials and Money:
If you are on the cheap, you may not be able to spend $60 or so on a silnylon tarp. If this is the case, you may be able to score some old Tyvec from a construction site. This stuff, you'll find, is incredibly loud. To work around this problem, try washing it in the washing machine two or three times. This will soften it up considerably and get rid of most of the loud noises that keep you up at night.
Guessing Wrong:
If you use a tarp, you'll find yourself getting used to sleeping out, and start to wonder why you are even under a tarp many nights. The logical follow-on to this is to stop using a tarp if it doesn't look like it's going to rain. Well... what about when you guess wrong? It turns out that with a tarp the cost is much lower than with a tent. Simply stand up, pull your tarp out, and throw it over your stuff. Now... start pitching it. The whole time your pitching, your stuff will stay dry!
Group or Open Pitching:
If you want a bigger shelter and you have some friends with tarps, or if you just want a very open shelter, give this one a try. Take one corner of the tarp, and tie it to a tree around 5 feet off the ground, on the uphill side. Now, stake down the other 3 corners directly to the ground, so it's taught. If you have multiple, tarps, pitch another one similarly, but reflected, Now you have a huge shelter with one open side, partially protected by a tree-trunk. Note, also, that this pitch puts very little stress on the tarp.
Strangely, I've taken very few pictures of most of the tarp pitches. I'll post them here when I get some useful ones :)