
Metal Working
2015-03-28
For christmas Jess got me a metal-working class. 4 3 hours classes in a metalshop learning from experienced folks. As it turned out it was basically open ended "so, what do you want to learn?" With 2 guys running the shop, 2 of us taking the class, and maybe 1 to 3 other folks hanging out in the shop and getting help occasionally, there was lots of 1-1 time. Here's some of the stuff I did.
I decided to touch on blacksmithing, but I have a decent idea how to do a lot of things with blacksmithing. So I wanted to focus on getting welding to the point where I could actually go out and buy a welder, and weld something that mattered. At that level of welding, MIG is what you generally want to use, so that's what we learned (though a lot of it applies to other welding as well).
Day 1
We spent the first day just getting a run-down of the shop, how to use a coal forge, figuring out the welders, loading in a new wire spool, making a few beads, and covering the basics.
Day 2
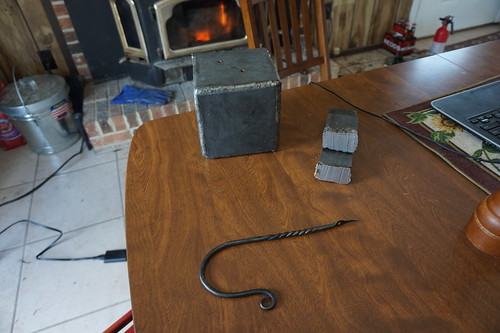
Both of us decided to get in our blacksmithing. So I made the hook you see on the bottom left. The process goes like this (skipping all the heating it up parts)
1) pound out the tip to make a square
2) roll it on the anvil as you pound it to make it round
3) start the curl on the anvil horn
4) finish the curl by holding the straight part flat on the anvil and striking far down on the curve towards you. Then bring the bar up a little off the anvil, and correspondingly strike the curve a little closer to the tip and a little lighter. Repeat until the bar is vertical instead of horizantal and you are striking down.
5) make the "hook" on the horn
 6) hammer the segment you're going to twist so it has flat sides or grooves or something, so the twist shows up
7) grab it with a vice and twist it!
6) cut the end off in the right spot using the... thingy who's name I forget (it's basically an edge you set the rod on and hammer *almost* through, then you brake it off with pliers)
7) make square tip at the other end
8) hammer it flat
9) drill it
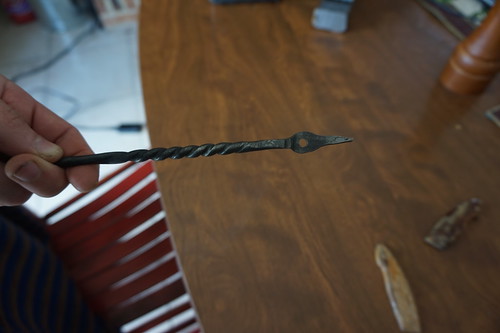
Oddly, getting an even twist is actually easy, you just do it not too hot. it's a bit harder to make it *uneven*. This is true because we were working mild steel (as most blacksmiths do these days), that means it is very consistent in it's carbon an allow content. Traditionally blacksmiths worked wrought iron, which is far less consistent and thus to get an even twist you have to work it unevenly, so you have to do it very hot and it takes a lot of skill
Day 3
Down to business on welding. The goal was, making a box that will hold water. In a more serious class for professionals the goal would be to make that box hold 100 psi for 24 hours. We're just mucking about though, so didn't go that far.
I decided to do this by sitting the box corner-to-corner, welding the inside first, and then filling the space on the outside of each crack. I did this to build 2 half-boxes of 3 sites making a corner, then attached the two together (welding only the outside at that point of course).
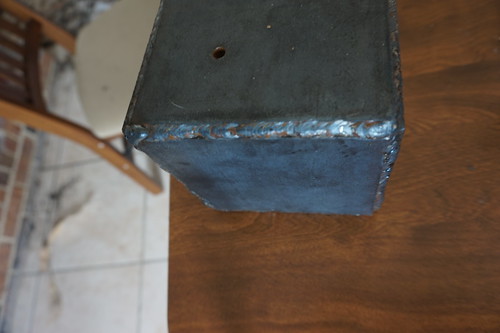
The idea was good, but I missed one KEY step to really doing it right. The right way to do it (besides cutting more carefully) is to *tack* weld before you make the real welds. I could've tack welded the 3 sites together seperately and checked that everything was really going to fit *just* right. The inner welds I did weren't of much use. If I did this again I'd probably skip them and simply tack-weld the 2 3-sided pieces together at that point and make sure it all lined up *perfectly*... if not cut it apart and try again. Then you fill the outside.
That said, even though I had a huge gap I filled it in well enough and the end result does hold water without leaking. Pretty cool.
Note that what looks like a good weld might not really be a good weld. Prettyness is a sign of skill and thus a proxy for knowing technique, but not necessarily a sign of good binding. It's possible to make a bad weld look pretty. Good binding has to do with avoiding gaps, how much you heat up the metal, and how well you get the metal to blend together, and mostly... prep.
Most of the time spent building this box was spent not with a welder, but with a grinder. We cut the plates first. Then I had to grind all the faces to ensure I'd get a good binding. Being new to a grinder this took quite a while, but no matter how good you are... most of welding is actually grinding, not holding a welder and laying a bead.
Day 4
Now comes the real challenge, taking BIG pieces of metal, and joining them with a tiny little MIG welder. This is done by cutting V-notches in to both sides of the metal then slowly filling in the space one bead at a time. You start with the pieces not quite touching and fill in the almost touching points, then flip it and do that on the other side, avoiding ending up with any air gaps. Then you work your way up filling in the V cut.
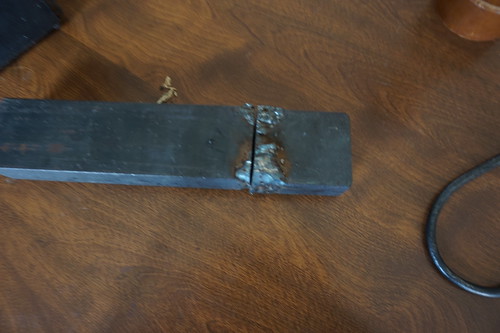
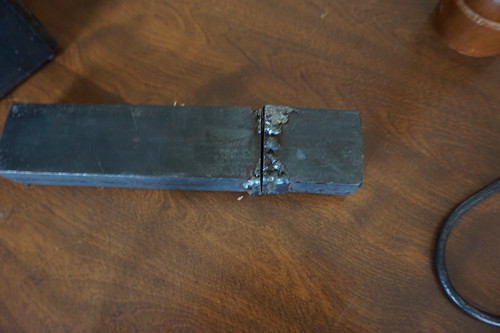
If you are anything like me, this probably looks like a pretty bad weld to you. This weld represents about 1.5 hours of grinding and a half-hour of welding. We didn't want to waste time, so I didn't grind it out to make it all pretty, and I didn't add a cap-weld (though the bottom side of the upper picture was cap-welded by our instructor, just t show us how it's done).
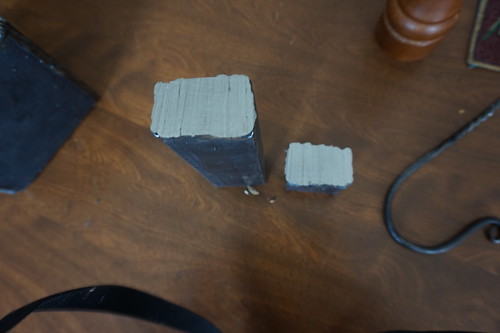
Interestingly, while this weld is far from ideal (the root pass is pretty bad), it's a lot better than you might expect. Unfortunately we missed the real center of the weld when we cut it, but still, it shows that this metal really is bonded together.
What you see as vertical ridging is just marks from a very sad band-saw. If you stare at that image really closely you can see horizontal marks. At first we thought those were showing lines between my beads of weld, but after staring at them and considering how I was welding I'm certain that's not what they are, I believe they also are a side-effect ot he band saw.
BUT if you look really carefully at the outer 1/4' of the cut on each side (the part that cut through my actual weld), you can see that there are little pits in the metal. These are air-gaps due to poor technique on my part, and they shouldn't be there.
I'll need a lot of practice if I want to be a professional welder (which I don't), but for my first heavy joint I'm pretty damn happy with it. For things like building armor for a 4x4, welding up a picture frame or a metal fence, etc. I can weld!
We also took some tubing and tried welding that, as well as patching it after we blew through it by accident (which is easy to do on pipe, due to how it traps heat). With mild steel you can patch it and grind it and make it pretty much as strong as new. This isn't true for steels that are more heat sensitive (crystallize more easily) and need to be re-tempered after you weld them to get full strength (e.g. cro-moly). This is dependent on the alloy, carbon content, etc.
Conclusion
Unlike my last welding class, now I feel like I can go buy a MIG welder, and actually weld something. I have some vague plans to build rock-sliders for my Jeep... maybe. We'll see. If not maybe I can find another excuse to do some welding, like shoring up cave entrances for caving, repairing tools, etc.
I'd actually be helping clean up the entrance to a cave today, but I'm stuck at home due to an on-call shift. Oh well, I guess you can't play all the time. It's a good chance to write up some experiences though :).