
MYOG: Canvas Tarp Experiment
2014-07-20
While we were in Vermont I got the idea to make a canvas tarp. The idea was to 2 pieces of canvas that we could use to roll our gear up in and tie it to our pack frames, then attach the two pieces to make a nice tarp to sleep under.
I spent a while looking up various types of canvas. What I wanted was 8 ounce cotton duck canvas. Duck canvas has a weave that makes it quite water resustant. I wanted 8 ounce because that's the lightest duck has ever been made.
Well, 8 ounce duck is basically unavailable, 10 ounce is the lightest you can get. I'd like linen duck even better, but good luck finding that. If you touch canvas the water will tend to wick onto you, so I wanted a larger tarp then normal, I figured 10x9'. At 10 ounces a yard this comes to 6.25 lbs. At half that for each of us (plus a little for ties and overlap), we'd each be carrying ~3.25 lbs of shelter. That's not terrible, but it's not light either. At 8 ounces that would be ~2.6 lbs, which is sounding a lot nicer.
Not being satisfied with what I could find I decided to try getting raw 7-ounce non-duck canvas, and seeing what would happen. I got raw because I don't like the carcinogens in the flame retardants. If it didn't work out I'd have canvas for other projects, so it wouldn't be a total loss. This comes out more like 2.3 lbs each. And I made this:
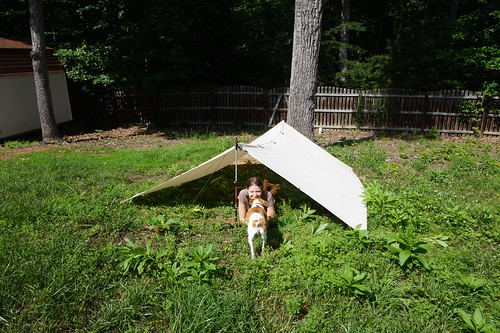
This is made entirely of cotton and linen. It's stitched with a cotton jeens thread, and the tie-outs are made from linen twine I plied into cord for this purpose. The joints along the ridgeline work like below, a large loop goes through a small loop and a stick is stuck through the large-loop to join them.
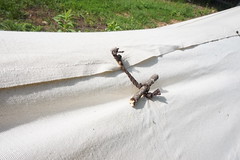
Both halves also have 8 tieouts themselves, so each can be used as a smaller standalone tarp.
When we pitched it we immediatly found one flaw in my design. I hadn't provided a way to pull *both* tarps taught with the guyline, only one. so we ended up having to join them with a rock like so:
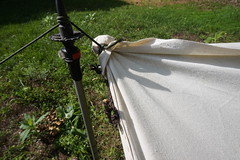
You can see where the normal ridge joint is, it's down the side a bit, the problem is that this didn't attach it at the actual ridgeline itself, only several inches down at the edge of the overlap. The rock worked fine though.
We slept under it like this in a decent thunderstorm in Vermont. The ridge-joint worked very well, but the fabric did not. We did not get soaked, but we certainly did get wet. We were using a blanket, rather than down sleepingbags, so we stayed out all night and were fine, but it simple didn't cut it. The rain would hit and mist through the fabric due to the weave simply being too loose.
Recently I ran it 3 loads through the washer and dryer on hot, to see what we could do. The tarp was originally 11 feet long and about 10 feet wide. It is now about 10 feet long and 9 feet wide (my target dimensions, I knew it would shrink). The hope is that this has closed the pores enough... sadly we've yet to get a good rainstorm.
I also fixed the end joints very simply. I just added 2 more ties, one small and one large, that join the ridge right where the tieout goes. Rather than a stick we just use that loop as the tieout, like so:
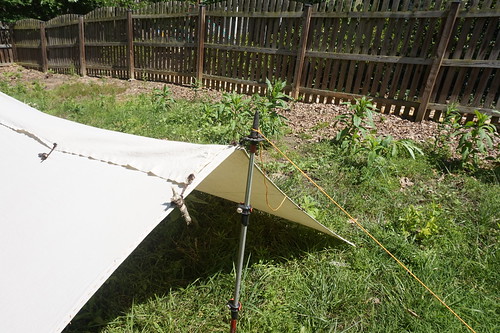
This design is simple and gets good ridge tension.
I have been stalling on writing this article for some time, waiting to sleep in the tarp post shrink, in a real storm, but it's going to be a while longer yet before that happens as we're in the middle of moving (again, but for a while this time!).
Overall conclusion:
- The idea of canvas seems to be good (no issues besides the misting), but 7 ounce canvas just isn't dense enough preshrink, and unlikely to be dense enough shrunken, but I'll try and update
- This method of joining works very well. It's a little slow to rig, but not bad, and as a result we have a tarp that's 100% biodegradable made of nothing but cotton and linen, and I think that's pretty cool.
- The plied linen cord works very well, and is plenty strong. We did ride out a storm, there was significant wind, and that wasn't an issue.
- If you use raw canvas keep in mind that it changes shape quite a bit, this canvas is not really a rectangle anymore
- Untreated canvas does mildew, this tarp has a little on it from not getting it totally dry for a couple of days. Be careful about this if you invest a lot of time and money.