
Homemade shoes: A new design
2018-03-17
So, I made shoes once before that were pretty successful:
http://www.blog.smalladventures.net/2014/10/homemade-shoes.html
I liked these a lot, but they had a few flaws as noted in that article. There are 2 major issues.
- Heal stretch caused my heal to start landing on the heal-seam. This limited distances I could walk in these to ~10 miles, and if I did that I couldn't do it again the next day.
- Wear life. The twine holding the soles on would get worn through, and then the shoe would fall off of my foot.
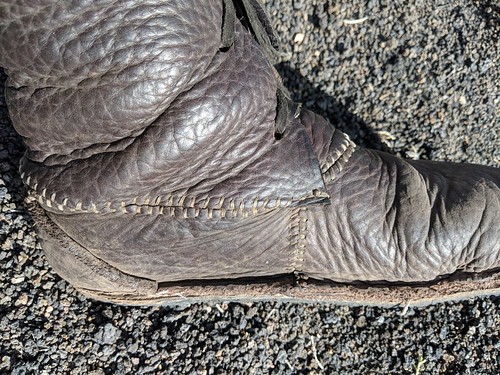
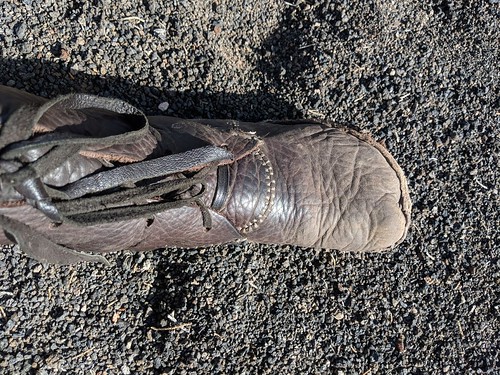
The basic shoe design is similar, but there are of course some major differences. Notice the heal reinforcement. This reduces stretch in the heal of the shoe, and should resolve the heal-stretch problem I ran in to with my own pair.
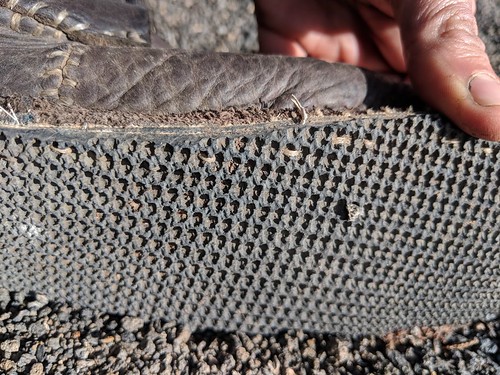
Another big difference is the sole construction. The leather sole is first glued to the sole using contact cement. I'd also been using my contact cement incorrectly, you want to coat both surfaces, let it dry until it's just barely tacky, then stick it together in one shot. Once it's glued the upper is sewn to the sole straight through the leather and the conveyor sole.
See those stitches in the image above? That's where I messed up. The stitching is done with fake sinew, which is nylon. You try and keep the stitches in the "valleys" of the tread pattern, then you pull each stitch REALLY hard. If you do it right you pull it so tight that the stitches disappear down in to the rubber and you can't even see them. My second shoe was better... This solves my second major problem.
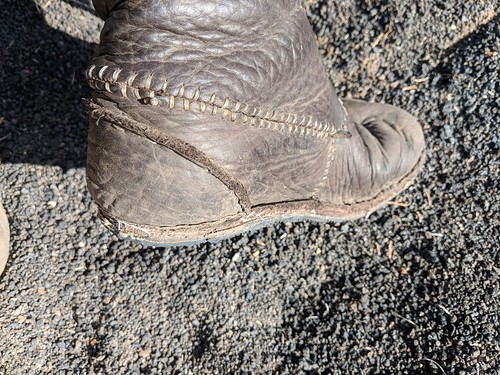
Here's another shot of the heal re-inforcement. We used bison leather, which is very supple for it's strength and thickness, and as I've discovered also very waterproof. You start stitching on the inside of the foot and stitch around the vamp towards the toe. To get enough space for the toes you "scrunch" the leather a bit as you near the toe, then keep scrunching it as you go around the toe, until it's just the right length to meet the hatch mark on the other side.
The heal reinforcement is glued and then sewn to the heal, then you sew the heal to the shoe, cutting off the excess when you reach the vamp. The two are baseball stitched together... this method leaves a flat yet basically watertight seam, resolving a lot of the issues of trying to sew an upper together without uncomfortable seams that chafe your foot.
At this point you basically have a finished shoe. But, to make a tall moccasin like I did, you make a tongue and sew that to the vamp again using baseball, then sew the ankle portion to the heal section... Note that in the image at the top the ankle portion extends a bit over the vamp and is sewn for 2 or 3 stitches with a running stitch instead across the vamp.
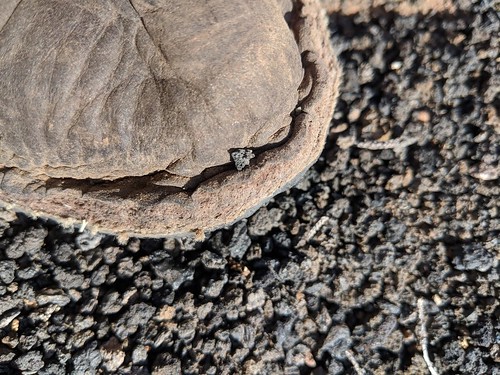
This design is amazing. I made the sole of my moccasin just a little too small for the thickness of socks I usually wear (these were designed for being worn barefoot I believe), and the leather I used was some of the sleeziest part of the bison... so i'm actually still having minor heal-stretch issues, but using leather from near the spine, rump, or neck for the heal and heal reinforcement should resolve that in future pairs.
So, how about the pattern? That's always the big question. Well, there's always an art to it, but here's the basic idea:
- Trace your foot on to a piece of paper (brown paper bags work great)
- Find the highest point on your instep, and drop this down to the pattern directly below, make a mark on both the left and right sides. This marks where the vamp will meet the heal.
- still standing on your sole pattern scrunch a piece of paper over your foot and around your toes where the vamp goes. Trace a line around your toes and back, stopping at the mark on the sole.
- Take another piece of paper and pull it around your heal to those same marks, and mark the paper. Also check the height, you want the seam with the upper ankle portion to land below the ball on the side of your ankle, so keep that in mind when you mark out the height of your ankle portion... mark this piece a little large in all dimensions, especially where it meets the vamp.
- Clean up all the markings you've made. For the sole make sure you add a little extra space for your toes, if you are using a sock inside it at least cut on the outside of the line, this seems to be about the right adjustment for "normal" socks if you are using perminant marker. You should *only* need to adjust the sole, maybe add a TINY bit of the vamp.
- Cut out all your pieces
Note that my shoes have a curve where the tongue fits to the vamp... don't worry about this curve when making your pattern or cutting out your pieces, just do a straight line. Once you have the shoe sewn you can stick your foot in the shoe and see how easy it is to get in... if it's too hard you can cut this curve to help make it easier.
Also, these shoes will be "too tight" when first finished, the toes stretch out to fit your feet better over time, it takes a little wearing for them to really fit comfortably.
I plan to experiment more, but this seems like a really good and simple design for a shoe. Angie actually bought a pair Sonny made himself, since she wasn't able to take the class. She loves her pair. My intention is to make one low to mid top pair for summer, sized about as described above. Then make a high-top pair that is significantly oversize to wear as winter/edge-season hiking boots. They seem to be waterproof enough I think I can replace my vivo-barefoot boots with them in the long term.
If you can't tell by my writing, I'm pretty excited about this. It comes at a good time too... Not long ago I went to purchase my standard runamoc moccasins from softstar and they had stopped making them even for custom order. I purchased what they say replaces them and only ~3 months later the side has busted and I've barely worn the sole at all... they are total garbage compared to the runamocs I used to buy from them... So, it seems, no more buying shoes for me. Time to get down to business and make my own.