
Howto: Simple homemade shoes
2018-04-24
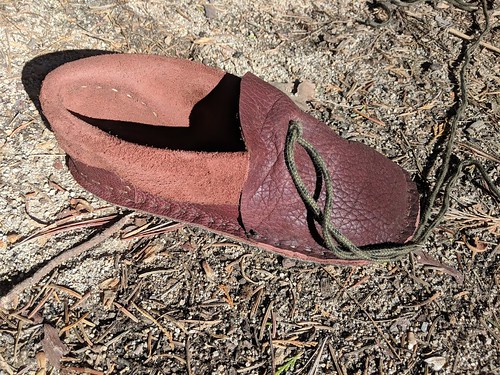
This post describes how to make these shoes:
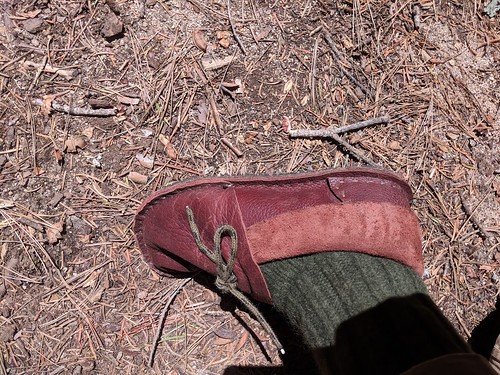
This is the simplest fully functional rubber soled Moccasin I've figured out how to make. It's made from 3 pieces of leather, and one piece of conveyor belt. They are zero drop, no support, minimalist shoes that should have a very good wear life even compared to typical hiking boots.
This is a surprisingly easy project, but the "fudging" parts can be a bit frustrating. I have very high standards for shoes, if I can't walk 15 miles in them without getting sore spots, it doesn't fit right. I definitely don't promise you'll get a shoe that fits just right on your first try. The pair above is my 3'rd pair of shoes ever, and my first of this *exact* design. These are new, but they do seem to fit just right.
This is a moccasin of my own design, but I'm using some tricks from this design:
http://www.blog.smalladventures.net/2018/03/homemade-shoes-new-design.html
The last time I made this general design was before I knew those tricks. In particular I didn't know about bison leather, the heal re-enforcement panel, and I did the sole sewing/gluing process in a different and far less effective order. That pair of shoes was usable (I was able to do a 10 mile hike in them without major issues), but they definitely weren't perfect for long-distance walking, and the wear life was less than ideal as the sole kept coming off. These new tricks should rectify all of these known issues.
To do this you'll need:
- Leather, veg-tan bison leather is preferrable as it's both supple and tough
- 2 ply rough-top conveyor belt (which you can find online pretty easilly).
- Some fake sinew (Natural materials could work, but can't take the tension you'll want to apply, and will rot out too fast... you're using a rubber sole anyway, a little biodegradable nylon isn't a big deal)
- 2 egg-eye size 000 leather glover's needles
- A good tough cutting board
- A pair of small plyers
- A source of fire (lighter works great)
- A pattern material (brown paper bag works great)
- Contact cement, I use original formulation barge
- A leather cutting implement, leather shears are easiest, scissors work okay as does a knife
- An implement for cutting conveyor belt. Heavy shears are easiest, but a knife works okay (be careful though, it takes a difficult sawing motion).
- An awl, nail or some sort of punch to make holes for laces
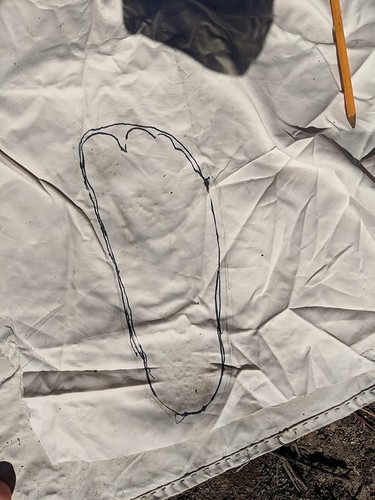
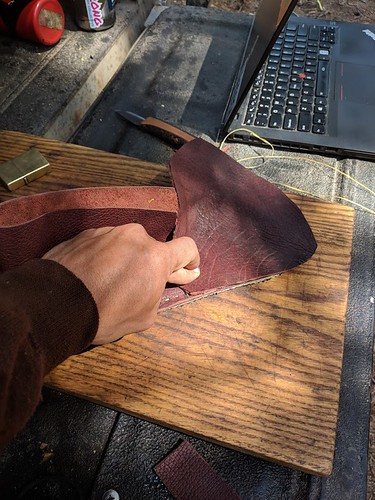
After tracing, sketch a little extra space around the toes.
A lot of making a pair of shoes you really like is about doing just the right fudging. Here's where it starts. If you just want to wear these barefoot, you're probably good. If you want to wear them with thick socks (like i do) you might have to fudge just a bit more and add a touch to the whole foot.
Another tip, my preference is to not have the shoe curve under my arch much at all, I'd rather it run basically straight from my heal to my toe. So I'll actually tweak that when sketching (as you can see above, also notice the pencil marks as I try and work out the size I want). If you want a more fitted shoe through this area, you may need to tilt the marker a little.
Step 2: Mark where your vamp and heal pieces go
When you are done and think you have it right, place your foot back on the pattern. Find the base of your little toe, where there's a "dent" in your foot, and put a mark next to this on your pattern. This is where your heal material will end on the outside of your foot.
Then, find the bone just behind that and go just barely back from it, put a second mark. This is where the vamp material will end on the outside of your foot. Notice that the heal and vamp will overlap by maybe 1.5-2 inches. That's exactly what you want. If you're confused look down at the sewing pictures later in this post.
Now on the inside of the foot, find the bone sticking outsideways behind your big toe, make a mark right about there. Again, this is where the heal material will end.
Lastly, go about the same distance back towars the heal as you ended up with on the outside of the foot and make your last mark, again where the vamp will end.
This is the key to the rest of your shoe pattern, spend your time here. This is my 3'rd pair of shoes and it still took me about 4 hours to make my pattern, and probably 2 of that was just fiddling with this component.
Step 2: Make the pattern for the vamp
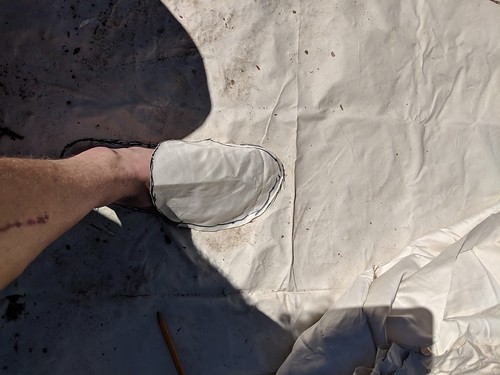
To do this scrunch your pattern material over your foot. Transfer the marks for where the vamp ends (the 2 marks towards the heal, one on each side) to the new vamp pattern. Then trace around the front of your foot.
Take the material off your foot.
Now... again, here comes the fudging. You actually need a bit more material than this for seem allowance as well as to "scrunch" up and make it fit right. I wish I had a better way to describe this, but here's about what I did. With the piece off my foot I followed the curve backwards another 1-1.5" past where the vamp "should" end (the transferred mark). Then from there drew an artful curve up to the instep.
Sorry, I hope eventually to have this step down to a bit more of a science, but so it goes.
Step 3: heal pattern
Wrap some pattern material around your heal and up to the front of your foot, still standing on the sole pattern you made first. Go to the forward marks on your sole pattern, then Add ~3" to both left and right. This doesn't need to be at all exact, just make sure it's enough... Similarly go up your ankle a couple inches past where you want it to come out (hint: you probably want it below the ankle joint that sticks out or it'll be uncomfortable).
This one really isn't precise at all, just make sure you get enough material.
Step 4: heal reinforcement pattern
Make a half-oval about 2.5" high by ~6" wide. Picture it on your heal and make sure it doesn't come out any higher than your shoe to be.
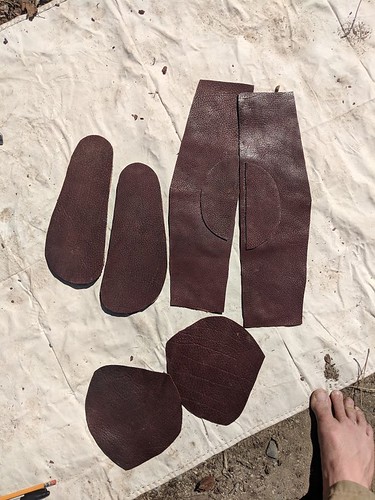
Step 5: Cut out all your patterns. Transfer them to the leather. Then flip all your patterns over and transfer them to the leather again (to make the shoe for your other foot). Make sure to use good stiff pieces of leather for the heal and heal re-inforcement. Damaged leather is fine for the sole component.
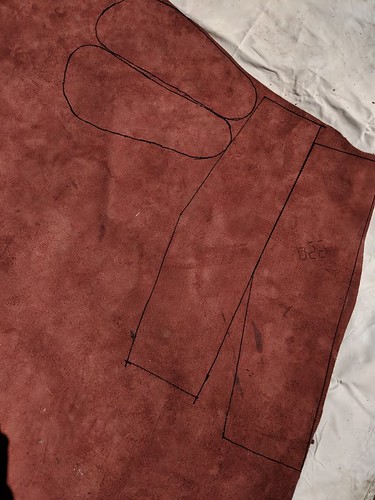
Note that this picture is missing the heal re-inforcement and vamp pieces. Pictured is the sole and heal pieces. I used different parts of the leather for some of that, so it didn't go well in one picture.
Step 5: Cut out your pieces. Make sure to cut the lines *off*, this will ensure your pieces are actually the same size as your pattern, not larger.
Step 6: Trace the sole pattern on to your conveyor belt, flip it and trace it again. Cut this out similarly to how you did the leather.
Step 7: Glue the leather sole to the rubber sole
Take your contact cement, spread it thin as you can on the fuzzy side of one leather sole, then on the "canvas" side of the conveyor. Wait for it to dry until tacky, then carefully apply the leather to the conveyor. Note that it will stick as soon as it contacts and you can't pull it back off and still get a really solid glue job. Try and just apply it smoothly in one go.
Step 8: Glue the heal reinforcement to the heal
Take the heal and fold it in half, mark where the center is. Do the same with the heal re-enforcement piece. Then, carefully place the heal re-infocement piece (smooth side out) on the heal (smooth side out) about 1/4" from the bottom edge using the marks you made to center the reinforcement on the heal. Trace the heal re-inforcement piece on to heal piece and remove it again.
Go to a well ventelated space. Coat the fuzzy side of the heal re-inforcement piece with glue as thinly as you can manage. Then do the same with the space you traced on to the heal. Wait for the glue to dry until it's just tacky... Then apply the re-inforcement piece to the heal, place it in one go and don't move it. Push it on as hard as you can against a stable surface.
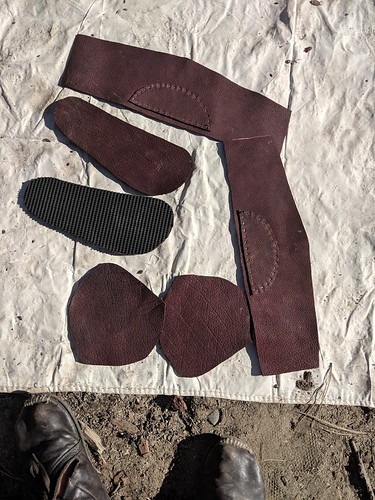
Do this for both heals. This should now be your 6 pieces. 3 for each shoe. Heal reinforcement glued on to the heals, and soles glued together.
Step 6: Sew on the heal reinforcement
Take a length of your fake sinew. If you fiddle with the end a bit you'll see it's flat and made of a bunch of stuck together threads. This makes it possible to split that flat thing in half. Take your length and carefully tear it in half so you have two pieces that are half the original width.
Stick one of these through your needle, double it, and tie a knot. I like to use a figure 8 with 1/4" or more of tail. Then, burn the tail down with your lighter until it's just a little ball next to the knot.
Take this thread and do a simple running stitch around the reinforcement panel, sewing it to the heal. You can use the cutting board to push the needle through and pliers to pull it out, or if you have strong fingers a swatch of leather works well for both and is a bit faster.
Repeat for both, heals you should now have something like this:
Step 7: Sew on the heal
Now that you have your pieces assembled, it's time to start actually making the shoe. Thread a needle again in the same way as you did to sew the reinforcement panels on.
Add a mark to the very back of the heal of both of your soles. On the top. Line up the heal piece on the heal of your sole, using this mark and the mark we put on the heal piece earlier. Then start stitching from the top.
You should read "sewing" below before you continue, but just to finish the description of your first stitch: When you reach the other side I like to run it back through the thread, just behind the knot.
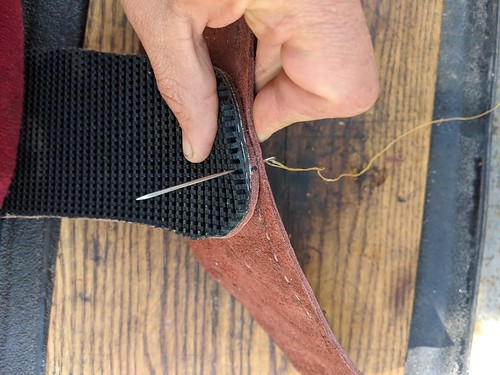
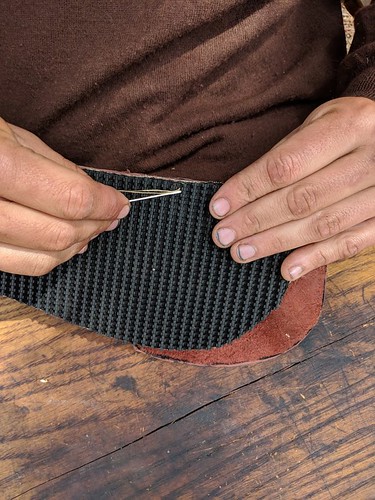
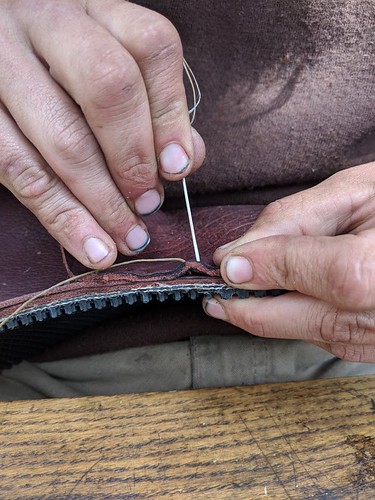
SEWING Go through *just* below the heal re-enforcement. Make sure as you do this that it comes through in a "valley' in the conveyor belt. Push it through using the cutting board. This may take a couple of tries, you can tilt the sole a bit as you stick it through to get it to hit the right spot. Watch your fingers! To finish pulling it through you can use the pliers.
Now go back to the top. When you go back through to the top, try to avoid going over a "mountain top" or "ridgeline". This ensures that the fake sinew isn't exposed directly to wear and is protected by the tread. This is a trick I learned from Sunny Baba. To get a good stitch spacing you may really need to go over a ridgeline. If that's the case you can instead go *under* the ridgeline.
To do this you can stick your needle sideways in to the "ridgeline" you want to go under
Then stand it up, this will sort of push the ridgeline out of the way, and let you go through the sole under the ridgeline (or where it will be once it bounces back).
Then pull it TIGHT. Don't just pull like normal stitching, really yank. The fake sinew will hold up and as you pull it'll sink in to the tread. If you get it right, the stitches should nearly disappear in to the sole so that they are quite hard to find.
Keep going around the sole, until you hit the *rear* mark (where the vamp ends. Then start from the heal again and go around the other side. At this point you have something like this:
Step 8: Trim the heal piece
Cut the heal piece where it aligns with the *front* mark on the sole. Here you can see I've sewn to the first mark, and I'm about to cut at the second.
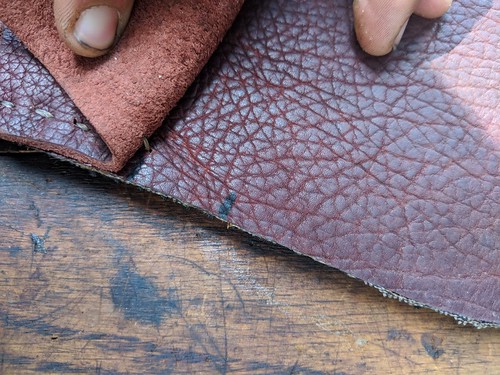
The part between the two marks will be sewed on later, when the vamp is sewn on directly over it. Just cut the heal piece around 90 degrees at that second mark for now. You'll cut it at an angle later to make space, but you can wait until the whole shoe together first which'll help you get the angle right.
Step 9: Sew on the vamp
Start on the inside of the shoe (the long, less curved side). Place the vamp over the heal piece aligning it with the rear mark (now covered by the heal piece)... And start sewing from there.
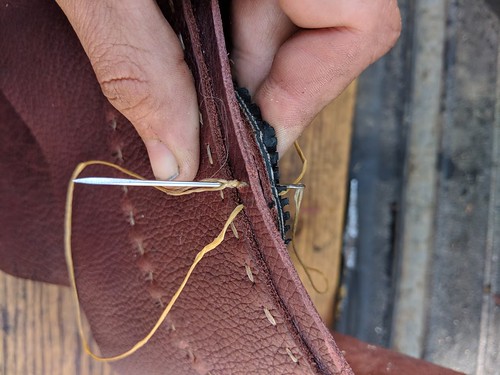
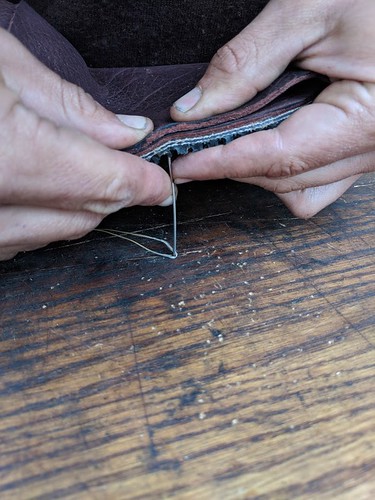
Remember how you added extra to the vamp? If you just sew straight the tip of the big toe of the vamp will end up way around the end of the shoe. Instead, what you want to do is "scrunch" the leather as you sew. This will help create extra space so your feet will actually fit in the shoe when you are done. To scrunch you bunch up the leather a little bit as you put the needle through, like this:
You can adjust how much you scrunch so that you keep scrunching up to the big toe, and the big toe comes out in the right spot. I use that as a marker 'cause it's easy to see on both the sole and the vamp patterns (it's the pointiest part of the front).
After this you probably still need to keep scrunching a little. Scrunch until it looks like you'll come out just past the rear mark on the other side of the shoe. If it's a little on the long side, no worries, we can always trim a bit.
Keep sewing all of the way around. Eventually you'll hit the heal section, sew right over it.
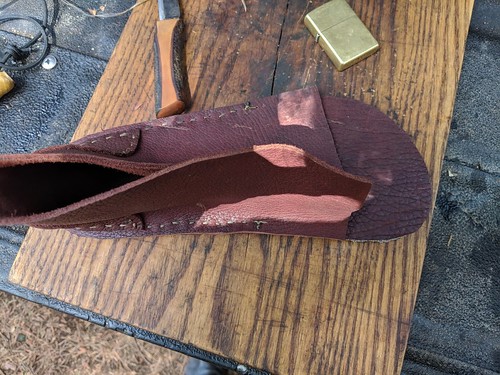
You basically have a shoe at this point
Step 10
Finish off your shoe. Flip the leather down, and see how it fits. Remember how we just cut the front of the heal section at 90 degrees or so? Using your preferred implement carve that back as needed so you can wrap this around your foot with some space in the front. Use your punch to make holes where you want the laces to come out.
If you don't have another material in mind, you can cut laces from your bison leather. Just carefully cut long strips, preferrably down the length of the animal hide along the back (this is the longest straightest line as well, conveniently).
If you missed on some stitches so your leather sticks off the sole a little, you can carve it back a little so it lines up with the conveyor. A knife works best for this. Here's the finished shoe:
WEARING
One more note. When you first put these shoes on your toes will feel a little crushed. Don't worry, the leather will stretch. You can stretch them yourself with a broomstick or similar if they are too uncomfortable to wear. Once you can wear them, just wear them for a day or so and they should stretch to fit. You may want to start barefoot even if your goal is to wear socks with them.