
Sharpening a great american saw
2015-01-05
When I say a "Great American Saw" I'm not being flowery and philosophical. This is the technical name for the tooth pattern on my crosscut saw.
I got this saw a couple of months ago, and have since done a bit of cutting with it. I just wasn't happy with how it was cutting, so I decided to take a shot at sharpening it. I had never sharpened a saw, so this took a fair bit of research that I figured I'd share with you here.
Before going on with this post about sharpening a complex pattern you'll need the basics just like I did. These are important so you can understand what's going on and basic terminology. I could try and describe things but visuals are way better when trying to understand the angles involved. So, I suggest you do just as I did and watch these youtube videos. The first covers rip-cut saws, the simplest.
Well... that's a bit different. Once you get into bucking and felling saws. Basically, saws for cutting logs, there are a lot more patterns out there. Champion tooth variants are probably the most common. The tooth pattern above is called a Great American pattern. This also shows up as a "lightning tooth" (which I think is a brand name) or occasionally an "M" tooth, though strictly speaking I believe an M tooth should only have 2 points. M tooth patterns are really common on bucksaws (distinct from bucking saws).
In any case, it's pretty hard to find a resource explaining how to sharpen a Great American tooth pattern. After some digging I found some poorly photographed pages from a rather opaque book posted in a forum http://www.ukworkshop.co.uk/forums/post676349.html#p676349 . I used that, reading a few more forums, and the logic of how saw sharpening works in general I *think* I figured out how to do it.
The resulting saw certainly still cuts, and it seems to do so better than before so I think I succeeded. Here's how I did it.
Tools
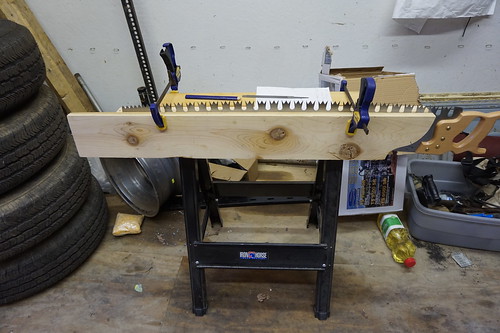
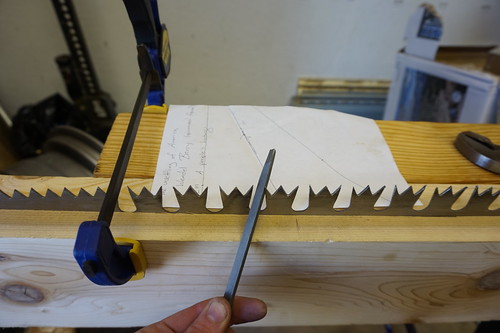
First, I lack a saw vise. I considered building one but in the end said to heck with it and used the setup you see above. This is a saw-horse, a 2x4, another piece of scrap wood, and 2 bar clamps. It's *okay* although the scrap-wood is thicker than ideal so blocks some file angles which is just a touch annoying.
I picked up a simple triangular saw file as a file.
I wanted a 15 degree fleam. So, to get a 15 degree angle I used some basic geometry. I measured out a 3,4,5 triangle (6,8,10 inches actually). The smallest angle in this triangle is 30. I then bisected that angle using the standard geometry trick. Once I had that angle I folded the paper on the line so I could flip it over and measure -15 degrees easily as well.
Set
My saw is still fairly new, this is it's first sharpening, so I didn't worry too much about setting the teeth, I did a tiny bit of touch-up with a pair of heavy pliers.

I think the teeth could actually use a little more set. Everything I've read says the tips should hit at about double the width of the rest of the saw-blade. I figure I can add more set later if I need to and I'd rather not bend things too much on my first try sharpening a saw.
Fleam
It turns out that this saw was sharpened with basically no fleam at all originally! I found this rather surprising. In some other saw patterns (like a champion tooth) some teeth actually cut through the wood, and others clear away the cut strips. When that type of saw is working well you actually get strips of wood as your leftover, rather than dust. It looks like they sharpened it as if the center tooth of each set was a clearing tooth, and the two teeth on the ends of each group are cutting teeth.
This may have been intentional. In the Great American pattern all teeth usually serve both purposes, but this pattern is also well known for being difficult to draw through the wood. Extremely fast, but causing the user to wear out quickly. The sharpening they used did put a fleam on the outside (long) edge of each edge or cutting tooth. So it would cause the saw to slide over the middle-teeth.
The downside of this approach is you now have some cutting teeth, and some not cutting teeth. The cutting teeth will wear much faster. Wood is a tiny bit springy too and you want the cutting teeth to cut while the clearing teeth just skid along the surface a pull stuff away, if the cutting teeth are too short they won't be able to get into the wood much and each stroke won't cut off anything. If they are too long though the clearing teeth do nothing and the cut ends up full of "stuff".
My understanding is that the Great American pattern was invented before the concept of separating cutting teeth came about, and consequently the pattern clears quite well, even with no clearing teeth. Every tooth sort-of fills both roles. In this case the teeth should wear and closer to the same speed, and you don't have to carefully set the depth of your teeth every time you sharpen, making the tooth pattern fast and easy to sharpen.
So, I set every tooth at a 15 degree fleem, changing the pattern from how it was when I received it. In the future I may go up to 20 degree, but you start risking chipping bits of the tooth off and such, so it's a tradeoff, much like the angle-grind of an axe. I'm cutting mostly dead oak and hickory, so very hard woods, so I figured I'd try 15 for now... especially since it's more work to go higher since I have to reshape the saw.
Actually sharpening!
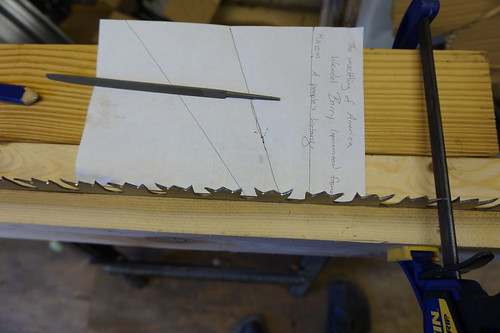
First lets talk about the simple part. If you watched the video above you saw how to sharpen a cross-cut saw (a saw with a fleam). Well, for the 2 notches in each set of 3 teeth I sharpened it just like that, putting a 15 degree fleem in. Note that the set of 3 teeth alternate the set. On the one I'm sharpening the middle-tooth might be bent away from me and the two end teeth towards me, then the next set the two end teeth will be towards me and the middle tooth away. You always want to sharpen it so the point ends up on the side farthest from the saw, the side the tooth is bent towards. If you work that out it turns out you *don't* alternate 15 and -15 degrees every time! When you switch teeth you keep the same angle... it's weird, but if you stare at it long enough it'll eventually make sense.
Here's kindof what this process looks like (photo is kinda upside-down I guess):
Then, you flip your piece of paper to do the other side of the M.
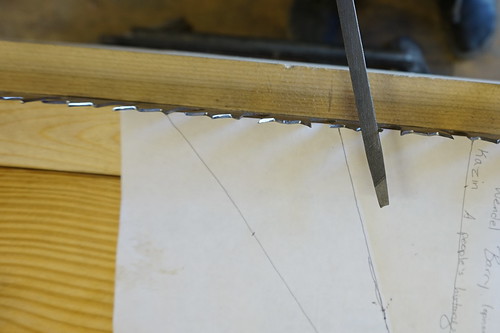
So, that's the middle notches. Now, for the edges of the teeth I kept my 15 degree fleem as well. Here I definitely will consider going to 20 eventually.
Reading through a forum I found mention of doing the ends by moving the butt end of the file downwards so the tip of the file is sticking up in the air at ~80 degrees. When I tried it I could see that by doing it this way you ensure a smooth transition into the rest of the tooth, if you do it horizontally it doesn't automatically take the right amount off below the tip. I could only hit maybe 60 degrees due to my jig, but it seemed to accomplish the task.
Note that although in my photos I am only using one hand, that's because the other is holding the camera. I found it far more effective to hold both ends of the file when doing this.
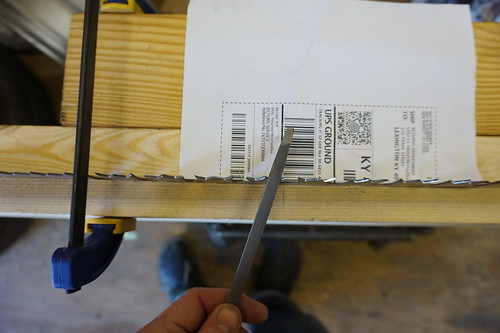
Overall it worked pretty well. I did get a bloody knuckle from ramming it into the jig repeatedly, and I stabbed hand a couple times on the teeth drawing a touch of blood, but nothing significant.
Because I was seriously reshaping the teeth, and at first was doing it quite slowly, this took a long time, something like 6 hours total. That said, I imagine that in the future I can do a touch-up in just a couple of minutes, just swipe the file down each side of each tooth twice and call it good.
Another surprising thing to discover is that many of the teeth weren't pointy! A lot of them had flat tips. I suspect this was actually manufacturing flaws. Nothing serious, but it was a lesson not to expect a tool to arrive sharp. It's also part of why I was willing to adjust the fleam. Had it been perfect, and sawn perfectly when I got it, I would want to sharpen it just how it was. I didn't get every point pointy, but almost all of them are now and the all have a sharp edge. Next sharpening I can probably get it sharper than I did this time, I ran out of patience I guess, and didn't want to use up all that metal.
Trying it out
I don't have a full report for you yet, as it was late when I finished. I did take a few quick cuts at a log and it appears to saw quite a bit faster than before. It's harder to push through the wood than before. This could just be because I'm actually cutting something off with each stroke now, because it's sharp enough to dig in. It could also be that the fleam I added to that middle tooth means now there are more cutting teeth that I'm pushing through the wood. I don't think I need more cleaning teeth, with dead wood you don't take off huge shavings that need to be pulled out, and it doesn't feel like it's clogging at all. The greener and softer the wood the more the cleaning teeth matter, because the more wood you can cut with a single pass.
In any case, I have succeeded in making the saw sharper. I'd love to get even better at this, but now I can at least maintain my tool myself, and thus use a sharp saw instead of a dull one. Awesome!
I have a book on the way describing how to do this, so I'm curious to see if it matches :D.