
Fire and snow
2013-12-04
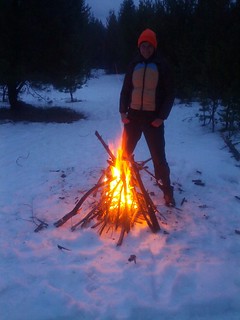
Jess and I were camping up in the mountains on our way out toward Montana, and the good spot we found was quite snowy. We wanted to cook up some meat that evening and thus really wanted to start a fire. So, that's what we did:
ALL of the wood was wet, there was no hope of finding dry wood. There also wasn't much tinder around.
A quick primer in starting fires in the snow. The first step is to make it so the the melting snow doesn't sap all of the energy straight out of your fire. Fundamentally fire is about getting a chain reaction. When trying to get it to light up you want as much of the heat from what you have burning so far to go back into the stuff you want to burn as you can, to keep the chain reaction going and building. The easiest way to do this is to lift the fire up out of the snow so it doesn't sap out all that energy. To do this we started by building a platform of sticks. This is just a layer of sticks layed side-by-side, and then a second layer on top of that. 2 was plenty. In really deep snow this platform may slowly work it's way down into the snow, I've heard of using green bows under it to keep it up, but I can't say as I've tried it yet.
Next I stripped some of the driest needles I could off a dead branch still attached to a tree. These needs were *just* dry enough to actually burn very very slowly. I placed these on the platform. Jess had gathered the driest tiny twigs she could find off some nearby fallen trees (for some reason the sticks on the standing trees were like rubber that day, totally soaked). I piled these twigs on top of the pine-needles and lit the needles. There was little wind, so it required a little blowing to keep the needles going.
Next we started piling on more and more twigs, worrying less and less about dryness and more about volume as we went. The more outer layers should be dry by the time the fire gets there, and there's more energy to spare to dry them out. Then we started going to larger and larger wood, and building up more of a Tee-Pee shape. The classic "Tee Pee" approach to building a fire is *extremely* effective, but I find that if I build it all up before lighting I usually knock it over and get really frustrated. Instead we usually start with a heap of smaller stuff, often we just keep going with the heap, but in more difficult weather such as that day the Tee-Pee really helps.
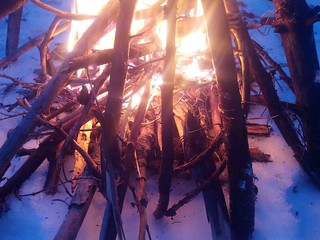
One of the tricks to making all of this work is to use LOTS more wood than you think you need, at every stage. Build it several stages past where it's burning at the time. You need the wood to start drying long before you expect it to burn. The extra layers also serve as a bit of a shield holding a bit more heat in the center to help your chain reaction. Normally this would just be a waste of wood and you'd end up with a ridiculous bonfire that you can't cook on. But, if your wood is really wet and keeping a fire burning is hard, something closer to a bonfire is exactly what you want. Once you have some really hot coals you can just collapse it all and use it like a normal cooking fire (unless say, you're in pouring rain and a bonfire is the only way to keep it going).
We *did* use a lighter on this one. But using only a lighter, when everything was wet, we were soon burning logs we were literally digging out of the snow. Maybe someday we can get an on-the-spot built hand-drill to work in this weather... getting closer!