
DIY: linseed oil treated cotton sheet tarp
2015-04-03
Living in Virginia I ran in to some civil war re-enactors a little while ago. As I was looking at their stuff I got interested in the raw materials the used for rain gear, tarps, bags, etc called "tarred canvas". Tarred canvas is called that because it's literally canvas coated in tar. This material is very tough, and highly waterproof. Unfortunately, it also has an extremely unpleasant odor.
Upon doing a bit more research I discovered that the term is also used for basically any water-proofed canvas. For example, canvas that's been painted. Traditionally this was done with lead paint as the lead allowed the paint to flex rather than crack and fall off.
A 3'rd type I eventually discovered is linseed treated canvas. This fascinated me. Linseed oil is edible, and frequently eaten as a dietary supplement. It's also frequently used as a treatment for wood to help protect it from water.
Considering this, I decided to give it a try. I went to a thrift store and found a densely woven cotton sheet. I went to a hardware store and got a can of boiled linseed oil (boiled to make it thicker) and a can of mineral spirits. The mineral spirits thins the linseed so it comes out even when you treat the sheet with it, and then just evaporates off.

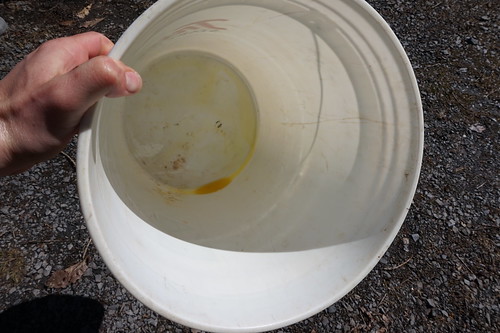
You mix these about equal parts. For either a double sized sheet I used 1 quart of each. Mix these in a bucket, throw your sheet in, and swoosh it around a bit, working the mixture into the fabric and making sure it gets on all of it. Amazingly, the photo below is what was left in the bucket when I was done. If I squeezed the fabric though I could squeeze some out, so it wasn't going to hold much more.
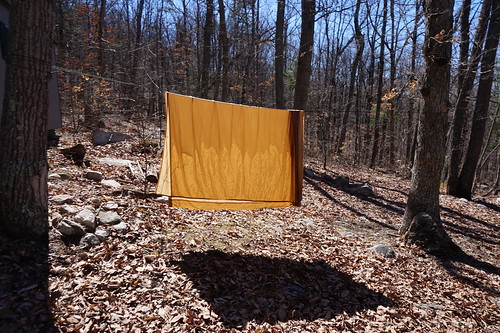
You need a double-clothes-line, if it touches itself as it's drying it kindof sticks and is annoying to deal with. So you want to hang it so no part touches itself. I suggest using clothes-pins to help keep it in place, something I didn't think of until half-way through it drying. Note that it takes a couple of days to dry, and if it rains the top flat part is going to collect water, which would be annoying.
Last night I rigged up my new tarp by setting rocks against it and tying around the rocks. I made the mistake last time I was testing a new tarp material of doing all the sewing first, and I decided not to repeat that mistake.
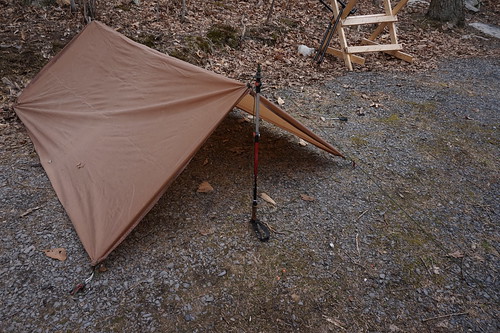
It wasn't an extra hard rain last night by any means, but I'd guess that it rained from around 2am until I got up this morning around 8, and there was a decently hard spell in the middle. There was no drip-age at all, and little dampness, the inside side of the tarp was the tiniest bit damp, but less so than I'm used to with plastic tarps. I would definitely use this as a tarp in the future and not worry about it.
The fabric feels like it might even work as a poncho. It's hard to know what the whicking behavior will be, so that will be an interesting test. That test is going to take some sewing first.
One downside of this tarp is that, being made from a double-sized sheet it's not quite big enough. It's okay, but I would like to have at least another foot of length on the tarp. I felt the need to stake out the middle of one side as well as the 4 corners, even for one person. I believe going to a queen would actually resolve this, and make it large enough to fit two people instead of one.
I'm really excited by this material. If I made a tarp and a groundcloth, and one of those doubled as a poncho (assuming the wicking works out not to be a problem), and the other doubled as bag I roll my gear in and diamond hitch to my pack frame, I could potentially get rid of most of the gear I have that needs to be plastic, opening the door to a more primitive style of backpacking. One remaining item is my sleepingbag, although I recently discovered that leaves will often work so I might be able to do some trips without it now. The last plastic item is shoe soles. After much consideration it's unlikely I'll ever give up rubber shoe soles, but if that is the only modern material I carry on some trips, that could be pretty cool.
UPDATE
My mother pointed out something really important that I forgot to mention. Linseed oil soaked cloth will spontaneously combust if not fully dried before folding, or even wadding up. I know someone who nearly burned down their house with a linseed soaked rag they tossed on the floor. So be careful.
Also, Linseed oil fumes are pretty hard on you, and this should all be done outside. Be careful you get the oil pretty dry before you crawl into such a shelter as well, to help reduce the fumes.
The above is true for linseed oil itself. But note also that "boiled linseed oil" is usually not pure linseed oil, so it has stuff in it besides what you would eat. Pure linseed oil is a common dietary suppliment, so it's safe to assume it's no big deal to get on your hands. Boiled linseed can be pure, but usually isn't. Usually it's actually got other not so great stuff thrown in there to help it harden. There's a more complete explanation here:
http://www.instructables.com/answers/Linseed-oil-health-dangers/
. When I've finished spoons and the like I've used pure dietary linseed oil, purchased from a health-food store. It's annoying and takes a lot of coats.
FURTHER UPDATE
Before doing this, please read the following post with more experiments:
http://www.blog.smalladventures.net/2015/11/linseed-oil-for-homemade-oil-cloth.html
ANOTHER UPDATE
I don't recommend using the methods from this article at all, this is a dated experiment now. If you just need it to stop rain while not touching anything, get 800 threadcount sheets, and don't treat it at all. If you need it waterproof while touching something (like a poncho) use this method instead:
http://www.blog.smalladventures.net/2017/02/waterproofing-cotton-poncho-experiment-2.html
. Lastly, for tieouts, grommets like these:
http://www.blog.smalladventures.net/2017/02/myog-plasticless-backpack.html
wear better than tieouts do.