
Howto: Simple homemade shoes
2018-04-24
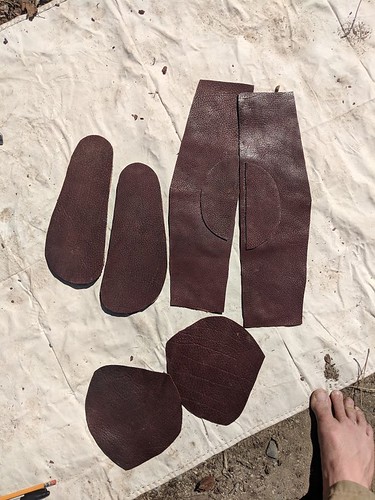
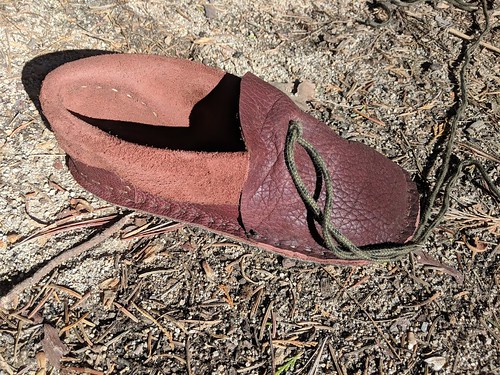
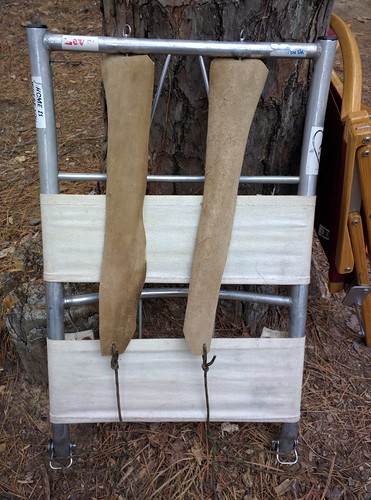
This post describes how to make these shoes:
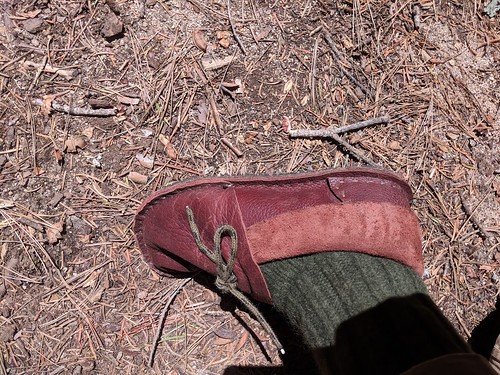
This is the simplest fully functional rubber soled Moccasin I've figured out how to make. It's made from 3 pieces of leather, and one piece of conveyor belt. They are zero drop, no support, minimalist shoes that should have a very good wear life even compared to typical hiking boots.
This is a surprisingly easy project, but the "fudging" parts can be a bit frustrating. I have very high standards for shoes, if I can't walk 15 miles in them without getting sore spots, it doesn't fit right. I definitely don't promise you'll get a shoe that fits just right on your first try. The pair above is my 3'rd pair of shoes ever, and my first of this *exact* design. These are new, but they do seem to fit just right.
This is a moccasin of my own design, but I'm using some tricks from this design:
http://www.blog.smalladventures.net/2018/03/homemade-shoes-new-design.html
The last time I made this general design was before I knew those tricks. In particular I didn't know about bison leather, the heal re-enforcement panel, and I did the sole sewing/gluing process in a different and far less effective order. That pair of shoes was usable (I was able to do a 10 mile hike in them without major issues), but they definitely weren't perfect for long-distance walking, and the wear life was less than ideal as the sole kept coming off. These new tricks should rectify all of these known issues.
To do this you'll need:
- Leather, veg-tan bison leather is preferrable as it's both supple and tough
- 2 ply rough-top conveyor belt (which you can find online pretty easilly).
- Some fake sinew (Natural materials could work, but can't take the tension you'll want to apply, and will rot out too fast... you're using a rubber sole anyway, a little biodegradable nylon isn't a big deal)
- 2 egg-eye size 000 leather glover's needles
- A good tough cutting board
- A pair of small plyers
- A source of fire (lighter works great)
- A pattern material (brown paper bag works great)
- Contact cement, I use original formulation barge
- A leather cutting implement, leather shears are easiest, scissors work okay as does a knife
- An implement for cutting conveyor belt. Heavy shears are easiest, but a knife works okay (be careful though, it takes a difficult sawing motion).
- An awl, nail or some sort of punch to make holes for laces
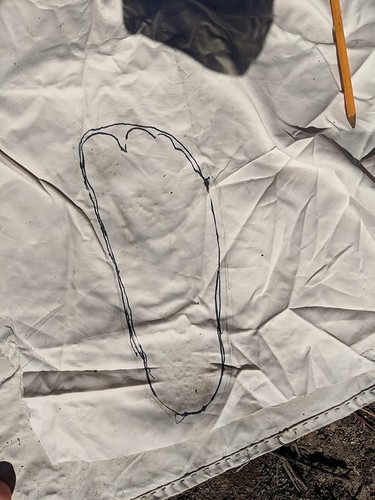
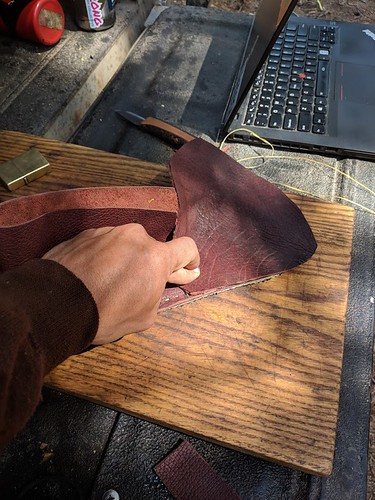
After tracing, sketch a little extra space around the toes.
A lot of making a pair of shoes you really like is about doing just the right fudging. Here's where it starts. If you just want to wear these barefoot, you're probably good. If you want to wear them with thick socks (like i do) you might have to fudge just a bit more and add a touch to the whole foot.
Another tip, my preference is to not have the shoe curve under my arch much at all, I'd rather it run basically straight from my heal to my toe. So I'll actually tweak that when sketching (as you can see above, also notice the pencil marks as I try and work out the size I want). If you want a more fitted shoe through this area, you may need to tilt the marker a little.
Step 2: Mark where your vamp and heal pieces go
When you are done and think you have it right, place your foot back on the pattern. Find the base of your little toe, where there's a "dent" in your foot, and put a mark next to this on your pattern. This is where your heal material will end on the outside of your foot.
Then, find the bone just behind that and go just barely back from it, put a second mark. This is where the vamp material will end on the outside of your foot. Notice that the heal and vamp will overlap by maybe 1.5-2 inches. That's exactly what you want. If you're confused look down at the sewing pictures later in this post.
Now on the inside of the foot, find the bone sticking outsideways behind your big toe, make a mark right about there. Again, this is where the heal material will end.
Lastly, go about the same distance back towars the heal as you ended up with on the outside of the foot and make your last mark, again where the vamp will end.
This is the key to the rest of your shoe pattern, spend your time here. This is my 3'rd pair of shoes and it still took me about 4 hours to make my pattern, and probably 2 of that was just fiddling with this component.
Step 2: Make the pattern for the vamp
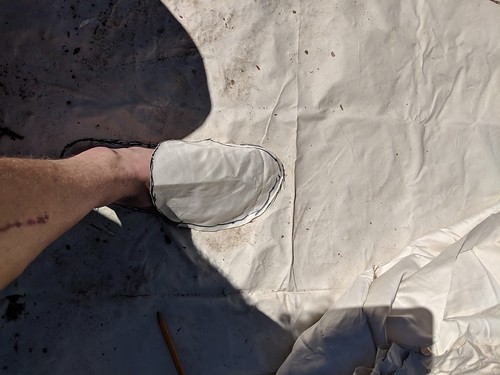
To do this scrunch your pattern material over your foot. Transfer the marks for where the vamp ends (the 2 marks towards the heal, one on each side) to the new vamp pattern. Then trace around the front of your foot.
Take the material off your foot.
Now... again, here comes the fudging. You actually need a bit more material than this for seem allowance as well as to "scrunch" up and make it fit right. I wish I had a better way to describe this, but here's about what I did. With the piece off my foot I followed the curve backwards another 1-1.5" past where the vamp "should" end (the transferred mark). Then from there drew an artful curve up to the instep.
Sorry, I hope eventually to have this step down to a bit more of a science, but so it goes.
Step 3: heal pattern
Wrap some pattern material around your heal and up to the front of your foot, still standing on the sole pattern you made first. Go to the forward marks on your sole pattern, then Add ~3" to both left and right. This doesn't need to be at all exact, just make sure it's enough... Similarly go up your ankle a couple inches past where you want it to come out (hint: you probably want it below the ankle joint that sticks out or it'll be uncomfortable).
This one really isn't precise at all, just make sure you get enough material.
Step 4: heal reinforcement pattern
Make a half-oval about 2.5" high by ~6" wide. Picture it on your heal and make sure it doesn't come out any higher than your shoe to be.
Step 5: Cut out all your patterns. Transfer them to the leather. Then flip all your patterns over and transfer them to the leather again (to make the shoe for your other foot). Make sure to use good stiff pieces of leather for the heal and heal re-inforcement. Damaged leather is fine for the sole component.
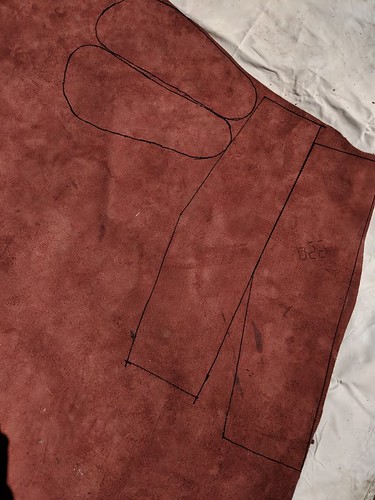
Note that this picture is missing the heal re-inforcement and vamp pieces. Pictured is the sole and heal pieces. I used different parts of the leather for some of that, so it didn't go well in one picture.
Step 5: Cut out your pieces. Make sure to cut the lines *off*, this will ensure your pieces are actually the same size as your pattern, not larger.
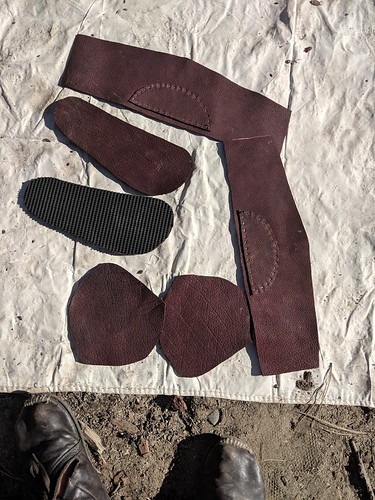
Step 6: Trace the sole pattern on to your conveyor belt, flip it and trace it again. Cut this out similarly to how you did the leather.
Step 7: Glue the leather sole to the rubber sole
Take your contact cement, spread it thin as you can on the fuzzy side of one leather sole, then on the "canvas" side of the conveyor. Wait for it to dry until tacky, then carefully apply the leather to the conveyor. Note that it will stick as soon as it contacts and you can't pull it back off and still get a really solid glue job. Try and just apply it smoothly in one go.
Step 8: Glue the heal reinforcement to the heal
Take the heal and fold it in half, mark where the center is. Do the same with the heal re-enforcement piece. Then, carefully place the heal re-infocement piece (smooth side out) on the heal (smooth side out) about 1/4" from the bottom edge using the marks you made to center the reinforcement on the heal. Trace the heal re-inforcement piece on to heal piece and remove it again.
Go to a well ventelated space. Coat the fuzzy side of the heal re-inforcement piece with glue as thinly as you can manage. Then do the same with the space you traced on to the heal. Wait for the glue to dry until it's just tacky... Then apply the re-inforcement piece to the heal, place it in one go and don't move it. Push it on as hard as you can against a stable surface.
Do this for both heals. This should now be your 6 pieces. 3 for each shoe. Heal reinforcement glued on to the heals, and soles glued together.
Step 6: Sew on the heal reinforcement
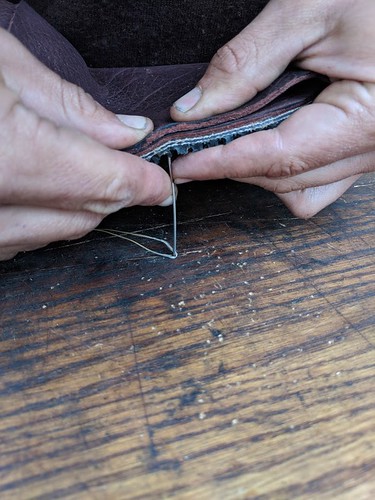
Take a length of your fake sinew. If you fiddle with the end a bit you'll see it's flat and made of a bunch of stuck together threads. This makes it possible to split that flat thing in half. Take your length and carefully tear it in half so you have two pieces that are half the original width.
Stick one of these through your needle, double it, and tie a knot. I like to use a figure 8 with 1/4" or more of tail. Then, burn the tail down with your lighter until it's just a little ball next to the knot.
Take this thread and do a simple running stitch around the reinforcement panel, sewing it to the heal. You can use the cutting board to push the needle through and pliers to pull it out, or if you have strong fingers a swatch of leather works well for both and is a bit faster.
Repeat for both, heals you should now have something like this:
Step 7: Sew on the heal
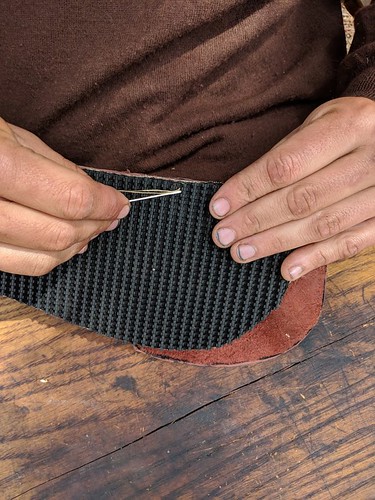
Now that you have your pieces assembled, it's time to start actually making the shoe. Thread a needle again in the same way as you did to sew the reinforcement panels on.
Add a mark to the very back of the heal of both of your soles. On the top. Line up the heal piece on the heal of your sole, using this mark and the mark we put on the heal piece earlier. Then start stitching from the top.
You should read "sewing" below before you continue, but just to finish the description of your first stitch: When you reach the other side I like to run it back through the thread, just behind the knot.
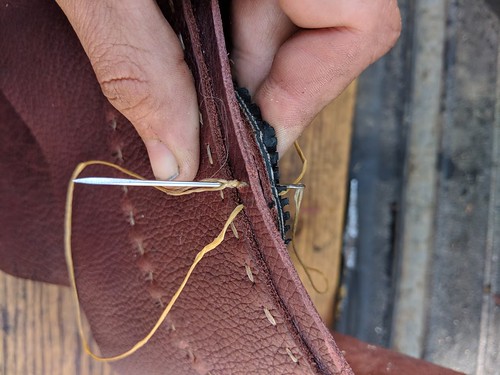
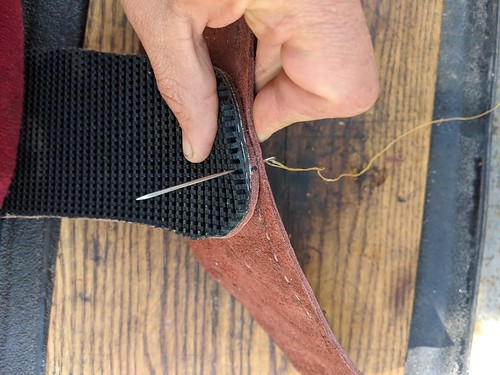
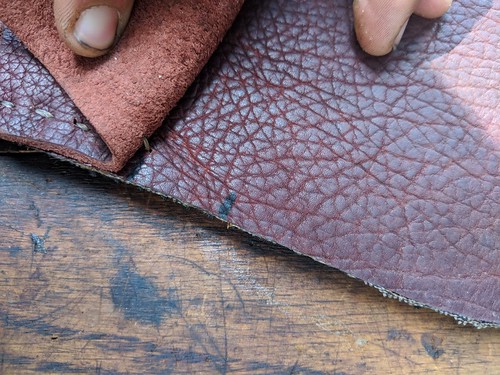
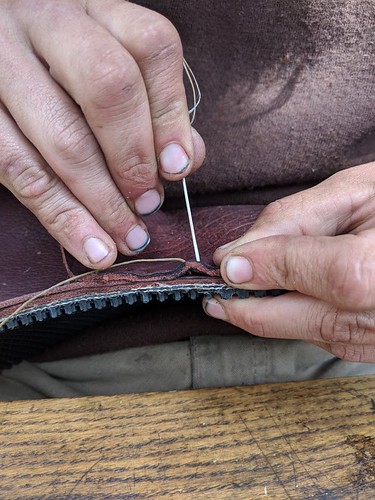
SEWING Go through *just* below the heal re-enforcement. Make sure as you do this that it comes through in a "valley' in the conveyor belt. Push it through using the cutting board. This may take a couple of tries, you can tilt the sole a bit as you stick it through to get it to hit the right spot. Watch your fingers! To finish pulling it through you can use the pliers.
Now go back to the top. When you go back through to the top, try to avoid going over a "mountain top" or "ridgeline". This ensures that the fake sinew isn't exposed directly to wear and is protected by the tread. This is a trick I learned from Sunny Baba. To get a good stitch spacing you may really need to go over a ridgeline. If that's the case you can instead go *under* the ridgeline.
To do this you can stick your needle sideways in to the "ridgeline" you want to go under
Then stand it up, this will sort of push the ridgeline out of the way, and let you go through the sole under the ridgeline (or where it will be once it bounces back).
Then pull it TIGHT. Don't just pull like normal stitching, really yank. The fake sinew will hold up and as you pull it'll sink in to the tread. If you get it right, the stitches should nearly disappear in to the sole so that they are quite hard to find.
Keep going around the sole, until you hit the *rear* mark (where the vamp ends. Then start from the heal again and go around the other side. At this point you have something like this:
Step 8: Trim the heal piece
Cut the heal piece where it aligns with the *front* mark on the sole. Here you can see I've sewn to the first mark, and I'm about to cut at the second.
The part between the two marks will be sewed on later, when the vamp is sewn on directly over it. Just cut the heal piece around 90 degrees at that second mark for now. You'll cut it at an angle later to make space, but you can wait until the whole shoe together first which'll help you get the angle right.
Step 9: Sew on the vamp
Start on the inside of the shoe (the long, less curved side). Place the vamp over the heal piece aligning it with the rear mark (now covered by the heal piece)... And start sewing from there.
Remember how you added extra to the vamp? If you just sew straight the tip of the big toe of the vamp will end up way around the end of the shoe. Instead, what you want to do is "scrunch" the leather as you sew. This will help create extra space so your feet will actually fit in the shoe when you are done. To scrunch you bunch up the leather a little bit as you put the needle through, like this:
You can adjust how much you scrunch so that you keep scrunching up to the big toe, and the big toe comes out in the right spot. I use that as a marker 'cause it's easy to see on both the sole and the vamp patterns (it's the pointiest part of the front).
After this you probably still need to keep scrunching a little. Scrunch until it looks like you'll come out just past the rear mark on the other side of the shoe. If it's a little on the long side, no worries, we can always trim a bit.
Keep sewing all of the way around. Eventually you'll hit the heal section, sew right over it.
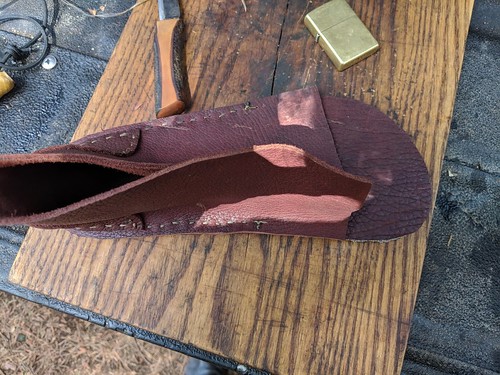
You basically have a shoe at this point
Step 10
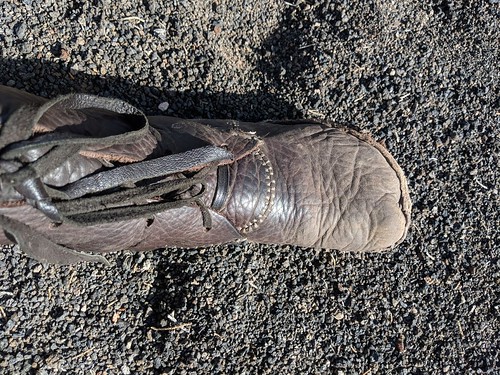
Finish off your shoe. Flip the leather down, and see how it fits. Remember how we just cut the front of the heal section at 90 degrees or so? Using your preferred implement carve that back as needed so you can wrap this around your foot with some space in the front. Use your punch to make holes where you want the laces to come out.
If you don't have another material in mind, you can cut laces from your bison leather. Just carefully cut long strips, preferrably down the length of the animal hide along the back (this is the longest straightest line as well, conveniently).
If you missed on some stitches so your leather sticks off the sole a little, you can carve it back a little so it lines up with the conveyor. A knife works best for this. Here's the finished shoe:
WEARING
One more note. When you first put these shoes on your toes will feel a little crushed. Don't worry, the leather will stretch. You can stretch them yourself with a broomstick or similar if they are too uncomfortable to wear. Once you can wear them, just wear them for a day or so and they should stretch to fit. You may want to start barefoot even if your goal is to wear socks with them.
Review: Softstar Runamoc
2018-04-24
I just purchased my 4'th pair of these.
The Softstar Runamoc is designed as a minimal running shoe... and I mean minimal. The sole is 100% flat and completely unshaped. The shoe is made of one layer of leather sewn to a leather sole which is subsequently glued to a vibram sole.
You can have Softstar custom make whatever you like, but I get them with a full-grain leather upper, and Softstar's "trail sole". The trail sole is the thickest of the soles they offer minimizing bruising of your feet by rocks, and maximizing wear life... it's still *very* flexible, easy forming around rocks and the like. I like the full-grain upper because I think it's a little tougher, and it resists water a *little*, so I can walk across a damp field in the morning and not instantly have wet feet.
The good
- Wear life is approximately equivelent to a normal shoe
- Easy to repair
- Truly flat zero-support shoe
- No padding to collapse and give you knee trouble
- 100% leather upper is non-porous to grass seed
- Lightweight
The Bad
- Slots where the back meets the front allow mud in to the shoe
- Waterproof? Hah, it's barely a layer of leather, and has a slit in the side
- You better be ready to bruise your feet on rocks
I wore a pair of these on my 72 miles in 72 hours hike on the "ring of fire" in Virginia. It was extremely rocky, and my feet definitely hurt from bruising, but they worked great being light-weight and grippy, and I didn't get any injuries.
The toe usually blows through first, which is great. As I explained in my article on shoe repair http://www.blog.smalladventures.net/2017/03/shoe-repair-on-and-off-trail.html this is a very easy repair, and will get a fair bit more life out of the shoe. By the time you get around to replacing the shoe the sole will be paper-thin anyway and the heal possibly torn through as well... but you'll still be walking in them fine. This is perfect for those of us who don't replace gear until it's really shot.
If you usually wear a normal shoe do NOT buy these and start backpacking in them! If anything you'd want to buy these as your normal shoes and keep wearing supportive shoes for backpacking. If you walk around barefoot a lot, and want a shoe to walk on trails covered in chert, or otherwise have been looking for a thin layer of leather and rubber to wrap your foot in when hiking, these are the shoes for you.
UPDATE:
They no longer make these shoes. I bought one pair of the so-called replacements, which have rubber bicycle inner tube over the toe, and I blew them out in less than half the lifetime of the old ones. The sewing is poor, the leather is too thin, in general they are simply no good.
Sadly, if you want a shoe like this now, you probably have to make it, see my later articles on making shoes.
No synthetics backpacking Y
2018-03-25
In short: Yes!
Several years ago I started a project to try and backpack without synthetics. At the time I thought this was a bit of a "stretch goal". That is, I wasn't at all convinced it was possible, but I figured it would be cool to try.
At the time, was simply looking for a goal that would encourage me to do more experimentation. I considered re-creation, but while that's cool, it is antithetical to experimentation. I wanted to try and take old ideas and use them now, not just stick myself to what has been done. Anyway, I set out on a quest to see what could be done.
In particular, I wanted to see if I could build what I considered a "reasonable" though-hiker kit for doing the Applachian Trail. Having done most of that trail one summer, and spending my childhood vacations in the white mountains, I had a good idea what that might take. To define "reasonable" I decided to target a <20 lbs base weight, and around the same comfort and safety level as I had when I did my not-quite thru-hike in 2009 when I carried ~14 lbs base weight. I figured 4 lbs water 8 lbs food and you get ~32 lbs total... which isn't ultralight by any means, but it's lighter than many many thru-hikers do carry and would allow a good hiker to do a 3 or 4 month thru-hike.

When I told people about this goal, most people told me it couldn't done... not for a reasonable weight. I was skeptical that I'd ever find a reasonable sleep system that didn't weigh a ton. I wasn't sure about replacing my tarp either. Anyway... they were wrong and so was I. I'm still honing my kit, as all hikers always are, but listed further down is a kit that I'm convinced would work well and comfortably me on an AT thru-hike... for ~18.5 lbs base weight.
There is ONE piece of synthetic gear that so far I'm unwilling to replace, and that is my shoe soles. Rubber is just too good for shoe soles. Recently when I was learning a new technique for making my own shoes (the result of which are my primary shoes right now), someone with a LOT of experience in the matter told me that leather soles only last ~300 miles. I'm sure you can extend that by making them extremely thick and stiff, but then the grip is bad, which can be downright dangerous. Also, it ruins the natural human gait. So, for me, this is the one place I will not give.
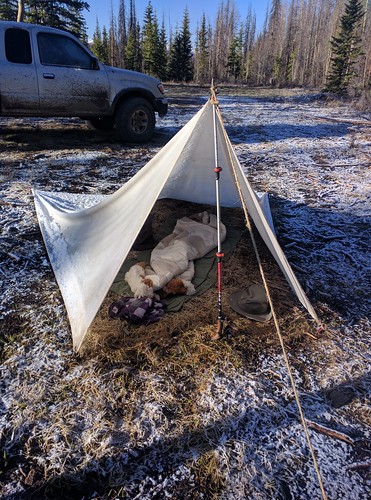
Note that I'm really not cheating here. This list is missing the drugs for my medical conditions, and that's it. There's no underwear because I don't wear it. Stuff that is sometimes worn and sometimes not is listed as part of base weight. I've tested this gear in torrential downpours, and below 20F. Some of it might want minor robustness tweaks I'd do before taking it on a full hike (my sleepingbag could use a reinforcing triangle of buckskin where the ties join the leather), but it works for me.
(article continues after table)
For any gear that isn't blatantly obvious, you can almost certainly fill in the search box on the right of my blog and find out where I got it or how I made it.
I actually think I can cut even more weight off this. The blanket pack I'm experimenting now should cut another ~1.5 lbs, bringing my base weight down to ~17 lbs.

The ultimate test would be to actually DO a thru-hike with this gear. Angie and I had actually intended to do a PCT thru-hike, before we realized that the west coast is almost continuously on fire these days. It would be miserable with all the smoke, and quite possibly deadly for me with my asthma. That leaves an AT thru-hike... which maybe we'll do eventually, but just isn't nearly as motivating for me having already hiked a huge section of it. A PCT thru-hike would of course require a few tweaks. Warmer boots, like the ones I recently learned how to make, a way to carry more water, and maybe an alpenstock like the one I've already made and partially tested... but not a lot more than that.

So, after all this experimentation, what was the hardest piece of gear to drop besides shoe soles? Answer: Gaskets. Most of this gear works so well that I have no intention of ever going back. I love my cotton tarp, my waxed jacket, my canvas shorts, my wool sweaters, etc. But... gaskets are hard. For smaller mouthed waterbottles leather works well enough, and I'm going to keep using it since it works fine. But, for my BOT, (which I love, since it cuts out an entire cookpot from my gear), I couldn't get the leather to quite seal like I want. silicon gaskets are amazing.
Obviously what I'm doing requires more knowledge and skill than buying the standard gear set at REI does... but, personally, I find it more fun and fulfilling. If nothing else, I hope that others look at my experiments and realize just how little gear you actually need... and how much less than that you need to purchase.
Go out, have fun, and HYOH!
Blanket Pack
2018-03-25
While at Wintercount (a traditional skills gathering held in Arizona every Febuary), I took a class from Jeff Sanders on "flat fabric camping". Jeff Sanders taught for BOSS (Boulder Outdoor Survival School) for many years, and more recently has started his own school called "The Desert Dawn". Suffice to say, that he's rather knowledgeable and skilled.
Anyway, the idea of his flat fabric camping class was basically to use blankets from thrift stores for the bulk of your backpacking kit. I've used flat fabric tarps myself as my only backpacking shelters since around 2004... so the biggest thing for me was the backpack, referred to by most as the "blanket pack".
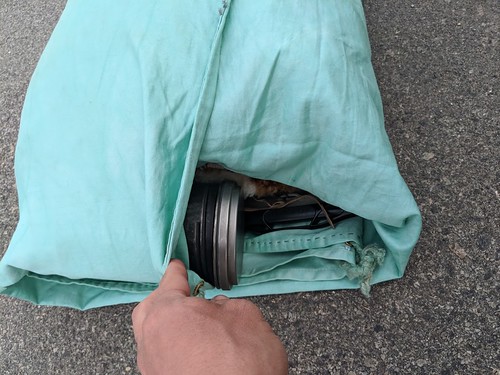
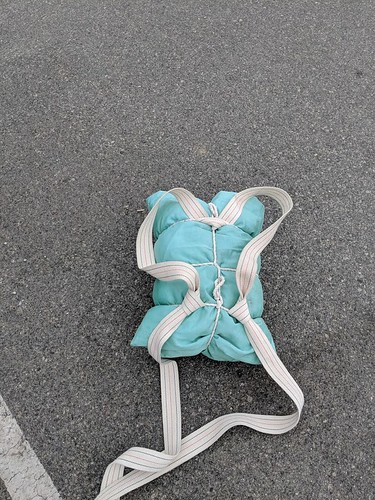
Right now my backpacking sleep system doesn't involve using any blankets, so I decided instead to use my 800 threadcount sheet/tarp as my "blanket" to make my pack out of (I dyed it recently, that's why it's green). I've used this on 2 overnight trips now. Here's how it works:
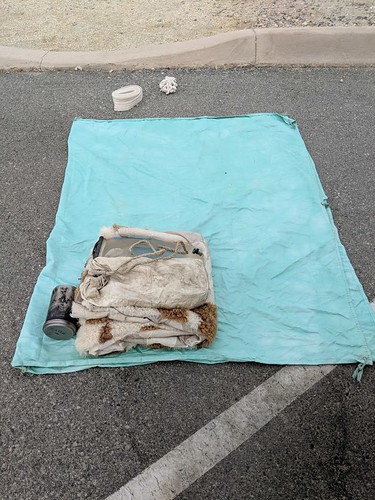
Start by laying out your blanket. In this case I folded my tarp all the way in half. I'm still working out the best folding method for my specific materials, but this worked okay.
Jeff does it a little differently, he lays his fabric out with the long axis vertical, then folds the right side towards the left 1/3 of the way across (like you were folding in thirds, but just the first fold). That fold is critical, you'll see why in a minute.
Some of you are wondering where the rest of my gear is... good catch. You'll see I have a 3L bladder, a bag full of food, my sleepingbag, and a 1L waterbottle/cookpot in the image (we were doing an overnight with no available water). Yes I have more gear, you'll see it in a bit.
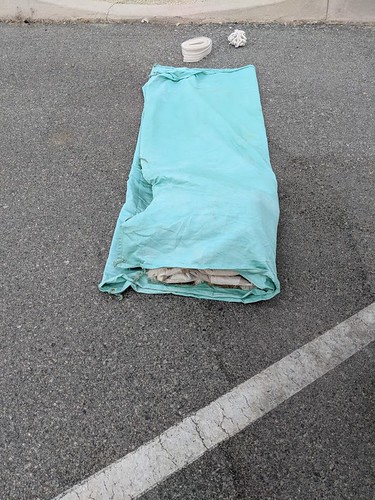
Fold the fabric over the stuff you are packing... it's actually easier if your fabric is longer, than you can fold it up over your stuff at this stage, which helps keep your stuff from falling out in the next step.
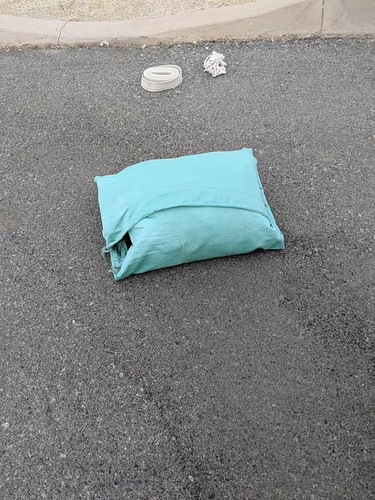
Now, you roll the gear up in the blanket rolling away from you. Because of how you've folded the blanket, the end of the sheet is like a pocket, so you can stuff the roll you have in to that pocket forming a pillow shape. Jeff's is prettier than mine... but mine works okay.
Here you can see a bit better. See how that layer of fabric kind of pulls over the top? That's the "pocket" that it was sort of stuffed in to. In retrospect I should've shot a video of this step, but hopefully you can still figure it out. Anyway this folding makes it possible to get to one or two items on the top of your pack without disassembling it all the way.
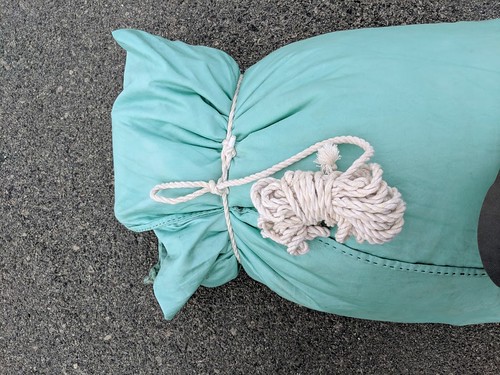
You need ~25" feet of cord. I'm using this 1/4" cotton cord I've come to like. Tie a small bowline in the end to make a loop. Invert the loop on itself to make a sliding loop and slip that over the top of the pack. Tighten it down and tie it off with a slipped half-hitch. Slip a half-hitch over the first to lock it.
Then take a turn around the middle, and a turn around the bottom, tying the bottom of similarly to the first loop.
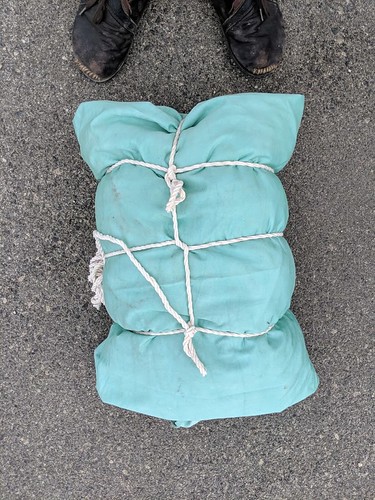
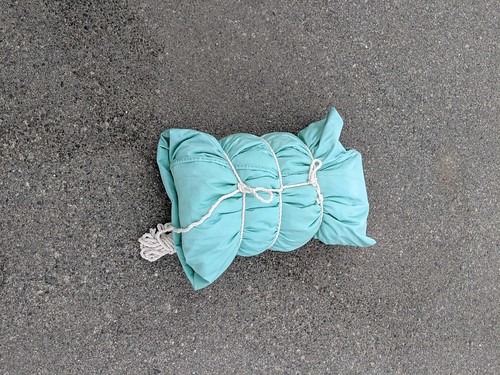
Go under the bottom and around to the other side and tie off to the bottom loop, wrap the cord around the middle loop, tie off again to the top loop. And finally (not shown above) wrap over the top and tie off to the top loop again... your final tie-off point will be the top back of the pack, pointing away from your back.
Take ~15' piece of 2" cotton webbing (I cut mine down to 14' after the first trip), and run it under the top loop, over the vertical, and under the other side of the top loop again. Tie off each side to the bottom loop using an overhand. Make sure these are the same length. You're first few times you'll have to do a fair bit of fiddling as these are your shoulder straps. It takes practice to get them the right length on the first try (I'm not there yet). That is the blanket pack itself... which is pretty cool, but here comes the real trick that makes this work so well.
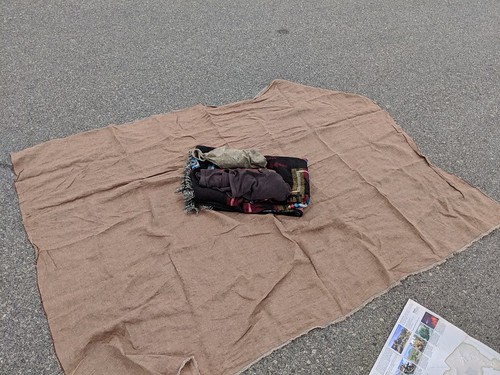
This is a 5'x6' rectangle of linen. I chose a piece that's a little loosely woven so it has some stretch on the bias... this is important for comfort. A piece of herringbone linen (like suits use) doesn't stretch well on the bias, so probably isn't the best choice. The exact dimension isn't critical. Jeff said "a bolt width" is what he likes, I'd say unless you are quite large around just get "2 yards" at the fabric store and you can always cut it down if it's too big. I actually kind of like the extra on this mine.
Anyway, lay that out and place some stuff in the center. Make sure there's a good quantity of soft stuff. This is also where you should put most stuff you want to access while hiking so extra clothing layers are a good option. Here I use a sweater and the poncho I use both for extra warmth when not hiking, and as a sleepingbag liner for my alpaca. I also have my ditty bag with repair gear and the like, as well as my knife in this role. Later on the trip I threw in some snacks as well, a couple manderin oranges, a bar, and a bag of nuts all fit well. It's actually helpful if this is fairly large, you'll see why soon.
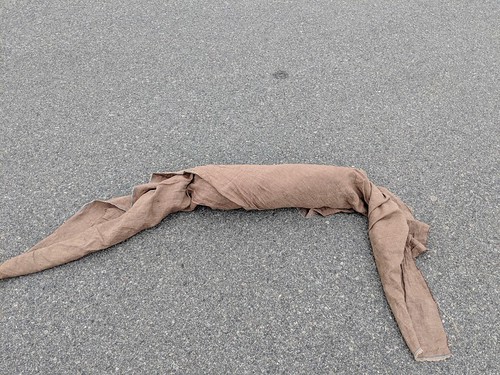
Roll that up as tightly as you can. This roll is going around your waist, so you want the width to match the size of your hips, so it'll sit well. Also, make sure all the soft stuff ends up on one side, so you can put that against your back and have it by comfy.
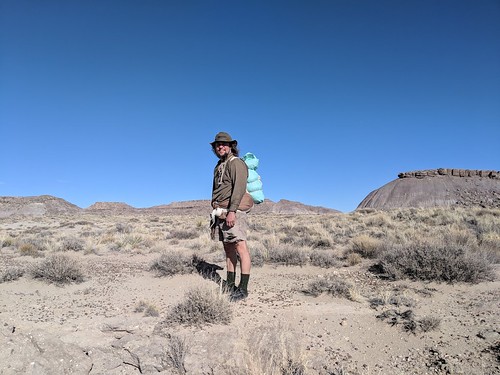
Now with the parts assembled, tie the linen-wrapped bolster around your waist. Then sling the pack on your back (probably taking it off two or three times to adjust the shoulder-straps). The pack should sit *on top* of the bolster to a large extent. Finally, take the ends of the shoulder straps, CROSS them behind you (this is a bit odd, but look at the picture below) run the two straps around your hips UNDER the bolster and tie below the bolster tie off on the front of your hips.
This is what the final result looks like:
Here's the back so you can see just how the shoulder-straps run behind the back:
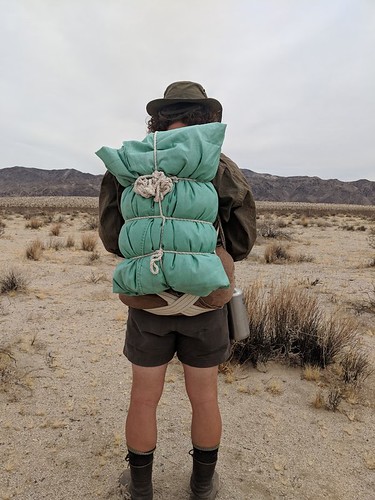
The cool thing about this is that the bolster ends up acting like a hipbelt for the pack. So, not only did you get a good portion of your stuff off your shoulders, AND to somewhere you can get in and out of more easily, that portion then helps hold the rest of your stuff up significantly lightening the load on your shoulders.
Note that the linen has a number of uses once you are in camp. It's quite nice as a ground cloth for keeping your stuff from getting sandy. I discovered (not while on a trip, but I'll use it later I'm sure), that I can wear it like a sarong to let my thighs dry out from chafing. Jeff uses it as a hanging cover on the ends of some of his tarp pitches to help hold in heat and cut the breeze a little. Suffice to say, it's a lot lighter, and more useful in camp, than a backpack.
The strap is all cotton, and makes great charcloth. Otherwise I haven't found a use for it, but it's just the one piece, instead of an entire expensive backpack.
The linen I acquired at a fabric store. The strap is a piano moving strap, which, sadly, it turns out has a small amount of nylon in the middle, despite being sold as "100% cotton"... oh well.
Obviously there are still things I'm working on. Jeff (and BOSS) use a poncho-tarp, which would cover up the pack during a rainstorm... as is, my stuff would get wet. I'm not using down, so it's not a disaster, but it might kind of suck in a 5-day rain out east. So, I need to use a poncho, or work in the piece of waterproof fabric fabric I was using with my external frame pack, or something.
Here's the external frame pack setup I've been using (give or take... this was a trip in the zerkels where I had more winter gear)
The blanket pack is super neat though, and it's kind of amazing to get out there and realize that you only have a few pieces of kit, yet are well prepared. More experimentation to do, but I'm seriously thinking that I might not use a pack for backpacking anymore... one less piece of kit both in the bush, and to store in between!
Homemade shoes: A new design
2018-03-17
So, I made shoes once before that were pretty successful:
http://www.blog.smalladventures.net/2014/10/homemade-shoes.html
I liked these a lot, but they had a few flaws as noted in that article. There are 2 major issues.
- Heal stretch caused my heal to start landing on the heal-seam. This limited distances I could walk in these to ~10 miles, and if I did that I couldn't do it again the next day.
- Wear life. The twine holding the soles on would get worn through, and then the shoe would fall off of my foot.
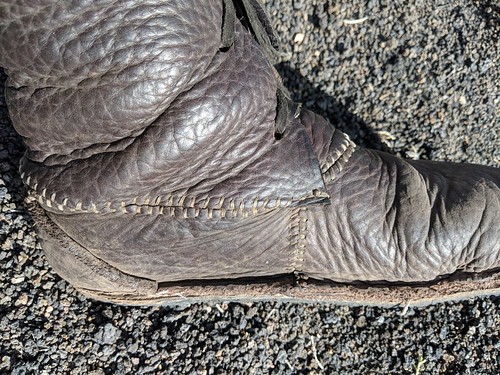
The basic shoe design is similar, but there are of course some major differences. Notice the heal reinforcement. This reduces stretch in the heal of the shoe, and should resolve the heal-stretch problem I ran in to with my own pair.
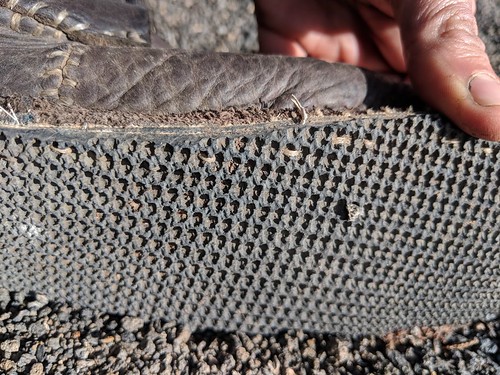
Another big difference is the sole construction. The leather sole is first glued to the sole using contact cement. I'd also been using my contact cement incorrectly, you want to coat both surfaces, let it dry until it's just barely tacky, then stick it together in one shot. Once it's glued the upper is sewn to the sole straight through the leather and the conveyor sole.
See those stitches in the image above? That's where I messed up. The stitching is done with fake sinew, which is nylon. You try and keep the stitches in the "valleys" of the tread pattern, then you pull each stitch REALLY hard. If you do it right you pull it so tight that the stitches disappear down in to the rubber and you can't even see them. My second shoe was better... This solves my second major problem.
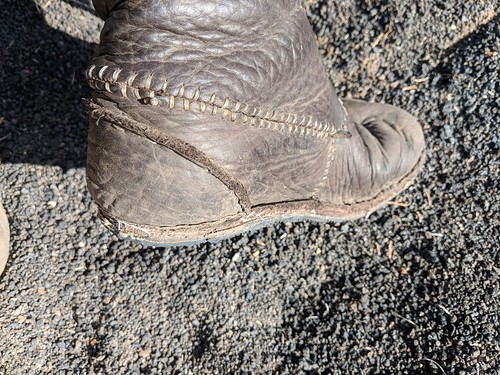
Here's another shot of the heal re-inforcement. We used bison leather, which is very supple for it's strength and thickness, and as I've discovered also very waterproof. You start stitching on the inside of the foot and stitch around the vamp towards the toe. To get enough space for the toes you "scrunch" the leather a bit as you near the toe, then keep scrunching it as you go around the toe, until it's just the right length to meet the hatch mark on the other side.
The heal reinforcement is glued and then sewn to the heal, then you sew the heal to the shoe, cutting off the excess when you reach the vamp. The two are baseball stitched together... this method leaves a flat yet basically watertight seam, resolving a lot of the issues of trying to sew an upper together without uncomfortable seams that chafe your foot.
At this point you basically have a finished shoe. But, to make a tall moccasin like I did, you make a tongue and sew that to the vamp again using baseball, then sew the ankle portion to the heal section... Note that in the image at the top the ankle portion extends a bit over the vamp and is sewn for 2 or 3 stitches with a running stitch instead across the vamp.
This design is amazing. I made the sole of my moccasin just a little too small for the thickness of socks I usually wear (these were designed for being worn barefoot I believe), and the leather I used was some of the sleeziest part of the bison... so i'm actually still having minor heal-stretch issues, but using leather from near the spine, rump, or neck for the heal and heal reinforcement should resolve that in future pairs.
So, how about the pattern? That's always the big question. Well, there's always an art to it, but here's the basic idea:
- Trace your foot on to a piece of paper (brown paper bags work great)
- Find the highest point on your instep, and drop this down to the pattern directly below, make a mark on both the left and right sides. This marks where the vamp will meet the heal.
- still standing on your sole pattern scrunch a piece of paper over your foot and around your toes where the vamp goes. Trace a line around your toes and back, stopping at the mark on the sole.
- Take another piece of paper and pull it around your heal to those same marks, and mark the paper. Also check the height, you want the seam with the upper ankle portion to land below the ball on the side of your ankle, so keep that in mind when you mark out the height of your ankle portion... mark this piece a little large in all dimensions, especially where it meets the vamp.
- Clean up all the markings you've made. For the sole make sure you add a little extra space for your toes, if you are using a sock inside it at least cut on the outside of the line, this seems to be about the right adjustment for "normal" socks if you are using perminant marker. You should *only* need to adjust the sole, maybe add a TINY bit of the vamp.
- Cut out all your pieces
Also, these shoes will be "too tight" when first finished, the toes stretch out to fit your feet better over time, it takes a little wearing for them to really fit comfortably.
I plan to experiment more, but this seems like a really good and simple design for a shoe. Angie actually bought a pair Sonny made himself, since she wasn't able to take the class. She loves her pair. My intention is to make one low to mid top pair for summer, sized about as described above. Then make a high-top pair that is significantly oversize to wear as winter/edge-season hiking boots. They seem to be waterproof enough I think I can replace my vivo-barefoot boots with them in the long term.
If you can't tell by my writing, I'm pretty excited about this. It comes at a good time too... Not long ago I went to purchase my standard runamoc moccasins from softstar and they had stopped making them even for custom order. I purchased what they say replaces them and only ~3 months later the side has busted and I've barely worn the sole at all... they are total garbage compared to the runamocs I used to buy from them... So, it seems, no more buying shoes for me. Time to get down to business and make my own.