
Jack2: Sleeping Platform
2016-02-13
This'll be a short post, but I at least wanted to get up some photos that show how the platform is constructed. As I noted before, I wanted to have a lot of cargo capacity in the truck. I also want it simple Anything that breaks up the space in the bed reduces the actual usable storage space. Drawers and things are complicated. Similar to Jane I just wanted to keep it simple.
The question then was, can we make it even simpler than Jane's platform is? Here's what Angie and I came up with:
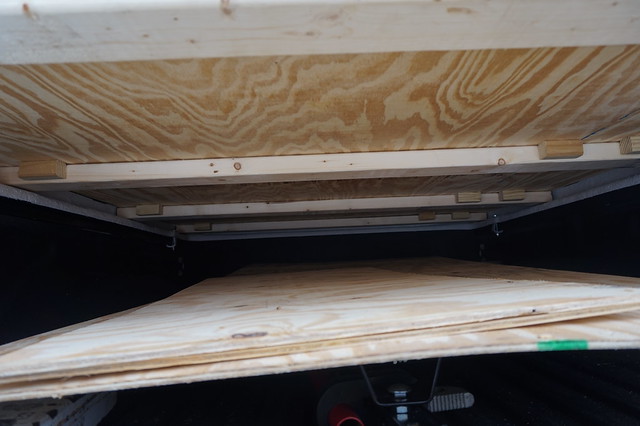
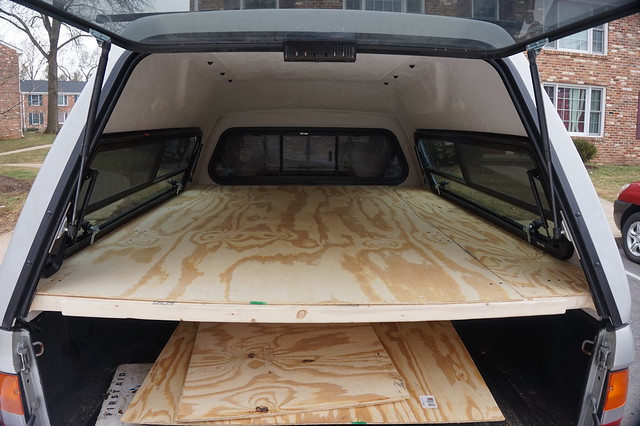
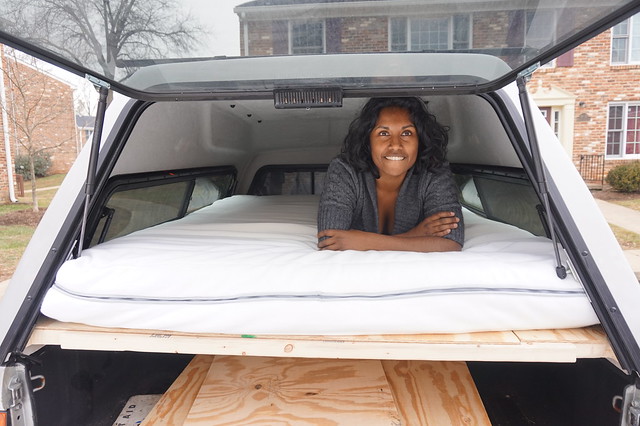
The design is 4 2x4's spanning the bed-rails. The cap tapers in as it goes upwards, and the 2x4's are as long as they can be and still fit, so they actually "spin" in to place. This is the same as the design of Jane's platform. Jane then had a tessellation of 6 panels filling the voids. That worked well and is great for easy assembly and disassembly... but the breaks in the platform meant that each panel was only supported at the edges, and thus drooped very easily, requiring them to be stiffined with 2x2's. The design in Jack2 is just 2 panels side-by side, each 73 inches long. This is much stronger, and requires less support underneath. It still uses some 2x2, but just little blocks to hold the 2x4's in place so they can't spin and drop out.
This build took about a day from start to finish. 2 10' 2x4s, a couple cheepo chunks of 2x2, and 2 4'x8' sheets of plywood. We ended up with a lot of spare plywood, but we needed two pieces to get sheets of the right dimensions.
It did take some tweaking to get it all to drop in place. We cut out notches in the rearmost 2x4 for the window latches. This was done with a saw cut down each side. We then drilled a series of holes, and hit the chunk with a hammer splitting it off. A bit of work with a rasp and sandpaper to smooth it out, and we were done.
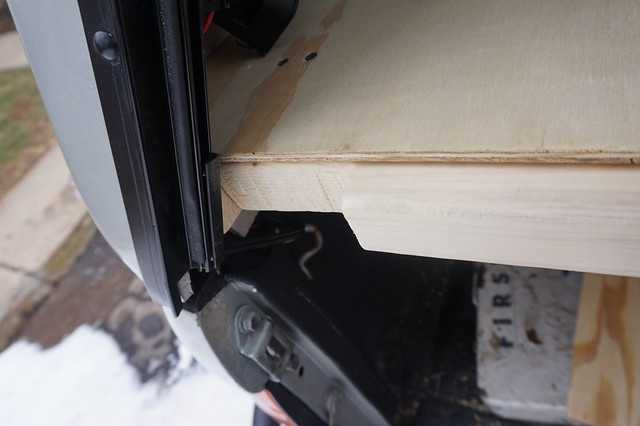
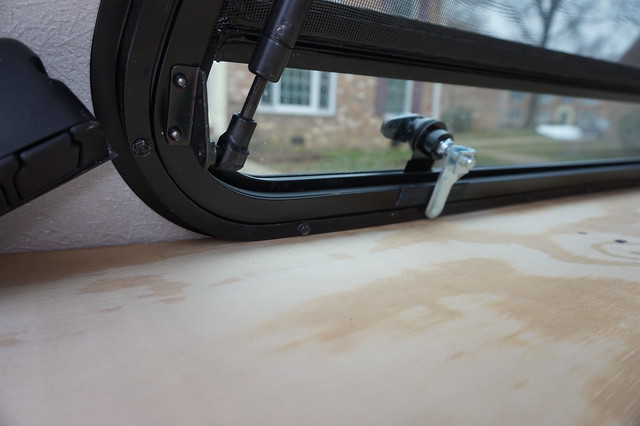
Notice how the platform actually sits just underneath the window, it fits pretty tight in there. It makes it a little harder to slide in place, but it means things are mostly held in place.
Angie's parent's had this old mattress around, so we decided to give it a try... 6" tall is too tall and it just takes too much headroom so I don't think we'll use it... 2.5"-3" would be nicer, but it was interesting to try it.
Excited to try it!
Jack2: Another Toyota Tacoma
2016-02-07
I got a Toyota Tacoma again, and I'm selling the Jeep.
My last Toyota was shared with Jess. When we were planning to settle down and buy land she started looking at cars. In the end I sold her my half of the pickup because it was perfect for doing K9 Search and Rescue, and I got a Jeep, because she already had a pickup, I work from home so mostly drive to get to the woods and we were going to settle down in Virginia, so why not a convertable? Also, it was cheap ($25k out the door) and available in manual. I loved the Jeep, and it was fun. I spent a few thousand upgrading it, e.g.
http://www.blog.smalladventures.net/2015/03/jeep-mods.html
, and learned a lot in the process.
Well, we broke up, and all my life plans changed, and now I had a Jeep. If you read:
http://www.blog.smalladventures.net/2013/10/review-tacoma-as-camper.html
you know how much I loved owning and living in a 4wd pickup truck. I pondered and pondered and looked at every vehicle out there. I considered 4wd vans, large SUVs like the ford Excursion, full size trucks, regular cab trucks, keeping the jeep and pulling a trailer, roof top tends, everything you can think of.... and in the end I circled around. The inability to sleep in the vehicle on
http://www.blog.smalladventures.net/2015/11/trip-report-boondocking.html,
Just confirmed that although the Jeep was a blast, it wasn't for me.
So, I went looking for a 4wd, v6, manual, Toyota Tacoma, between the years 2000 and 2002 inclusive, with as low of miles and as flawless a frame as I could find (tacoma's are known for frame rust), and preferably with a locker. Eventually I found one for $15,700, with 74000 miles, sold by a guy I trust (every truck on his lot was in excellent condition), that had been recently shipped out here from Reno, so had not a spec of rust on it. It was a little expensive, but worth it... so I bought it.
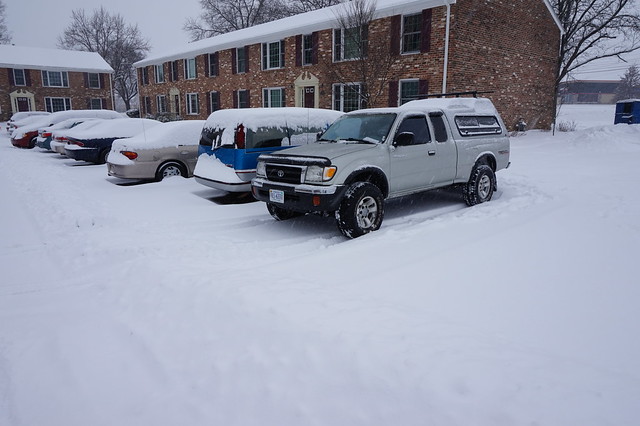
And thus, Jack the camper 2 began. Like the farmer who calls every mule he's ever owned Jack, I decided to re-use the name. The photo below is from the day I picked up the cap... in the middle of a snowstorm.
Here's the build plan I've been working on:
https://docs.google.com/a/smalladventures.net/spreadsheets/d/1_ZWVUtGTnxuYMNcJOHucrMbbrerY1BwLsxxAgM757AI/edit?usp=sharing
I'm also going to be posting more detailed build stuff here. Expedition portal is an amazing resource
http://www.expeditionportal.com/forum/threads/152989-2000-Extended-Cab-Tacoma-mild-long-term-overland-build?highlight=2000+tacoma+mild+build
Step one was to undercoat the whole thing with fluid film I swapped all the fluids (it had non-toyota coolant), pulled the security system 'cause it was obnoxious, and installed a fire extinguisher. Next I got a Leer 122 cap installed with windoors (like I had on the last truck) this time with a 12V power block as well. Yesterday Angie and I installed a new tougher bumper so we wouldn't wreck the truck if we back in to a tree while off-road, and so I have a hard-point and can pull my trailer. I also installed trailer wiring. I'm also slowly removing all the badging on the truck and cap.
Angie is learning to drive stick. She's getting pretty good, but isn't comfortable yet. Yesterday she asked "Why would anyone get an automatic Jeep", and I got a huge grin on my face. Another manual driver is born. Today we finally got Jack to a state where he's usable as a camper. Here's what the back looks like now.
My Jeep is currently for sale. My budget for Jack is whatever I can sell the Jeep (and trailer) for. I'll be writing up some of the specific projects on Jack as well.
As an overview the goal is the same as the last time. I'm looking for a vehicle I can camp out of short-term and live out of long term. The goal is reliable, robust, lightweight, fairly capable off-road so I can boon-dock, but good for long-miles on road. Most of the options I considered were thrown out for reliability reasons. It's hard to beat a Tacoma. A Roof Top Tent was thrown out due to difficulty stealthing, and them just not being that great for snow, wet, and cold. Mostly because of difficulties with drying the material so it won't mold/mildew (Jane ended up soaking wet for almost 2 months straight at one point due to freezing and thawing combined with rainy weather... an RTT would likely not have survived). I wanted something narrow enough to fit down difficult trails, and I wanted a lot of cargo capacity.
Cool link: Bankhar dog project
2015-12-22
I've been obsessed with reading about overlanding recently and I just tripped over this wonderful story on Expedition Portal.
It's about the founding of the Bankhar dog project, attempting to maintain low-impact traditional nomadic lifestyles in balance with rare species. It's such a short overview, but there are so many things at work here, things this blog is about. Give it a read:
http://expeditionportal.com/the-mongolian-bankhar-dog/
DYI: More shoe experiments
2015-12-16
I'm going to talk about several things in this part. A teardown of my Old shoes, and some new shoe ideas and thoughts.
Teardown of old shoes
These are the shoes I found I could actually backpack and hike in, the first (and only) success so far. Their primary flaw was that the heal stretched and I would step on the heal seam. This is a non-turn-shoe made as a simple 3-part moccasin:
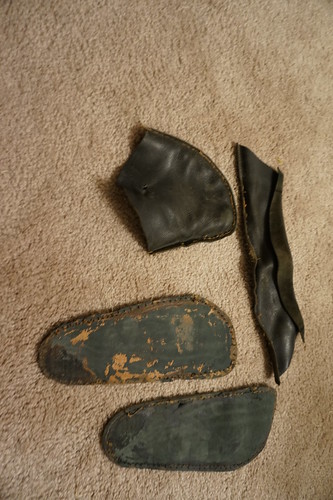
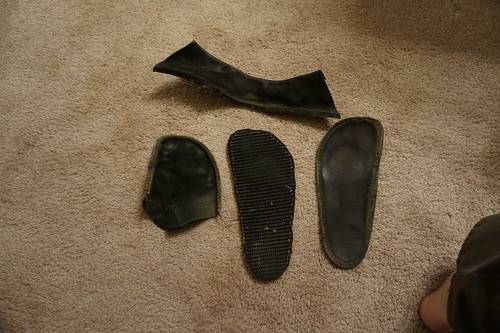
It's interesting that the barge cement was still holding parts of the leather very firmly.Looking closely you can see it tore the surface off some of the leather - I glued that leather shiny-side down, and it seems that the shiny bit (That is, the grain in leather terminology) tore off.
You can see very significant stretching in the toe-box. This was expected and is part of why the shoe worked, but it's fascinating to take the shoe apart and actually see it.
The stitching was holding a lot better than I expected. Pulling this apart took a while and was surprisingly difficult. It had torn out around the heal. That spot had been stitched too many times already so I couldn't repair it again... the leather was too perforated, but besides that the shoe was still pretty solid.
New ideas
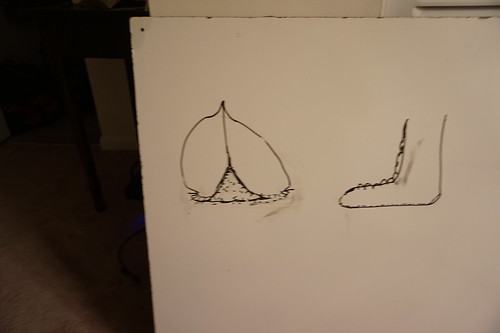
Jess went to england and came back excited about the idea of a roman boot. This is a welted lasted turn-shoe with a center-seam sewn after turning. This makes the turning process far easier, which is exciting itself. Here's my sketches of the concept:
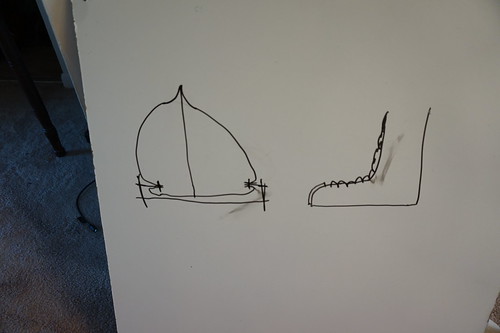
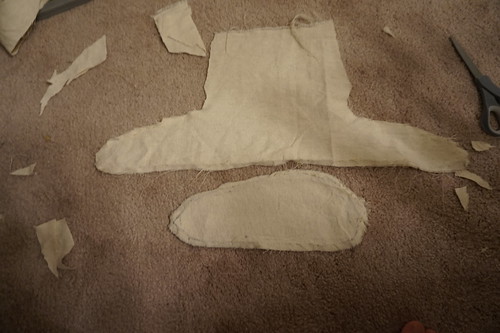
This is a lot to tackle and I wasn't confident I could get the toe to come out right at all. I wasn't sure how to last the boot either, so I decided to try mocking it out in canvas. Sadly I forgot to take photos before I disassembled it, but here's what I ended up with.
Note the upturn near the toe of the boot. When I tried it without that it just seemed too pointy if I didn't do some serious stretching of the leather. The upturn helps you end up with a rounder toe. on the other hand, the shoe would look more like this when done:
See how the sole pulls up on the toe? Given the shape of my demo fabric shoe above that would be a fairly sharp turn for the sole to make. It's already hard to get the conveyer soles I've been using to stay attached to the boot, and this makes it worse, so I tossed the idea out.
Jess is going to pursue this idea. I'm really curious to see how it goes, but I think I'm going to go back to something closer to my first design for a boot. I'm thinking of taking the design I had so much success with and
- Adding an extended tongue to make it in to more of a boot
- Flipping the two components of the upper, so the forefoot is on the inside like a modern shoe
- Making it as a welted turnshoe. This makes for only *one* seam around the outside edge where I ran out of leather last time. Just the one that holds the sole on
- Using an insole of leather to cover up the seam resulting from the turnshoe
Not sure when I'll get around to actually making them, but the first step to any project is to actually get the details solid in your head so you understand what you're trying to make and how it will go together... and I'm getting closer!
DYI: Leather belt pouch
2015-12-08
I've had the bag on the left for a long time. I used it as my wallet and "murse" ever since a generous friend of mine gave it to me back in 2006. It's been on my hip any time I've left the house, excepting only when I'm backpacking. In addition to money and cards it held my keys, albutorol inhaler, usually a knife or two, emergency whistle, and a pair of medical gloves. It lasted 10 years in this capacity... impressive!
Sadly though, even well made leather items eventually wear out. The stitching is STILL solid, but eventually the leather itself simple wore through. It's hard to see in the photos but there's a hole in the bottom of the bag, the straps have notches worn in to them going halfway across each strap, etc. In short, the bag is done. It is an ex bag.
What to do when one of your favorite items finally fails and you can't buy a new one (or even if you can)? Make one!
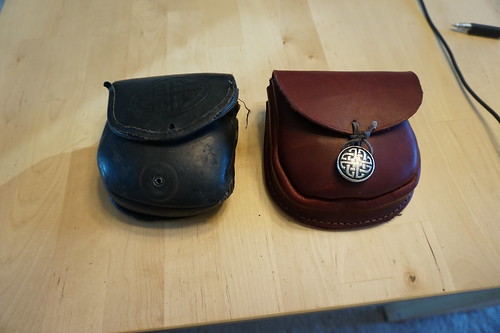
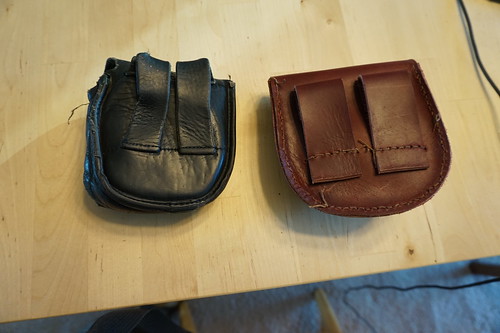
Since I liked it so much I traced the original. My leather is thicker so I knew it wouldn't bend the same way. I'm also sewing with heavy linen by hand, rather than light thread with a machine, so I can't get as near the edge as they can. I also wanted it a bit bigger if everything. So given that I added a significant extra allowance.
I first sewed the front to the side piece, inside out. I of cut the side extra long, so I could just line up one side, and sew across, then trim off the extra. Next I sewed this to the back. This time right-side in so the leather against my hip would sit flat keeping the pouch tight to me instead of floppy and giving a similar look to the original. I missed slightly and it came out crooked, so before I finished the second seam I pulled out a couple of stitches from the first seam, trimmed the front and side so it'd line up flat on the back, and then tied off that first seam again.
Finally (because I forgot to do it sooner) I stitched the straps on. You can't see it here but I did a "Z" pattern on the first set of stitches, like a lazier version of the "X" you see on backpack straps. Then I flipped the strap down and sewed the bottom down.
Lastly I pulled the button off the front and moved it over.
I'm really happy with the result, it's just a tiny bit larger, making it the perfect size. It sits a little higher on my hip helping compensate for the extra size. Also, it took about half a day to make. I don't think it'll last as long as the first one because the stitching is much more exposed, but I'm very curious to find out how long it does last.