
Another raincoat experiment
2015-12-08
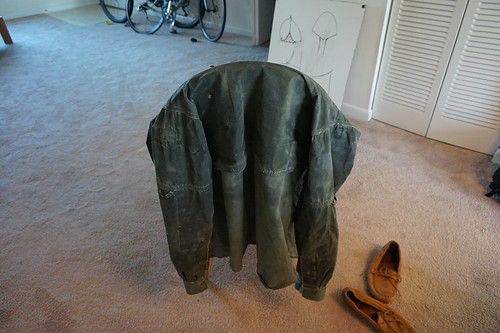
In my continuing quest to find the perfect cheap raincoat that never wears out. I decided to try another experiment. I took my old 5.11 shirt that's nearly worn out, and got some otter wax bar for ~$12.00. I tried heating the otter wax on the stove first and brushing it on. That worked *okay* but it wasn't melted in by any means.
(Final result)
Next I tried folding it outside in, enclosing the shirt in a pillowcase (tied at the top), and running it through a dryer for 20 minutes. The dryer didn't get hot enough, so it didn't quite soak in, but it did do something.
Next I tried taking it to a laundromat, using their dryer (because the ones where I live now are pretty cruddy), and setting it on "hot". That worked better, but still not well enough.
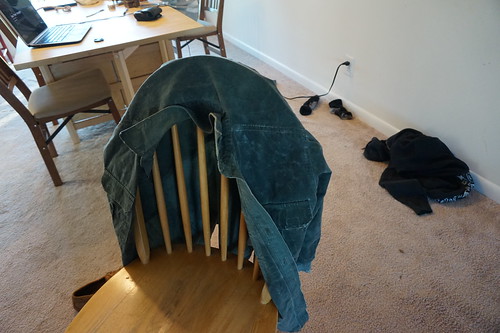
Finally I used Angie's hairdryer with an air-director to get even more heat in one place. About 2 hours later I had it soaking in.
When I did it initially I ran out before making it to the back below the top flap, but I got the sleeves, the shoulders, the front almost to the waist, and the back down a little less than half-way. This should be enough to find out if it works. It's also not perfectly even. Otter wax sells a more liquid form, but I wanted to try the solid form first because, as I'd hoped, it didn't soak all the way through the fabric in most spots. This left the inside feeling less "waxy" and making it a little more wearable as a base-layer.
I'm excited to try it out. If it works there's a lot more experimentation to do. I'm sure it's possible to get the wax more even on the shirt, and in so doing probably use a bit less of it. Also, Otter was is supposedly made of all natural non-terrible stuff, which means there's a chance I can make something similar with some experimentation. I figure if their stuff doesn't do what I want, I can cut off a lot of that experimentation, and if
it does I have a clearer direction to go in.
Okay, so why am I exploring this? If you've been following this blog you know that I've gotten frustrated with commercial plastic jackets costing a fortune and then wearing out. In addition I've been working towards a gearset that doesn't really use much plastic. My last couple of experiments involved linseed oil, but I got frustrated with both the performance and the smell and moved on. http://www.blog.smalladventures.net/2015/11/linseed-oil-for-homemade-oil-cloth.html
In addition to the general search and asthetics, more practically speaking I've been using this same 5.11 shirt as my "light rain" coat lately, usually layered over my marino sweater, and then using a plastic silnylon poncho in pouring rain over the top. So far this has worked well for me, but it does mean soaking wet arms if I'm doing things in pouring rain. I also have to wait for the rain to slow a bit sometimes to pitch my poncho-tarp as a shelter, since I can't be under it while I'm pitching it. So good, but I'd love to make it better.
There are basically 3 traditional solutions non-plastic rain-coat solutions. A stiff plant fiber coat, leather, or the most modern coated canvas. The first is very effective, but not very mobile for backpacking. Jess has extensive experience (2'nd hand, but still) with home bark-tanned leather as a raincoat... several people and 21 days of continuous pouring rain in fact. So that's one clear option. Even made with a thin leather it's a bit heavy though, and it's a lot of work to make, so I wanted to explore the other option further, just to understand the whole space.
My 5.11 shirt certainly is part plastic of course, but I wanted something to experiment on that was the right material. It's ancient and worn out and about to be thrown away, so by doing it this way the experiment only cost me the $12.00 for the otter wax (plus dryer fees and electricity).
One more interesting bit of data if you're going to do this... It shrank quite a bit. It probably lost a half-inch to an inch across the shoulders. This shirt is already a very well worn garment. A 5.11 shirt near being thrown away, we're talking serious wear. It was well worn before Jess got it used in a park ~2010, she used it until we went on the road, then I got it and have used it very heavilly since since.. So, if you do this... make sure to start with an oversized garment. It's a lot of heat to melt in the was.
I haven't tried it in rain yet. I can't wait for a good rainstorm to give it a test.
trip report: Boondocking near Ashville
2015-11-18
My camera broke such that I didn't know it was working, so I don't have many photos, but I did take a few.
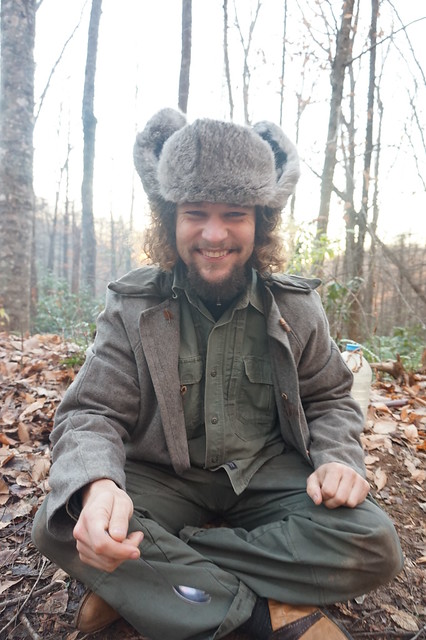
For my birthday, Angie and I decided to take a trip down to Ashville. Since staying in hotels is silly, we boondocked of course! My Jeep is no-where near as good for this as my old truck Jane was, but it worked pretty okay. On the upside it got us pretty far down a very rough road, farther than Jane could have.
Here's Angie eating a nice vegetable and tofu soup cooked over a small fire. To help the fire burn and make it easier to get the water to a nice simmer we stuck some stakes in the ground as a pot-stand. You can see in the foreground that we turned the sticks almost entirely to ash. When we left the next day we rubbed the ash into the ground and put the leaves back too for a little stealth camping. After next rain no-one will be able to tell we camped there.
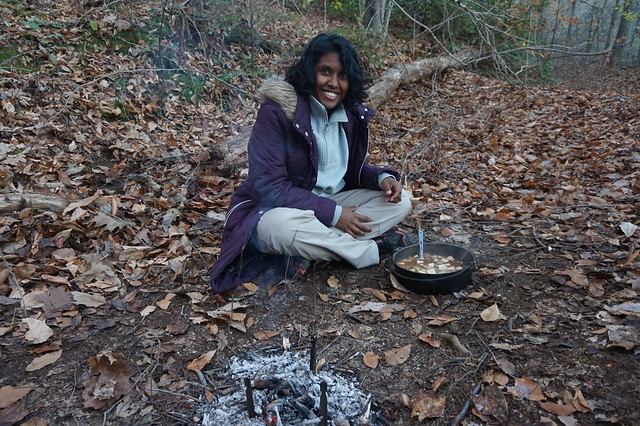
It was a little on the chilly side. It dropped below freezing both nights. The morning after these photos were taken we went up the ridge a bit for a hike and pretty ice crystals were growing out of the ground. By my figuring it must've been ~25F or colder up there, so it can't have been too warm down where we slept.
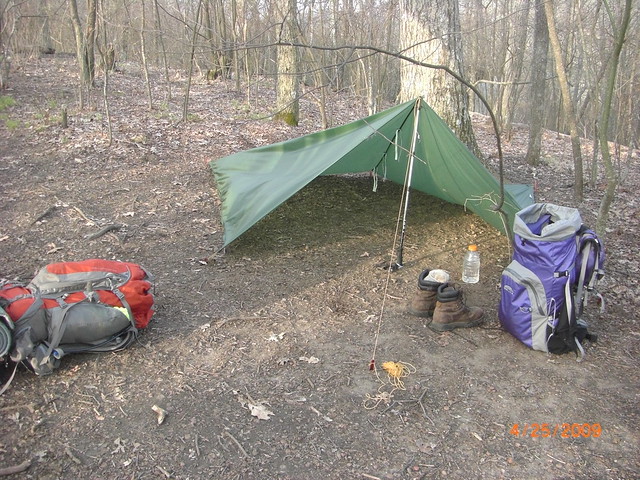
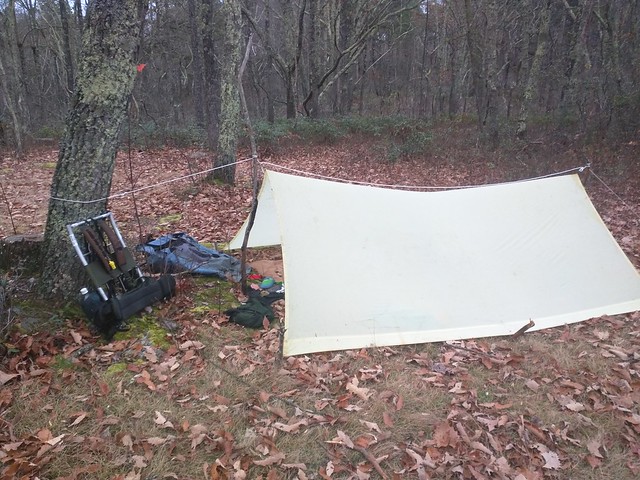
A good sleepingbag and a warm hat will do wonders though. Once my fingers got a bit too cold too play more guitar we slept snug and cozy, using a silnylon tarp in a cave pitch to break the wind. The photo below isn't from this trip, but it demonstrates a (rather poor) cave pitch to explain what I mean for handling wind.
After our hike the next day we went in to town and wandered Ashville, then found a site off a rather easier to get down dirt road by a nice river. Sadly I took no pictures that evening. We had a similar dinner, and as we had an established fire-ring that night, played with the fire most of the evening.
Linseed oil for homemade "oil cloth" - further experiments
2015-11-09
A while back I wrote this article:
http://www.blog.smalladventures.net/2015/04/diy-linseed-oil-treated-cotton-sheet.html
Since the tarp worked I decided to try some further experiments. I took this tarp and made it into a poncho. This involved adding a hood, and a way to fold up a flap of the fabric so it didn't drag on the ground, because the tarp is too long for my height. I then used a second sheet and made a new tarp. I planned to use the larger tarp as a shelter, and fabric to roll my gear in and tie to my frame. I'd then use the smaller one as a groundcloth and poncho. So, how'd it work out?
TL;DR Don't do it.
Making The Poncho
For the hood I approximately traced the hood for a silnylon poncho I have. It's a simple 2-piece hood, reducing the sewing. This is especially important because I hand-stitched the hood using full-felled seams. This is a method for making nearly water-proof seams in water-proof materials, by sewing a flat seam, then rolling it and sewing 2 more seams (so it's 3 lines of stitching for every seam sewn). Note how in the picture below the seam is not only full-felled but layered such that the water flows off the fabric rather than into the seam
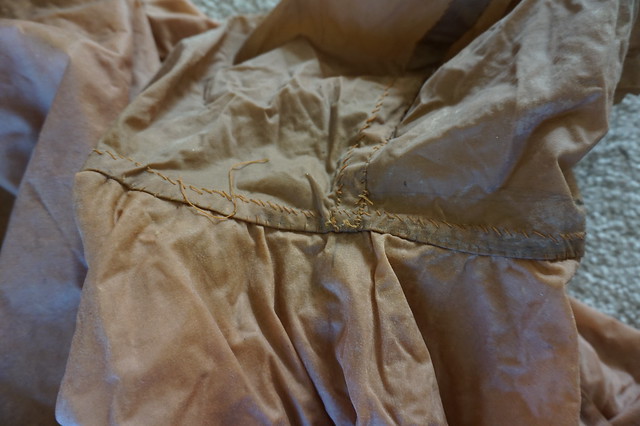
This worked *fantastically* and I ended up with a beautiful perfectly fitting waterproof hood. I was very happy with the fit
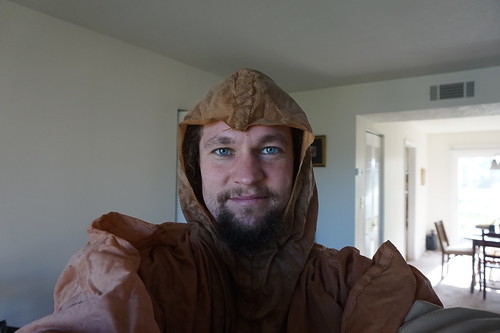
To make it actually fit I also added some buttons so I could button up the flap in the back. By putting the loops in the middle of the fabric and the buttons on the end it would still be comfortable to lie on.
Sorry the photo is a bit poor, but the flap is folded down from the top of the photo and buttoned, you can see the button on the right edge, and the center. These were made from sticks by just carving a notch in the stick, and tied on using linen. The button "holes" are also linen twine.
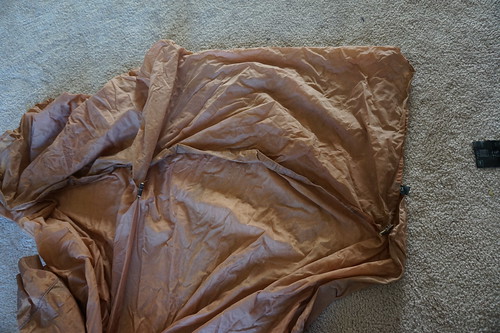
This made for a fairly wearable poncho... not bad. It still smelled bad, but I hoped that would fade.
Making the tarp
The new tarp is made from a 600 threadcount sheet I found at target for ~$18.00 if I remember right. Goodwill didn't have what I needed. It's a thinner sheet and as such absorbed less of the linseed and resulted in a significantly lighter tarp per square foot. It came out ~10'x10'. This seemed like a good size to test with, so I didn't bother modifying it.
I then simply sewed some linen tieouts to the edges and called it done.
Testing
I finished the tarp about a month ago. I forget when I sewed the poncho but I think it was last winter. Oddly, between that time and now I have basically not been on a walk in the rain. There's been some hard rain, but there was no point in testing it in a *light* rain, I needed real rain to even bother with it. In a sprinkle I've been wearing my 5.11 shirt over my icebreaker sweater for a couple of years now, and it works great.
Well, this weekend Angie and drove out to the forest, knowing it was going to rain, and I decided it was finally time to put this gear to the test. It was late, but we and I found some sticks, used a knife to carve stakes and hammered them in with the Axe. A bit if nylon rope and we had pitched the tarp. You can just barely see the poncho ground-cloth peaking out of the end of the tent.
It wasn't raining yet, so we slept outside (partly to avoid the smell of linseed). Later in the evening though it picked up so we moved in. Overnight it was rain, but light rain. It worked fine and we were snug and warm, no problems. I touched the inside of the tarp and it was dry.
There was a break in the rain when we got up in the morning so we lit up a fire (on the 3'rd try... using a sparker some some plant fluff I gathered previously) just as the rain hit again, and cooked up a sausage for breakfast. After breakfast we decided to go on a hike.
Angie went to shift her sleeping-bag so I could use my poncho and discovered that it was wet where it had been touching the tarp! Not like condensation either. You could see that where the tarp was touching it, the tarp acted more like normal soaked through cotton. The treatment had stopped water from traveling to the underside of the fabric normally, but if something touched it and wicked the water away it would happily keep whicking water through the fabric, soaking whatever touched it. This is classic behavior for canvas, but I hadn't expected it given the dry feel to the inside of the tarp.
Next I pulled out the poncho and put it on... after 10 minutes with it on, before we even left, I realized my shoulders were getting sticky! Ick! The poncho, even after hanging outside and curing for over week, and even where there wasn't too much linseed on it, near the center where it was just about right, had gotten sticky again when it got wet! DAMN! Given the behavior of the fabric on Angie's sleepingbag I was also convinced that it was unlikely to work anyway. All of this and both the tarp and the poncho still reeked of linseed smell.
Angie and I did go on our hike, I just wore my 5.11 shirt and sweater. It was actually raining, though not that hard, eventually my shirt soaked through and I was pretty wet when we got back. Not unhappy, but wet. We decided we'd learned a lot of what we had wanted to learn by coming out in the rain, and it was time to go home and work on how to make it more comfortable the next trip.
After the trip I was looking at the tarp more. The way it was pitched, with the middle low there was a band in the middle where it was a different color, here water was collecting and going through the fabric, then running down the inside... unlike the rest of the fabric. Also, we found a spot where there was a slight wrinkle in the fabric, and this was actually dripping slowly on to Angie's sleepingbag. Both of these are slow processes and not deadly at all, only allowing small amounts of water through very slowly, and steeper/better pitches will help... but I'm quite good at pitching tarps and I mean only a very very slight wrinkle.
Conclusion
Both pieces of fabric I've treated ended up with parts that stayed sticky and smelly even after a long time trying to get them to "dry". These spots are on the edges where the oil "flowed" to when it was hanging to dry. So, first up, if I ever use linseed again I'll paint it on, rather than soaking the fabric. This should help get a more even coat that dries properly and doesn't end up smelling as much.
Next, Linseed treated cotton is not usable in applications where it's *touching* something. It makes a usable tarp for shelter. The dripping noted above was extremely minor and I wouldn't hesitate to use down under something this waterproof in a multi-day downpour. That said, I'm fairly convinced that it would never make a very good poncho as it wicks water across the boundary. This is likely a property of most thin and lightly treated cotton fabrics, so it's something to keep in mind when figuring out the right fabric for any given application. Also, the smell and stickyness make it a non-starter for clothing in my mind.
I may try linseed again at some point, but I'm going to set it aside for now and try some other methods of treating cotton fabric that hopefully won't be as hard on my lungs, and won't stay sticky the same way.
71 miles in 72 hours
2015-11-09
This was a weekend through-hike of the Massanutten, a short trail here in Virginia. This trail is 71 miles long, running on ridges virtually the whole way in a loop around Fort Valley. Parts of it are flat, but it is fairly rough trail, often steep, and usually very rocky. Jess and I thought it might be interesting to try and do in a 3 day weekend. We weren't at all sure we'd make it, but wanted to try.
This is a rather long post. I broke it in to the preparation and the trip. I recommend reading the whole thing if you are planning a through-hike of this trail. The prep section is also probably interesting to anyone doing warm-weather ultralight backpacking regardless of region.
Preparations
It was supposed to be warm, but rain part of the trip, so it was the perfect time to finally rely on things I've been testing. Here's everything I carried but food, full skin-out. The following was written before I left:
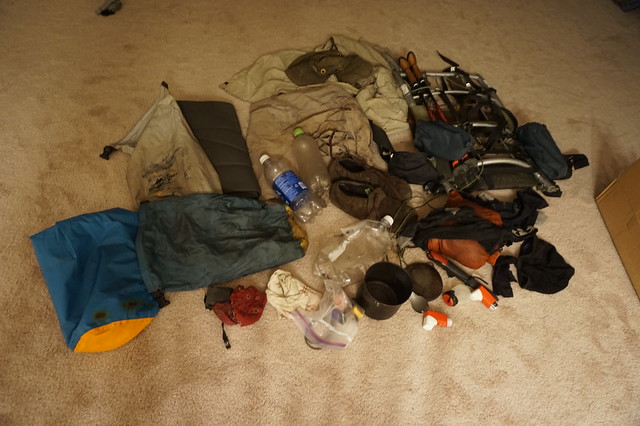
Backpack
- external backpack frame with belt, pockets, and water-bottle holders
- drysack for gear
- drysack for food
- string and grossgrain ties for tying the above to the pack
- Poncho-tarp
- heat-shrink groundcloth
- 50ft trip-teas line
- silnylon sack to hold the above
- 5F quilt (I don't own another option, pretty sure a sheet is heavier)
- drysack for the above
- 1/8" gossamer-gear sleeping pad
- compression shorts
- shorts (my compression shorts are too worn to wear alone)
- thin nylon long-sleeve shirt
- tilly hat
- 2 pair darn-tough socks
- runamocks (shoes I made need repairs first, so using these)
- Thin icbreaker skull-cap
- 2 plastic water bottles
- 0.9L titanium pot
- titanium spork
- belt knife
- headlamp
- salt lick
- polar pure iodine
- several "cheater stcks" for starting fires
- lighter
- sparker
- tinder and backup matches
- Pill bottle
- sewing kit
- perscription drugs w/ backups
- hiking poles
Note that I could reduce the number of items I'm carrying fairly easily. For example, I could swap my water-bottle and cookpot for a steel waterbottle. Or I could not cook and just drop the pot. But that would be heavier overall, and this time my goal is weight rather than minimalism.
The quilt is silly, but I keep going over options. Good sleep makes a big difference. A blanket is definitely heavier, even a sheet probably only about breaks even. A sweater and long-pants are probably also heavier. A 40F quilt would be optimal and probably drop a pound off my weight, but I don't really want to push one around, so I don't own one.
You'll notice I have almost no insulation here. I'm counting on it being warm and on not sitting around outside my sleepingbag if it does chill off.
The sleepingpad has 2 purposes actually. First and foremost, we may end up sleeping in a shelter one night. Some folks can sleep directly on hardwood, but I'm not one of them. Secondly I would stick to the groundcloth really badly making sleep difficult. This gives a comfy layer to lie on under my quilt.
I rarely hike with hiking poles these days. That said, they were a godsend on the AT. Occasionally my ITBS flares up when I do something stupid like try and hike 71 miles in 3 days when I haven't been doing 15 every day. The hiking poles will hopefully stave this off a bit.
Much like the hiking poles I haven't used compression shorts in years. I can usually make it through a weekend trip these days, even a high mileage one like my last trip, without the compression shorts. But I usually come home a little sore from chafing. It doesn't get too bad and I figure this helps toughen the skin up for a trip like this one. So when I do wear compression shorts, I can be confident I won't have issues.
I *could* get away without the Ground-cloth, but my sleepingpad is not all that large, and if the ground is wet I don't really want to spend time dealing with that (e.g. digging through leaves looking for dry layers, or finding something dry to lay down under my quilt). Long days of hiking mean making camp at night, and I want to be able to go to sleep fairly quickly.
Trip
We had a 3-day weekend, so we arrived on Thursday night. Around 7pm and hiked out. Jess brought Beau along. Beau had a pack and radio GPS collar as she was still being trained.
We aren't sure of the exact mileage we covered any given day, but the plan was to try and get 5-8 miles in the first night. Leaving us ~21 miles a day for the next 3 days of hiking. Our first campsite was in known territory. We had a little trouble finding wood in the dark, but we found and enough small twigs, and by lighting it and immediately starting to cook with it were able to make our Lipton sides for dinner. The rain had hit early, and we were only getting sprinkles. Jess' gear was similar to my own and we each pitched our ponchos as shelters and went to sleep.
The next day after maybe a mile of hiking Beau bounded by in front of us with no pack on! SHOOT! The harness the pack mounted to was still on her, but the pack had fallen off as Beau ran through the forest. The pack had contained the spare leash, her water bowls, and all of her food. We considered the idea of Jess bailing and taking Beau home, leaving me to do it it alone, but after taking stock of our food decided we would try running a little thinner on our food and letting Beau eat our food too. Suddenly our food was barely sufficient for the trip. To make her a water-bowl I cut up my spare water-bottle I'd intended to use as a bladder to make it through the longer runs... hoping I wouldn't need it.
We passed a bunch of runners. It turns out they were running the marathon that day, where runners run the entire 71 miles in <24 hours. They were near the beginning when we met them, only maybe 20 miles in, and a few even chatted with us a little as they ran by. We ran out of water, badly, up on the ridge, before we finally dropped down to a valley where we were able to get more. I was getting sick and light headed and so was Jess. We didn't have enough to spare to give Beau a whole lot either so she was starting to suffer from heat exhaustion. It was a slog, but we pushed through. Once in the valley we ate dinner by the water, sucking down water and cameling as much as we could for the next stretch. We then hiked into the night finally camping up on a ridge. We were getting near the northern end of the trail. That night I looked at my compression shorts and realized they had a big hole on them on the left side. I was near bleeding in that spot. I pulled out my sewing kit and repaired my shorts.
The next day we dropped down off the ridge at the furnace. At the northern end of the trail you have to cross between ridges so there's a lot of up and down for a while. Some of that trail is very rarely traveled so it's some rough going (the roughest spot we'd actually done the night prior though). Eventually though after quite a bit of climbing and dropping again we dropped down on to a smooth crushed gravel road. My feet were hurting a LOT by this time. The rock trails had bruised my feet up pretty badly in my minimal shoes, and every slightly poky rock hurt to step on, crushed gravel being no exception. We met a few hikers through here, and happily got more chances to fill up on water. After the previous day we were pretty paranoid and cameled at every water-source we passed.
We then climbed up the ridge and ran down the ridge for a long time. We'd been discussing what to do about this section for a while. As you're probably starting to notice, water is a problem on the Massenutten. We knew it was a likely problem, and that there was a drought on, but as it turned out the drought was bad enough that a lot of springs that are normally running were dry, same for small streams. So far we'd been on the west-side of the trail, where the stretches between water aren't that bad. Looking at the east side we estimated a potential for 30 miles without water.
Our solution was to drop off the ridge. So that night we took a side-trail and dropped off the ridge to where there should be water. This was extremely rough trail, really more bushwhacking than trail, but at the bottom we found a stream and a fire-ring. We cameled up again and cooked dinner, then hiked onwards. It wasn't until later that I learned that the mosquitos had been feasting on us and I was covered in bites. I was too tired and hungry to care... I wasn't miserable to be clear, my feet hurt, but I'd been having a blast so far, I was sore, tired, and hungry, but happy. We then proceeded with the plan, which was to walk down the dirt-road in the valley for a miles or 2, and then ride back up to the ridge. We were going to "blueblaze" as Appalachian Trail thru-hikers call it. That is, hike a side-route instead of the primary trail for a short time. The total distance was still farther than hiking the Massanutten the whole way, but it let us get water with only about a 1-mile side-trip, instead of the full 2-miles it would've taken had we gone straight back the same route.
That night as I was sizing up how I was doing I looked at my thighs. My chaffing was terrible, my left thigh where the hole in my shorts had been was healing, but I was soaked in ichor along where my thigh meets my butt-cheak, along the back and into my crotch. I had a line of swelling along each side. My feet were fine, just the normal blister I get on my forefoot where my toes meet. But my thighs were bad. I resolved to go without compression shorts and hope that worked better.
The third day was *grueling*. Some very nice folks in the 4-wheel park actually drove off and got us water from a spring they knew was still running about a mile downhill. Very sweet of them. They also told us that the Massanutten is sometimes called "the ring of fire" by locals, due to how little water was on it. Even with that water we were having to carefully ration. I started to get heat sickness. At one point I even started to feel aggressive/violent. I sat down and let myself cool down for a bit, and drank more water than I had to spare. My core temperature was too high, I *felt* hot and I like I couldn't cool off. The ridge we were on at the time was low with a higher ridge guarding it from wind, so the air was completely still, there was just no way to dump enough heat. Eventually I felt somewhat better and stood up... when we hit a stream I was so happy.
My highs were far better, not wearing compression shorts had resolved my problem. I'm still not sure if I would've been better not to wear them at all, I suspect I would've had other chaffing problems. In the future though I'll keep my eyes out for that problem. Otherwise though My feet hurt, I was walking awkwardly due to chaffing, like a bowlegged cowboy. Wincing every time I stepped on a rock slightly wrong.
Oddly though, after we dropped into a valley and went up the next ridge, we both felt... fine. As the temperature fell and we got near the golden hour, suddenly home seemed near. I hurt, but I was having fun again. The last 6 miles still hurt, but it was a happy hurt. We finally hit the car at about 7pm, the same time as we'd left on saturday.
Conclusion
This was a blast. It was at the edge of what I could do, and I used a lot of skills and tricks to make it work. Had I not known how to start a fire in the rain, known how to ration my water carefully, how to keep from getting hyponatremic, had the skills to walk on rough terrain in minimal shoes, had at least a clue how to manage my chaffing, known my gear well and just what my body could do, this trip probably would not have worked, and we would've ended up bailing. As it was I had fun almost the entire time, despite being sore, tired, and hungry, there were probably 6 hours or less when I was miserable and just pushing forward anyway.
I felt like a wimp actually when I was done, some people did this entire loop in 20 hours, on the same weekend I was hiking it! But always remember that other people are not you, just because another person can do more takes nothing away from accomplishing something yourself.
old post: Cut up a tree by hand
2015-08-27
This is an old post that for some reason I never published. I don't even live at that house anymore, but I think it's a pretty interesting post particularly for anyone considering cutting wood by hand:
A while ago in
http://www.blog.smalladventures.net/2014/11/cutting-wood.html
you might recall that I felled a tree with an axe, and was bucking and splitting it for firewood using only hand tools.
Well, I finally finished today. This tree was oak, dead but not rotten, and mostly heartwood. The standard way to measure a tree is diameter 4' off the ground, and by that metric this tree is probably about 2.5ft. In short, it's a pretty damned big tree.
I've lost track of the hours spent cutting this tree. The upper branches were rotten and useless, so I only chopped up the trunk, which is actually the hardest part. From the trunk I'd estimate that I got about a half-cord, though I burned some before I was done, so I don't know for sure. That trunk took about 15 cuts to buck in to 18" logs for our fireplace. If you're careful about your fenceposts that comes to around a 25 foot log, which sounds about right. Earlier I said it took about 30 minutes a cut. Optimally cutting time ought to be proportional to the surface area of the end of the e.g. piR^2, in reality it's a bit worse as the log grows, because saws work most efficiently on narrower cuts (this is why a saw with more bow to the blade is almost always a good thing, mine has fairly little). At the time I measured I was cutting the narrow end, on the wide end I'd say it probably took more like 1 hour. So. lets call it 45 minutes per cut. Add in 10 minutes to split, 5 minutes to futz and shift things, and we get about 15 hours, add in 4 hours to drop the tree, 4 hours to drag the tree around and get it off the drive, probably another 4 hours spent rolling the thing around to position it for cuts, 4 hours sharpening the saw, and we get something like 30 hours total. That's still ignoring all the breaks I had to take. Those are all vague numbers, just to try and get an idea. So order of magnitude is probably about 40 hours, or about a week of work.
Overall that rate of cutting isn't bad, but way below what the old guy across the street from me said he accomplished in the CCC. In the process though I've gotten to the point where I can actually buck and split 2 rounds a day without hurting myself. This means that given a week at ~3 hours a day I might be able to cut 1/4 of a cord. That's okay, but not going to cut it if you live in Maine. I'd say that people just used to work really hard, but somehow they used to pull this off while feeding their families and without hurting themselves. So, I'm sure that I'm still missing something that could make me hugely more efficient. So what could that be?
- One major issue is that I'm cutting a dead log. Cutting deadwood is MUCH harder than cutting green-wood. Each stroke of my saw is pulling off a few fibers, where each stroke of a good bucking saw on green-wood pulls out long beautiful strips of wood. I'm pretty sure this is the largest factor.
- Another problem is almost certainly that I'm still learning to sharpen my saw. I know that I under-sharpened it because I was nervous and didn't want to wreck it. Next time around I hope it comes out a bit better. For dead oak I think I need slightly more aggressive fleem angles so it digs in more, and for sure I need to make sure there are no flat spots. Undoubtedly learning how to properly microbevel this tooth pattern would also help.
- I grew up splitting and wood, and learned to fell fairly young. I did some bucking as a kid, but working entirely with very dull saws that I didn't know how to sharpen. I think overall my bucking skills still have some way to go to catch up with my splitting, for example.
- I'm cutting a pretty big tree, and using a single-man saw. 2 man saws are significantly more efficient especially on larger trees.
I'm not going to quit cutting wood by hand. I want to keep getting better and someday be able to actually cut a full winter's wood. But, that said, the next time I really need to cut a large quantity of wood I may give in and use a chain saw. It feels really good to cut wood by hand, but it's hard to say that feels better than being able to cut all the wood you need by yourself.
The settlers dropped trees like this all the time, but there's a reason the crosscut saw had nicknames like the "misery whip". No-one likes crosscutting. It's hard hard work. American Indians simply wouldn't cut a tree like this, if they had to they'd burn through it. That's how much harder larger tree are to cut than smaller trees. Over about 6" across they just get really really difficult
Still... It's great to finally have that tree completely off the driveway and know that I did it all with tools available 200 or more years ago.