
Moving and stuff
2015-08-27
I know I haven't posted in a while. I'm in transition right now, with a lot fewer opportunities to get out and do neat things outside. I moved out of my cool house in the woods because I didn't want to sign the lease for another year, so I'm temporarily living in an apartment in Waynesboro VA while I look for an awesome place to live. I did get a good test of my trailer on the move, and I found that I really like it.
Although I haven't been getting out as much as before that's not to say that I haven't been doing anything. I'm dating a wonderful girl. The two of us went backpacking last weekend, and covered a LOT of mileage. I estimate at least 18 miles saturday and again on Sunday, and another at least 12 on Monday. We didn't bring a camera though so no post is coming. I'm also planning a blitz of the Massanutten trail for weekend after this one, it'll be interesting to see how that goes.
A couple of weeks ago I helped a friend who owns a small meat farm slaughter and butcher a bunch of chickens. That was pretty interesting. This is a very small family operation and we of course did it as quickly and humanely as possible. Butchering any animal for sale was new to me, and it was interesting to learn what people care about.
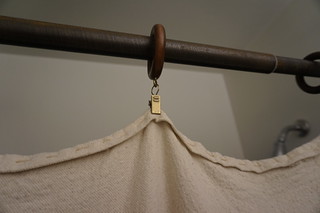
Moving into a new place is always a bit of an adventure. There's all sorts of little things you need. I needed a shower curtain but just couldn't stand the idea of getting a plastic one. But I had part of a cheap canvas drop-cloth I bought a while ago for my MYOG backpack experiments. So, we hemmed it while watching a movie and hung it up with some rings from home-depot.
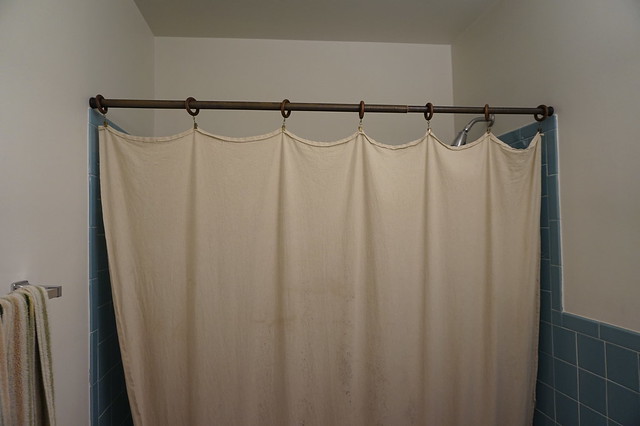
The rings cost cost ~$8.00. A plastic shower curtain would be cheap, but this makes me so much happier. And when I throw it away it'll actually decompose.
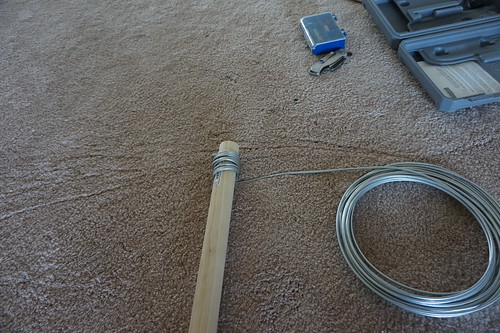
I also wanted some large S-hooks due to how the closet here is set up. S-hooks this large were ~$3.00 each at home-depot. That's just too silly. So I picked up a coil of wire instead. I then drilled a hole in a dowel I'd purchased as a curtain rod. Sticking the wire in the hole in the dowel I rolled the dowel along the floor (this is actually a lot of effort with wire this thick), using the dowel as a mandrill to make rings. I learned this trick originally from Lizza, who taught me how to make chainmail. Hat-tip to Jess for suggesting drilling the hole.
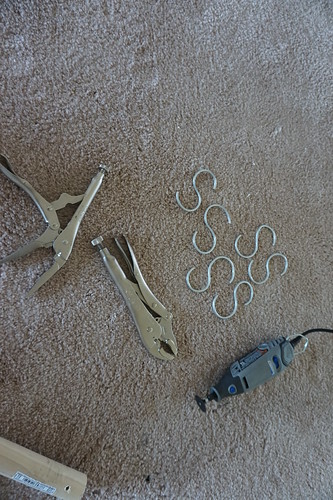
I tried using nippers and sadly put a giant dent in the jaws of my nippers. Damn, Luckily I got them for ~$3.00 at a garage sale or I'd be more upset. So I broke out the dremel and used the cutting wheel instead. Once I had the "spring" free I then used plyers to open up the last coil on the spring into an S-hook. Then used the cutting wheel to cut it off the the Spring. Repeat. I found it easiest to do about 6 at a time, just because the spring was an easy to work with size that way. The wire was ~$10.00 for the roll, and I've used a tiny portion of it. Though I probably used up another dollar or two worth of dremel cutting wheel.
So, life is moving along. Always learning and playing. I hope to report some good outdoor adventures in the not too distance future!
Buckskin shorts
2015-06-22
If you recall, a while back I finished tanning a deer hide.
http://www.blog.smalladventures.net/2014/05/brain-tan.html
. That was actually the second hide I started, I did some of the work in parallel, but I only just smoked the first hide I started maybe a month ago. This hide required something like 14 days of water-soak before I could scrape it, and (admittedly not knowing what I was doing) it probably has 10 days or more of working the hide trying to get the glue out. This was an extra-ordinarily dense hide.
So, this hide is perfect for making in to a pair of shorts!
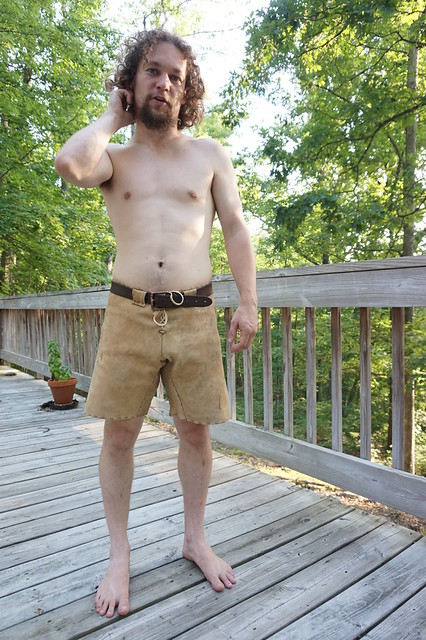
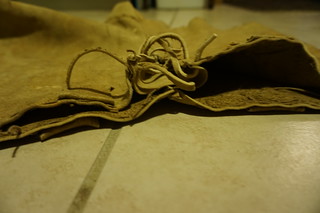
About 3 days total of work, and I have a pair of wonderful shorts. I had an antelope hide that I tanned using a slightly different method as part of a class a while back, it's full of holes and not very useful so I actually cut the lacing I used to sew the pants together out of that.
To make these shorts I started by tracing a pair of commercial shorts I have that fit me well. I particularly wanted to something with a comparatively snug fit, given buckskin's tendency to stretch. This pattern had a gusseted crotch, which I generally like, so I figured the pattern had the best chance of working if I just went with it.
The seams are simple welted seams (I considered other options but this just seemed best for my first pair). To handle the fly I sewed it halfway up the front. When I tried it on and fiddled I realized I'd end up with a bit of a "pouch" in the front, so I pulled that seam back out, cut off a bit more material and sewed it back up. That was my bit of custom tailoring :P.
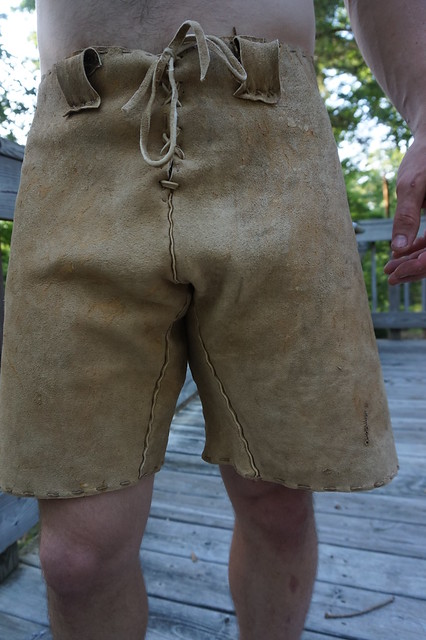
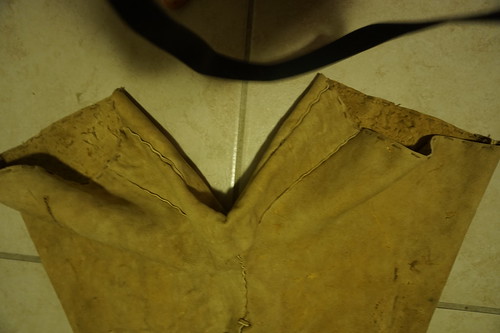
Behind the lacing you see in the image above there is an extra triangle of fabric, made from a really thin part of the deer like an armpit. That fabric is sewn in such that the lacing holes don't actually go all the way through the pants. It's hard to describe but basically the edges of this triangle turn back inwards and are sewn to the main fabric.
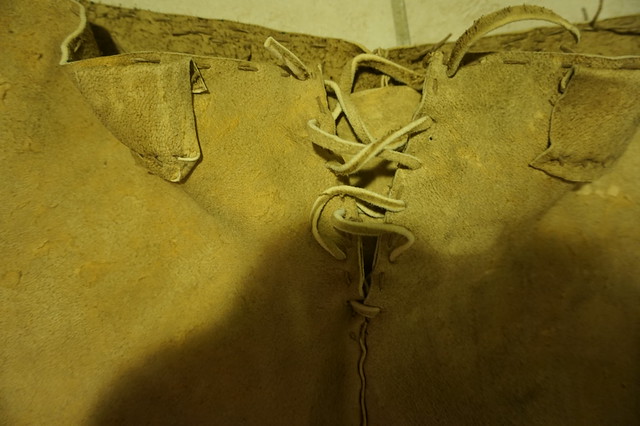
This has advantages for modesty and comfort both, while still letting the pants open up enough to pull over my not insignificant rear.
Now, onwards to the technical details.
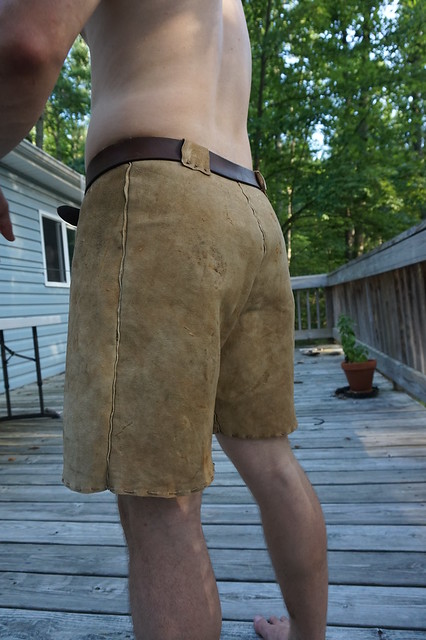
Working with buckskin is pretty interesting. It is very difficult to tear, and doesn't fray at all, but it stretches easily. I carefully laid it out so the rear was the thickest part, which on this particular hide is up near the neck area. The front is made from the rear end of the deer The gusset is made from a middling weight part of the hide. As mentioned above the extra flap behind the fly is an extra lightweight piece.
The lacing is cut about as thin as I could, from already thin bits.As mentioned earlier I used an antelope hide that wasn't otherwise super useful..That lacing was then wetted and stretched by squeegeeing out the water. This prestretches it so the lacing won't stretch too much once everything is sewn up.
You may notice looking at the shorts that there's a line of stitching around the waist, as well as a line around each leg. Since it's prestretched these lines keep the fabric from stretching out of shape so it doesn't fit right.
This is my first piece of buckskin clothing, so I got quite a bit of help and advice from Jess on various aspects like prestretching the lacing, using welted seams, etc.
Bantu
2015-05-06
I can't call this experimental archaeology, because the Bantu Pigmi and Baka people are using this trap today, as I write this post. So, I'm going with experimental anthropology ;-).
Everything I know about this trap I learned at Rivercane Rondezvous from Todd. Unfortunately, I forgot his last name, but he is the one who went to Africa and learned this trap from the Bantu. So, first credit for this trap goes of course to the Bantu and Baka. Credit for coaxing this information through too many translations, cultural barriers, etc. is well, the Bantu and Todd. I just made a crude replica and took a few photos ;-).
Sorry if I use a term which is not the most culturally sensitive. Since Todd talked with these people, I'm taking all of my cues from him. Todd taught this trap for the purpose of sharing it, and to protect the knowledge from loss in the event of a complete collapse of the Bantu and Baka. I figured the best way to honor that is to share it as widely as a can. So, this post is my attempt to share this trap more widely.
Note that if you try and set this trap the spring-pole is quite dangerous. Get down with your arm over as you're setting the trap so it can't spring up and hit you in the eye. This was very very important to the Bantu people who taught it to Todd, as apparently a number had lost eyes to this trap.
The Trap
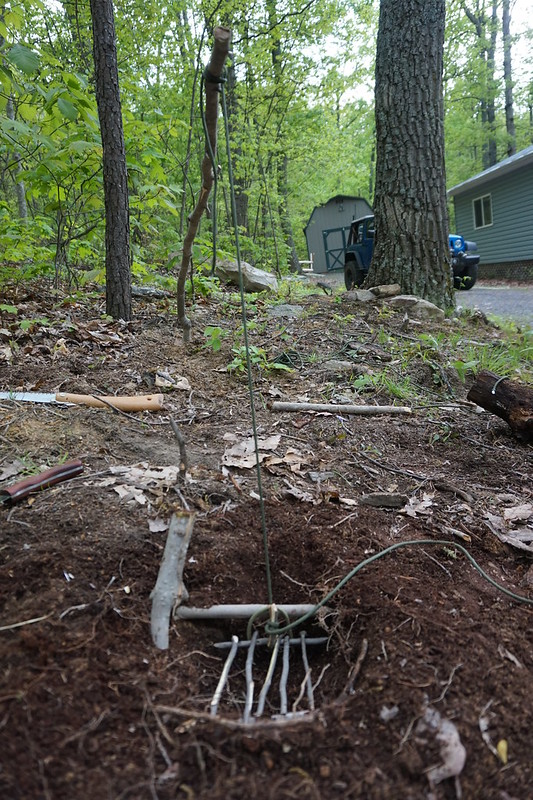
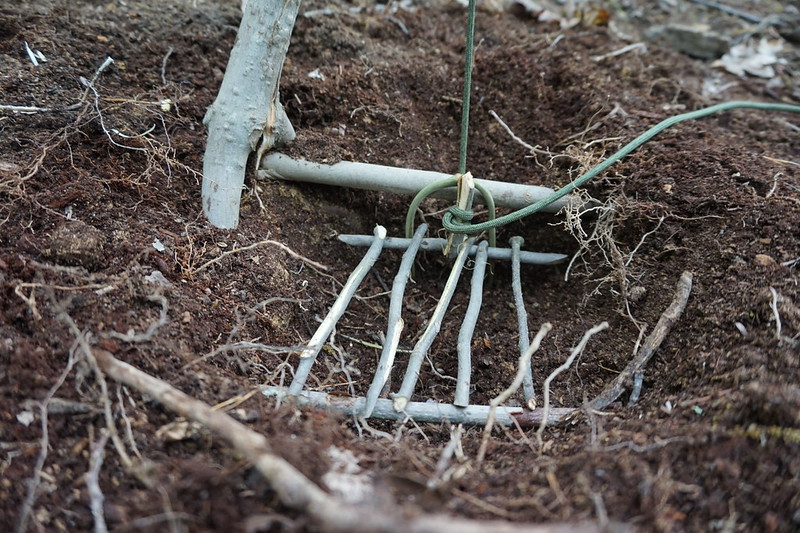
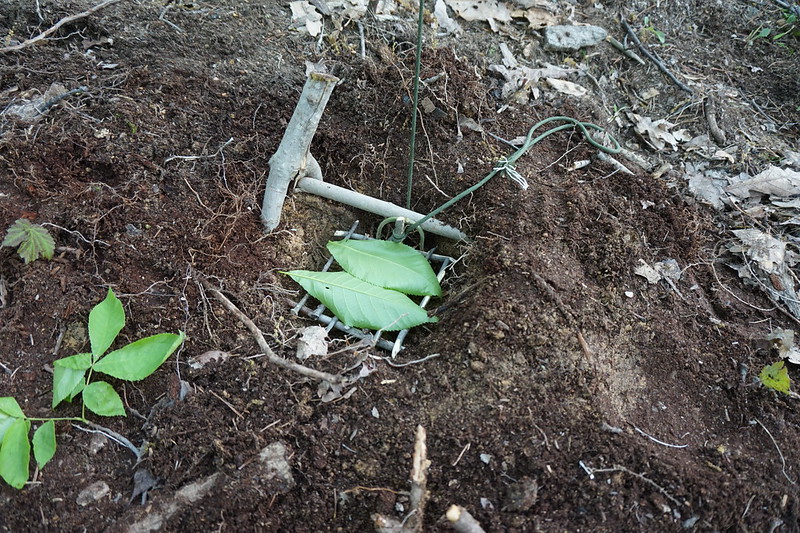
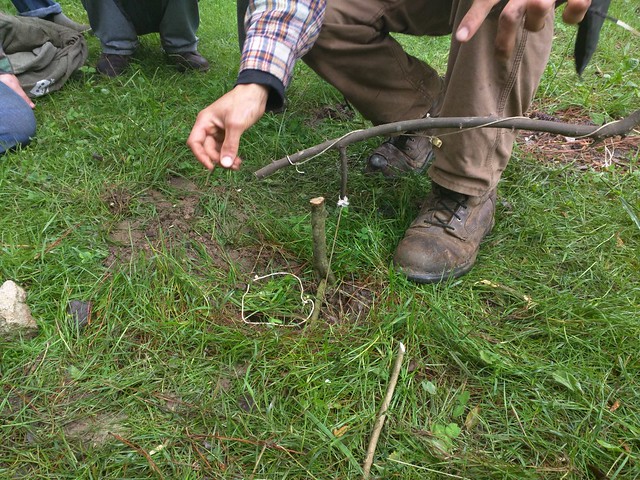
So, there's a springpole (as in the first picture) with a piece of cordage running down to the trap itself. Here's a closup of the trip mechanism.
The cross-pole is pushed in to the ground on one side, and held down on the free end by a forked stick. One side of the fork is long and driven in like a stake, the other can be short. You can see in this photo that I accidentally split mine, but it was holding so I went with it.
That cross-pole is the basis to support the load of the spring-pole. Next we take something very slippery, bend it and stick it in just in front of the pole (held in place by it). I used greenbrier here, same as Todd did, but obviously they used something else in Africa. This supplies a slide/support for the cross-stick that acts as the actual trip for this trap. This is the end of the non-mobile components of the trap mechanism.
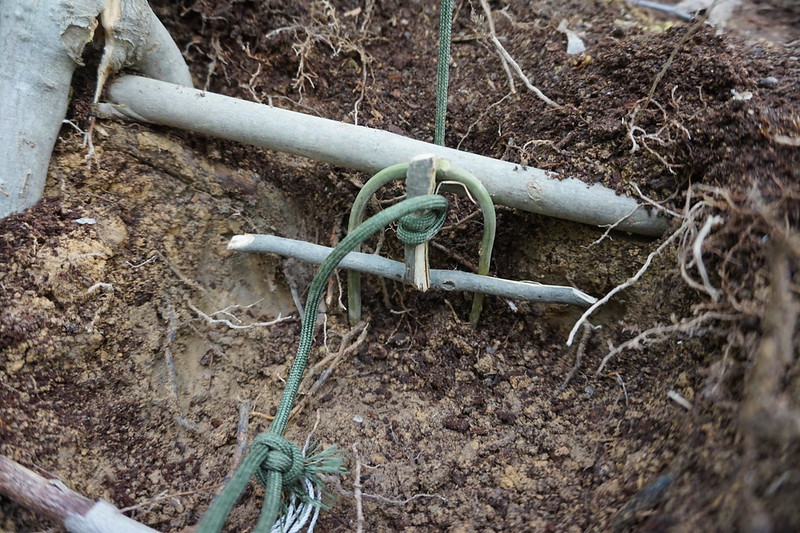
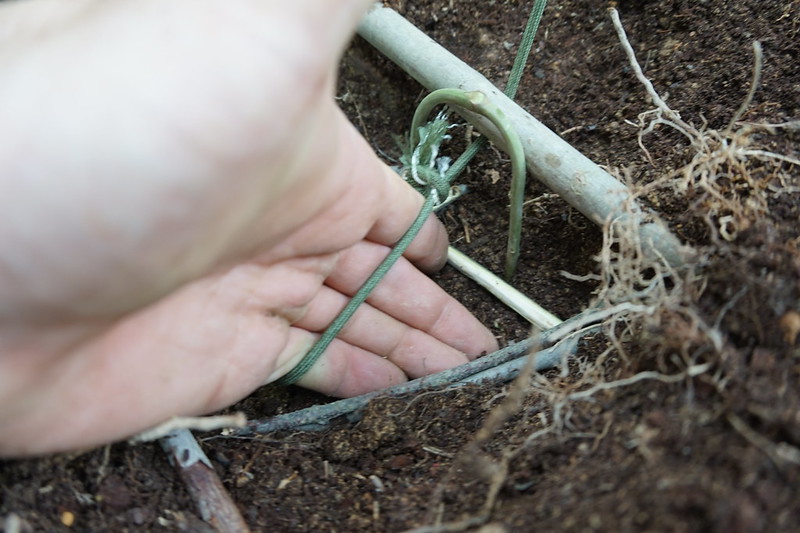
The cross-stick or trigger-stick is held in place by pressure from the toggle. The back side of the trigger-stick should be slippery as well, I removed the bark from that side in the trap pictured here.
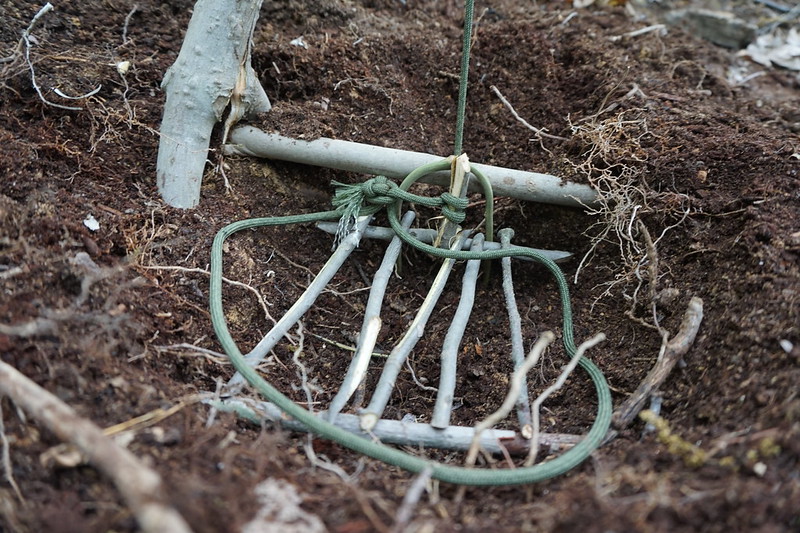
That's the basics of the trap. Now we use that trigger stick and use it as the support for one side of a trigger plate built out of cross sticks (the other side is immobile). As pictured below.
In a real trap we would then cover this with some leaves and sticks disguise it up most of the way. Then as the next to last step we would spread the snare. I'm leaving out all the disguising in the following photo to make everything easy to see
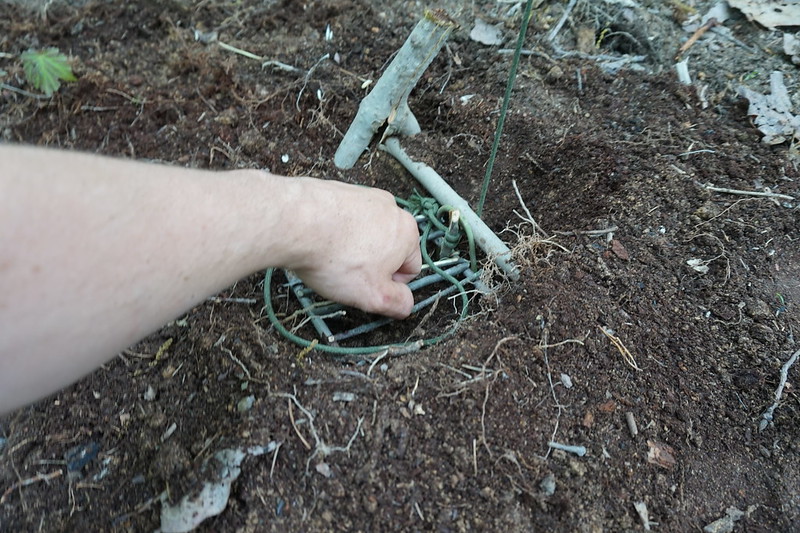
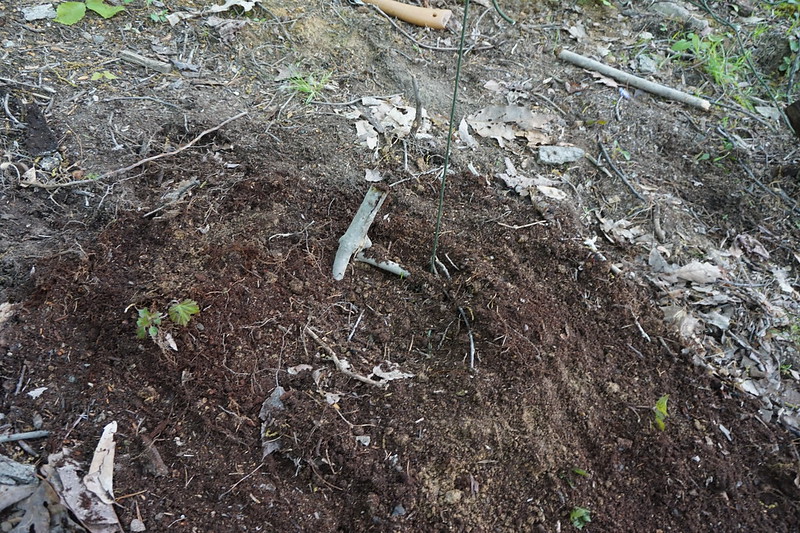
The animal steps on the foot-plate, that slides the trigger stick down releasing the toggle. This allows the spring pole to snap up, closing the snare on the animals foot. Here's what tripping the trap looks like.
Lastly, here's a couple pictures of my very poor and rushed attempt to disguise the trap.
Any real trapper sets their traps over and over and over again, and thus practices making it look just perfect so nothing will suspect there's a trap there at all. If anything you want to make that spot of ground look like a slightly better spot to stick your foot than the areas around it.
The place he visited is a National Park technically, where these peoples are living. Hunting there is apparently not legal technically. Their societies (especially the Bantu) are living on the edge right now. Every hunter has secrets they will not share. Todd suspected that they never showed him one of their actual sets, because then they'd be giving away their trap location, and that means another person (frequently from the same tribe) could check that trap and steel their catch. This is one of two trap sets they showed him.
This set is used in favor of extremely large deadfalls that had been used previously, for trapping large game, as it is safer for the trapper themselves. In theory, if you could drive the pole far enough in, or used a well rooted tree it could keep the animal from breaking even relatively weak twine by being unable to shock the cordage. Todd believed that these peoples lacking sufficiently strong twine or a way to anchor the poles, but were good enough trackers that an animal with a pole hanging off it's leg was a done deal, and would simply track the animal down and kill it.
Note that I used a separate tree-branch, despite the anchoring advantages of a normal tree. This trap would be set multiple times. Todd explained that the dead tree-branch stuck in the ground won't take a set as badly as a standing tree would, thus using a dead branch stuck in the ground actually increases the traps working life. This is particularly useful since this trap will sometimes trip without catching an animal.
This is one of the most elegant traps I've ever seen. It's not as simple as a promontory peg, but it's only a little more complex than a Paiute dead-fall. Like a Paiute dead-fall it's extraordinarily easy to set. You can get very light set on it and still set the trap quickly and easilly without having it trip on you as you're working. In practice I would guess that because it's a foot trap you don't actually want a super-light set on this trap anyway, a little stiffness will help make sure the animal commits their weight to the foot before the trap trips. I didn't check with a scale, but I'd hazard that the plate pressure on the trap pictured here is a bit on the light side for a fox actually, if you wanted to get picky.
Like any primitive trap it takes making a few before it gets easy. I struggled to build this trap, but it is the first springpole trap or snare I've ever built. It's also the first primitive foot-plate trap I've even seen.
Green Brier salad
2015-05-04
Food photos!
Everyone else does it, I guess I can't resist.
At the gathering Jess and I learned that the new growth tips of greenbrier are tasty in the spring. Well, on Friday evening I decided to try it. I went out and picked a bunch. Since I was picking greenbrier anyway I figured we could have it with some roadkill venison and have an all local gathered meal. This was our first time eating green brier in quantity, so we kept it as a side-dish.
As it turned out Jess' brother was coming over, so Jess picked a bit more green brier and made some mashed potatoes to bulk it all up. I enjoyed the dinner greatly. Sadly, it seems that I gave her brother one of the tougher cut of meat, but he still liked the flavor. Jess mixed up a salad dressing with a bit of honey, olive oil, and vinegar.
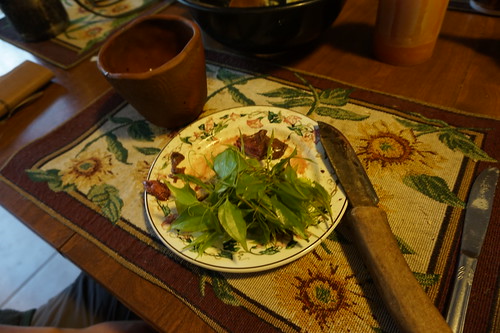
I forgot to take a picture until we were almost done it was so tasty, here's Jess' plate. As a bonus Jess made the cup in the photo, and fired it in an open wood fire. The knife was made by a friend, acquired by trading a softened but unsmoked sheepskin.
This evening Jess wanted to try another dish using the greens as the primary bulk of the meal as she was craving veggies, since the side-dish went over well. she picked a bunch of green brier (I helped her pick just a little more). I went on a mountain bike ride today, so was a bit hungry so we bulked it up with some store-bought green-beans after picking out the easy to get to briers right here. Then we made my family's spinach salad recipe. We fried up some bacon, used some balsamic vinegar, sugar, and salt mixed with grease from the bacon, and poured that over the greens. We were quite happy with this for dinner, lots of electrolytes and vitamins.

Again I forgot to take pictures until we were almost done eating, but at least I remembered at all! The bowl in this photo was made by Kempy, a good friend of ours.
Backing up a bit, the challenge with wild greens is finding sufficiently *bland* greens that you can use them for the base of a salad. There are TONS of tasty greens, but most of them are too spicy, strong, bitter, or whatever to use as the primary base of the salad. Such greens are super delicious in small quantities, as a garnish, but you wouldn't want to eat a ton of them, you're likely to get too many vitamins to be healthy, and it's just not tasty. Green brier on the other hand is extremely mild, and a bit sweet, making it a perfect bulky base for dishes like spinach salad, where the greens are completely raw.
Tasty!
Rivercane Rondezvous
2015-04-29
Directly after the SAR conference in southern VA, Jess and I continued south toward Georgia (stopping for a night to sleep at a nice trail-head in her truck Jane). Actually, as it happened we ended up in Damascus, a town neither of us has been in since we hiked through it on the AT in 2009, and hitched to and from 2 weeks prior to go to trail days, a big backpacker party held there every year. Anyway, it was nastalgic and fun to drop by again.
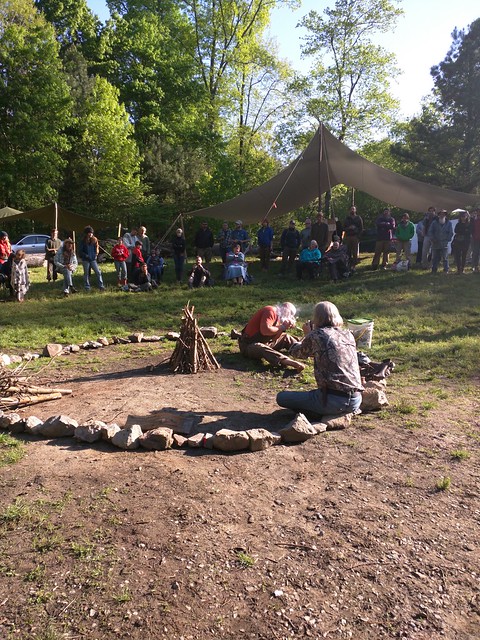
Anyway, onwards we continued to Rivercane Rondezvous. This is a primitive skills gathering, actually the oldest continuous running primitive skills gathering (this was it's 30'th anniversary). I went to it's sister gathering Falling Leaves in the fall, run by the same EarthSkills folks. I saw a couple of faces I know from the west coast gatherings actually, a lot more I met in the fall, and met plenty of new people as well.
(Two brave people start the main fire with a bow-drill in front of the whole camp)
As we've mentioned before, these gatherings focus around primitive skills generally with two different ideas in mind.
One is to understand how people used to do things, by trying to do them yourself. This is called Experimental Archaeology. If archaeologists often find tools and come up with theories for how those tools were used. Surprisingly these theories are rarely tested by actually trying to do it, and seeing if a) it works and b) it leaves the same marks on the tool or whatever the tool is used on as the historical artifact. People 10,000 years ago were no dumber than us now (probably smarter actually), so you can bet they found reasonable ways to solve their problems. This can be a pretty interesting aspect as people fiddle and around and try and figure out how things used to be done.
The other is simply to actually do them. Many people who come to these gatherings have an interest in gaining the skills themselves, keeping them alive, passing them on, and actually using them. I'm fascinated by experimental archaeology, but for me it's mostly a secondary.interest compared to understanding how I can actually do things now. The two naturally feed in to each other of course, if we can't get the tool to work the way we expect quickly and efficiently now, it's pretty reasonable to assume we've missed something, and chances are they had a good method so if we can figure it out I'm pretty interested in using it now.
Hickory day
I've made 2 bows in the past, both from bow-staves someone else cut and split out of a tree. The first class I went with was on felling and splitting bow-staves out of a tree. They had already dropped the hickory tree (something I've done before), but we talked about that some. Particularly safety, and how to choose the right tree both for the ecology of the forest so as to make the forest healthier by cutting, and for making good bows. We talked a lot about the way to split the wood so as to maximize the good bow-staves we get out of it, and then actually split them out.
There was some wood left though that was no good for bow-staves. So that afternoon I decided to use it. I went back. Using a folding saw and an axe I cut out two hickory splitting wedges. I then used those to split out some short tool handles for some hammer and hatchet heads I got at a garage sale a while back.
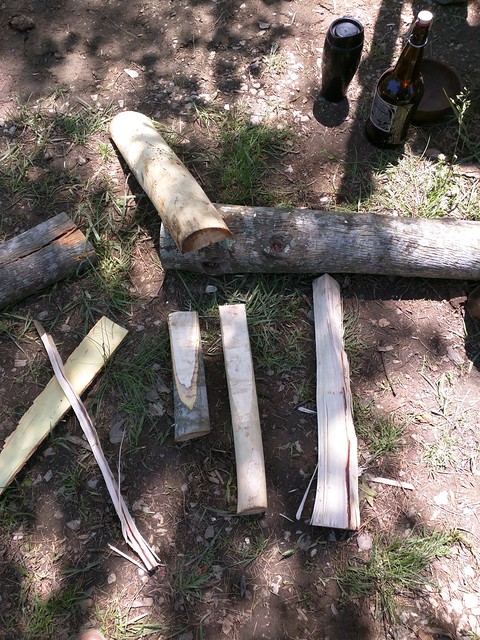
I'm letting those handles cure now, but there are few things more satisfying than going in to the forest with an axe and saw, making the other tools you need, and leaving with tool handles.
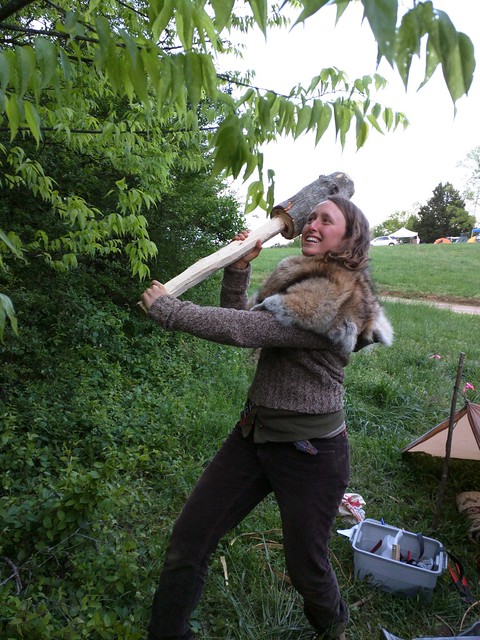
I also grabbed another hunk of tree to make a sledge. It's quite dangerous to hit metal with metal, and always better to hit metal with wood or wood with metal if that can get the job done. For this reason wooden hammers are really useful (also, they are free). So since I had a tree sitting there, I decided to make one. Here's a picture of my lovely friend posing with it (not quite complete) and a coyote fur.
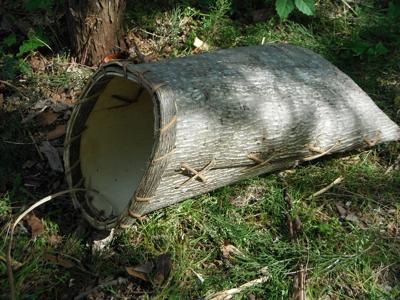
Well, I had to pull the bark off the handle to make this, and hickory bark is extremely useful flexible stuff, so I took this and bent it to make a basket. After 3 attempts at this (and 3 chunks of mucked up bark) and a little advice from others, I finally got it to work. I then took some long pieces, peeled the outer bark off, them, and used the inner bark for rings inside and outside the top, too bind those rings in to place, and to sew up the sides. Sadly I didn't take a picture of it though, and I traded it away at the trade blanket the next evening, so here is a picture of a similar basket I found online... Sorry to whoever owns the photo.
If you haven't gathered this yet, hickory is a really cool tree, being a great wood for bows, handles, baskets, and bindings.
The hickory basket, the splitting, or the sledge could all be individual posts, and may be eventually. There's a lot to talk about there.
Plant walk(s)
We had a super cool guest come to this gathering, Samuel Thayer. Jess and I have long been fans of his edible plant books, and of the 5 or so books I kept while living in the truck, two of them were his, so it was quite exciting to go on a plant walk with him. We were both fan-girling and squeeing a bit OMG!
I learned a bunch of new plants. I wasn't aware, for example, that you can live off of slipper elm bark! Crazy! Green briar tips are delicious. Mulberry leaves are tasty when young. False nettle is delicious. The best part of bur-dock root is the middle third. Etc. We also bought some delicious dark maple syrup from him... awesome!
Sharpening
This is embarrassing to say, but I didn't know how to sharpen knives and axes before this gathering. I *thought* I knew, but the simplicity and speed with which a friend and instructor taught me to sharpen tools was amazing. I just ordered a new set of diamond stones, and I'm really looking forward to having all of my tools perfectly honed and stroped. Maybe I'll write a post about sharpening at some point. I screwed up while trying to split out some wedges for wedging handles in to tools and buried my wonderful gransfurs brux axe in the mud, UGH! He had it sharper than it was when I got it in about 5 minutes.
Tracking
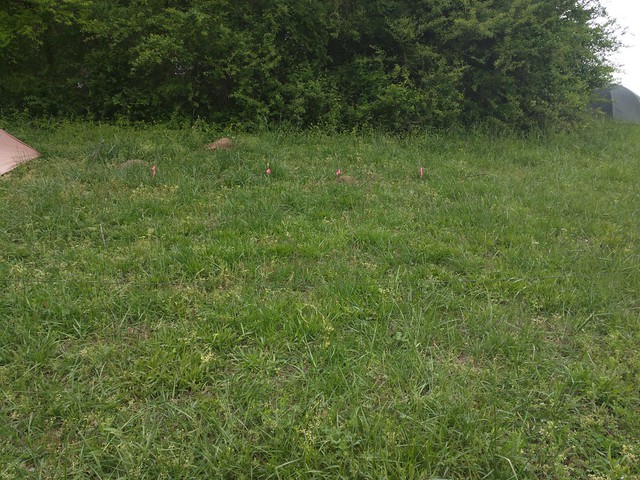
In my last post I talked about track aging, and how I wasn't as good at it as I wanted to be, so I decided to practice. I boxed off an area so others wouldn't step on it, then layed down about a track a day, tracking exactly when I layed down each track, and the weather. This way I could go back and stare at the tracks and try and set in my head what tracks of various ages look like after particular weather patterns, at least for this particular soil and vegitation. It was really really interesting. If you look hard you can pick out the ping tracking tape I tied to the sticks at the first print of each track. Each print was marked with a stick at the heal for the whole track, so I can find them again easily.
Tree Climbing
One of the instructors trims trees as a side-job sometimes. I happened to wander by and saw their climbing setup that was basically a mitchel rig using prussiks. I had to break out my frog rig using prussiks and share how that worked. He then taught me how to ascend into a tree using only 1 rope and no other gear at all.
Traps
One of the instructors had recently been to Africa, hanging out with the Bacca and the Bantu peoples. Despite problematic language and cultural barriers he learned 2 interesting trap sets that no-one in the US seemed to have ever seen before. One of them in particular is amazingly simple and elegant allowing these people's to live trap animals as large as deer without dangerous deadfall traps. It's elegance rivels the promontory peg or the Paiute dead-fall trap. Amazing!
This trap is based on a springpole. I don't think this information exists on the internet at all, so I'll try and do a write-up of this trap sometime soon, maybe I can make a set and take really detailed pictures of it. .
Shelter Building
I took a class in building a debris shelter. I was hoping to pick up more tips on sleeping out without gear in colder weather, e.g. below 40F. It turns out the instructor hadn't done this. Still, we built a debris hut and I picked up some tricks to help keep a debris shelter dry enough to really sleep in, like keeping the sticks you lean against the main limb from going above that limb, so they don't catch rain-water and funnel it in to the shelter. Sadly, I didn't get quite enough leaves on it to sleep in it in the rain-storm that followed as there were other things to run off and do by then, but I'd be a lot more confident trying it now..
Music
In the evenings people would party, dance around the fire, and play music. I had my guitar and had a great time jamming with various folks. Jamming has never been my strong suit, but you've got to learn somehow! It took me a while to find the spots around camp with the right vibe, but it happened eventually. It'll be easier next year.Awesome awesome people.
Tree down, OH NO!
This hickory tree fell on a friend's camp, and on their tent, in the middle of the night! As luck would have it they were out of the tent right at that moment, and they weren't killed, but it was scary. Amazingly the tree looks perfectly healthy. The camp at large harvested the tree for wood and bark, as it was a wonderful... ah... windfall if you will.
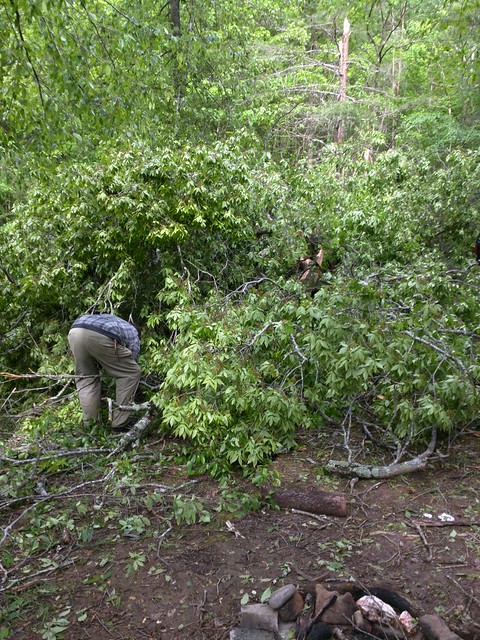
Jess and I have some bark in the garage that we harvested off of it actually, for doing bindings on projects in the future. I'm really glad my friend was okay.
More pictures
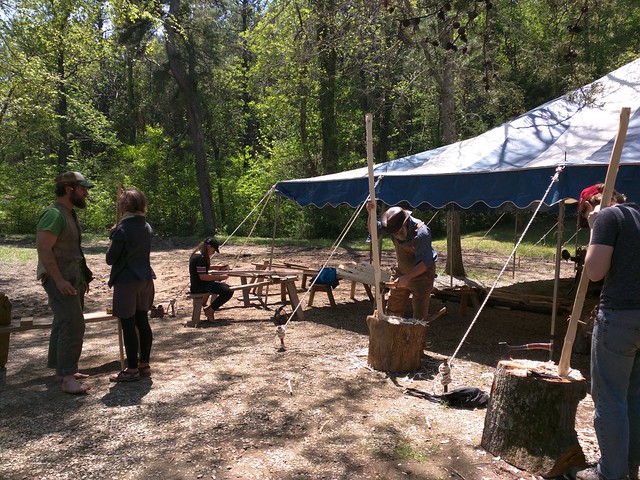
Here's some folks carving bows from bowstaves
The big field near the entrance. That TeePee in this photo was made by the owner, who's also an instructor. She taught me a bit about TeePee Poles, and pitching TeePees.
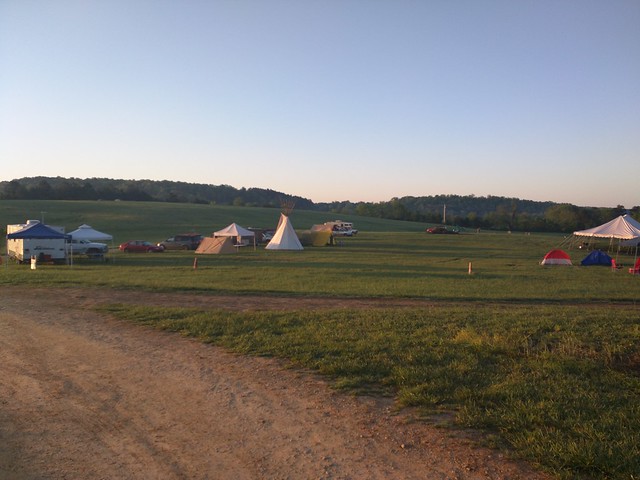
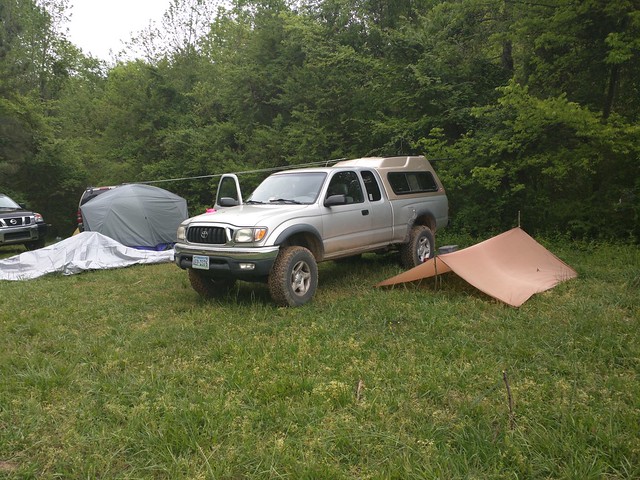
Our camp, including my tarp made of a sheet and linseed oil, posted on this blog a little while ago. I only slept in it part of the time, as there was an ant mound far too close by.
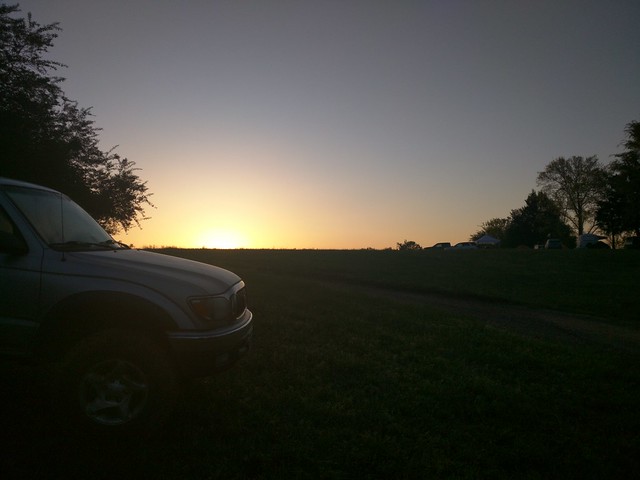
A beautiful evening viewed from our camp as the sun set over the hill
Conclusion
This is only a tiny taste of the goings on at a gathering of this sort. Every time I go I learn new things, and more important I get inspired with a whole new set of ideas about what to try and go do, and how little it takes to live happily.