
Car work
2018-03-11
While at Wintercount, a traditional skills gathering, we met James who lives down in Tucson, and ended up staying with him for a week, then housesitting for him for a week.
Anyway, James is a certified diesel mechanic, and while chatting about stuff I mentioned that our clutch was pretty old, and he offered to help me swap it. I couldn't pass up the chance to tackle such a large project with a buddy who had at least some clue what he was doing. How else am I going to learn? Just doing things, trying things, etc. is exactly what this blog is about, so we dove right in.
First, we spent a day researching how to do it. We watched videos of people changing their clutches and dropping their transmissions on similar model years (2000 Tacoma). We read through the Factory Service Manual (which I downloaded some time ago, let me know if you need it I can point you in the right direction, I know it's hard to find these days). We layed out all our tools and parts, and then we started taking stuff apart.
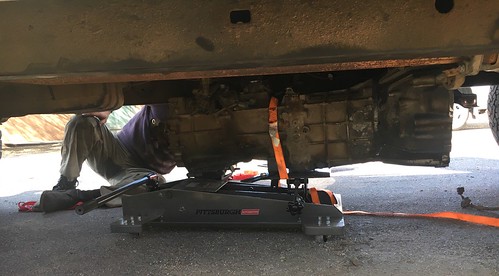
The project took about 2 1/2 days with two people working. Here's a shot of the transmission finally removed from the truck.
Having two brains helped enormously. If you've ever worked on a small passenger vehicle you know that the hardest part is *getting* to all the bolts and parts. James pulled some magic spinning the starter around and getting it to slide out... but having watched him I was able to remember steps of how to slide it in that he'd forgotten.
In the end though, it's mostly patience and just trying different things carefully and and slowly until something feels like it's really going to work. A lot of things didn't go perfectly, obviously. We tried to remove the front exhaust pipe (sometimes called the down pipe), and it just wouldn't come off. So much for following the book, but we realized if we fully removed the front driveshaft it probably didn't matter (and we lucked out, it didn't). Getting the driveshafts off took some ingenuity and we learned a lot. The back end plate we couldn't find for the longest time (it's on the front of the trans, below the engine block). When we finally did it was ridiculous to get off, and while getting it back on I realized it was trivial with the skidplate off... oops. We took several trips to NAPA (access to a second car was really helpful), and frequently what they supposedly had in stock wasn't really there, as a result we ended up getting the flywheel machined, rather than replacing it as I had intended. But... it all worked out.
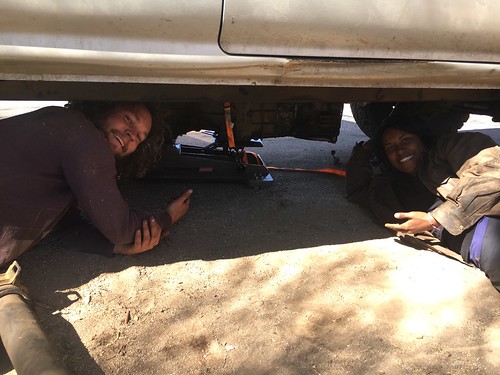
Angie helped actually pull the transmission and push it back in, adding a third set of arms and muscles.
Note the shot shown above the transmission is on a transmission jack. I bought that just for this project and I can't store it. Thing is, it was ~$175.00 a clutch swap in a shot runs ~$1200 or so, the bulk of that in labor. Buying a transmission jack made the job that much more sure to succeed so I was willing to tackle it, thus saving a ton of money. In particular it meant that when sliding the transmission back IN, we could adjust it fairly precisely (not perfectly, as the tcase put the whole thing a little off balance, but close). I could lift one end to tilt it, jack a little, tilt the plate, etc. to get it in to shape while James spotted.
This post isn't so much about the car work itself, as it is about the philosophy. James reminded me that just tackling stuff *works*. Thanks James! People are so afraid to do things, the modern world tells us we should just buy something to solve our problem or pay someone else to things for us, that somehow this will make us happy. But then we miss out on all those opportunities to learn. If you do your research and go at it carefully with patience, stuff usually works. In the rare case it doesn't you learn even more useful lessons. I find that doing things for myself also keeps me engaged in life, and thus happy.
After we got it all back together I had a check engine light. It took me about a day of testing with a voltmeter and reading online forums and the FSM to figure out that the O2 sensor wasn't reading properly, and then that it was due to the wiring. Turns out we'd pulled a wire out of the plug, so more research online on how to repair plugs, pull the wiring harness back out (about an hour of work), pop the pin, solder it back to the wire, reassemble everything, and the check engine light was fixed.
After this work I replaced my brake hoses and brake pads a job I'm not sure I would've taken on before doing this despite it being quite easy. I did all the fluids, fixed another broken sensor, and generally brought the truck back up to snuff.
After this experience I'm far more likely to tackle other car work. Doing projects like this builds on itself. I started by doing oil changes, then brake bleads, changing belts, swapping springs and shocks. But, it's not just car work. The skills for tackling big projects translate from one project to another, I don't only feel more confident in working on a car, I'm now much more seriously thinking about building our house someday.
The title of my blog was originally meant to enshrine this spirit. Every adventure is small because it builds on previous adventures. Then if you keep pushing your comfort level a little, trying something a little different, a little more complex, a more difficult season, a little less gear, pretty soon you'll be doing things you didn't think you ever could.
For anyone curious about actually doing this particular job, here's my tips.
- The "back end plate" is on the front of the transmission, just below the engine block above the skid plate. The bolts are small and go backwards in to the transmission. Pull the skid plate to get it on and off.
- You don't have to pull the front exhaust pipe, just pull the sensor out and set it aside.
- Use several extensions to get to the top transmission bolts through the shifter stick opening in to the cab.
- Use a ratchet strap off the rear axle to pull the transmission out.
- Since you're draining the transmission, drain the tcase too... it'll make it that much lighter and help with balance on the transmission jack.
-
Get it aligned *perfectly*, then shove it on with your feet to slide the transmission back in.
Tablet weaving: Learning through errors
2018-03-03

Tablet weaving is at least as old as the 8'th century, and is still a common method of weaving used today. What tablet weaving is https://en.wikipedia.org/wiki/Tablet_weaving
My plan was to get some cheap yarn to test out before using some nice yarn I got from Matthew's brother Daniel on Gnomespun.com . My hope being that by the time I use the nice stuff I won't mess it up too badly.
First step, research:
I reviewed youtube videos and found an amazing site for creating patterns, http://twistedthreads.org/ . It took me a little while to get used to the site and figure out my pattern but eventually I got it and came up with a pattern combining the center of one I found with a different border http://twistedthreads.org/pattern/gPgN3urSz6kAXcCtW
Second step, Materials:
- Yarn (bought a pack of 4 colors at the thrift store)
- Scissors
- 2 bar clamps
- Tablet weaving cards (made out of scrap cardboard, four holes each for yarn to go through)
- shuttle (also made of scrap cardboard)
- beater (I just used the scissors)
My first attempt failed beautifully. I screwed up at least 5 things. One of the youtube videos showed doing a continuous warp to get a good even tension https://www.youtube.com/watch?v=eConIrGd7Og . I did what I saw on the video, I put one type of yarn through each hole in the tablets and went at it... without thinking of the fact that my central pattern required only two colors, three of the same color and one different to show the pattern. Oh well, I decided that the pattern should still work and I would use the black yarn to indicate the pattern. I then removed the yarn from it's tension, then added tablets with two colors for the border pattern by doing each card individually. This was a little more tedious and in the end the tension was COMPLETELY off. I then tied one end to a bar clamp and attached the other end to myself with a piece of cord. I started trying to do the pattern and it was all wacky looking.


End of a day of weaving. I made this photo XL so you can see where I messed up. For one the tension was all wrong at the start, it was very loose and you can tell it tightened up but still not all the same tension. Also in the pattern I messed up somehow, I don't even know how! I was rolling along and getting cocky then boom, it's wacky. I figured out a few tablets were not aligned right and got them back on track. Unfortunately my tablets suck. The cardboard is corrugated and the yarn kept getting stuck in it, even after I trimmed the corners to be rounded. Oh, also learned that the farther the holes on the tablets are from each other the better, makes it easier to see which strings are supposed to be on top and on bottom when you go to separate them after each turn.


I attempted to fix them at first by just doing a square knot and some extra yarn. It worked just fine but the kept breaking so I abandoned ship by ending the weave, using the method linked above. I finished off by twisting the ends like you would when making twine...

In this photo looking from right to left you see what the pattern is, it looks like to strings twisting around each other once you get to the left of the photo you see where it swaps. Anyway, I was really excited to figure that out before everything went haywire with yarn splitting. I think to avoid the yarn breaking I need better cards... or to stop moving them back and forth across the yarn every time. I was doing that to help separate the top and bottom strings so I didn't have them on the wrong side... but that may be the reason they all started splitting at the same time. Still, I want nicer tablets that have smooth edges, like these nice wooden ones I found on Etsy https://www.etsy.com/listing/58802858/tablet-weaving-cards-24-ash-55cm-card

Smithsonian visit: "Eskimo" gear
2017-12-07
Recently Angie and I were visiting her parent's for Thanksgiving. They live near DC, so we took a day-trip up to the Smithsonians and went to the National Museum of the American Indian.
I really enjoyed the main exhibit about the Inca road. I knew a lot about the Inca, but very little about the cultures in that area after the fall of the Incan Empire.
Anyway, I wanted to share some photos of took of some far north American Indian equipment. Unfortunately, I forget exactly which tribes these specific pieces are from, as the museum had it all mixed together. I apologize for the title of my post... I think at least one of these is Yupik, but I'm not certain, and I don't want to label things incorrectly.
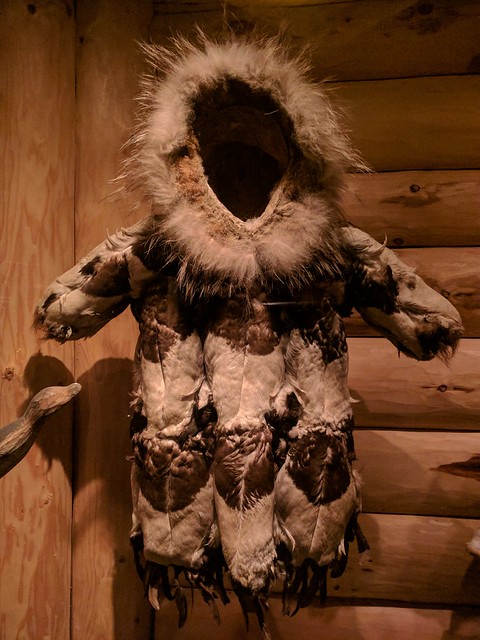
This is a parka made out of duck skin. If you look carefully you'll see the feathers are on the outside. This just blew my mind. Duck skin is thin, so it would be very lightweight. The down is all there to keep you warm, with the layer of original feathers over it to keep you dry as well. Water would just roll off this coat. I'd never even heard of using duck-skin like this before. I wish I knew how it was constructed, if anyone can tell me a *probable* construction based on experience with waterfowl skin I'd be very very interested. I've also no idea how pliable or packable it would be, but it really makes me want to try it.
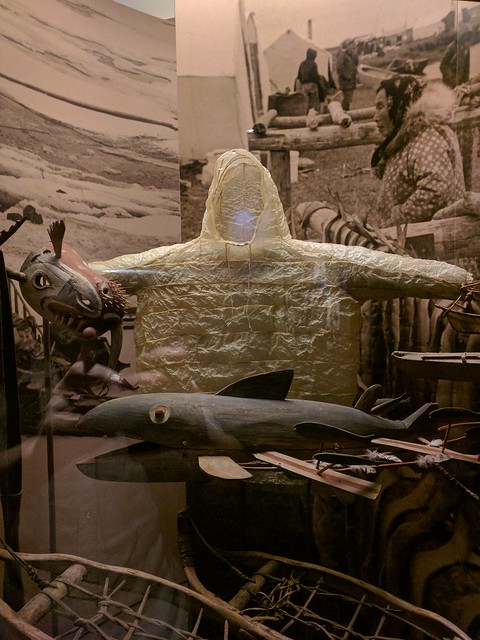
This is a parka made from seal gut. It had never occurred to me to use gut for jacket, but it makes good waterskins so why not? Again, I've no idea of the construction details, in this case it's not obvious whether the gut had been treated in some way or not. Maybe smoked? I don't know. It just looked incredibly lightweight and practical. I'd expect it to be similar in both weight and durability to modern ultralight raincoats.
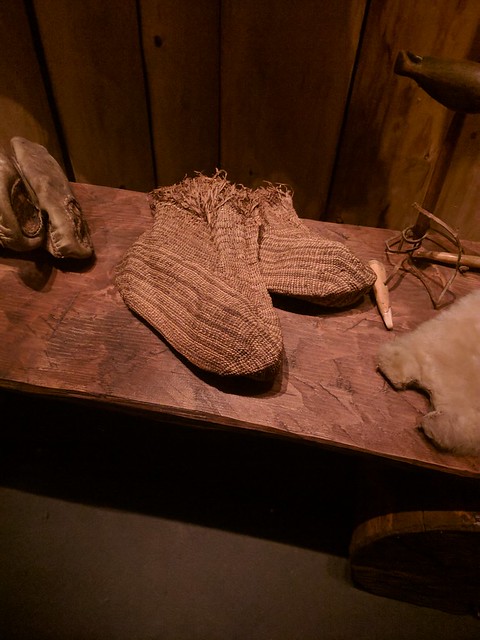
These are socks made from grass. This is less mind-bending than the earlier pieces if you're familiar with using straw to keep your boots warm or with say redwood bark being used for clothing. I'd never seen plant material socks though, so still thought this was really cool.
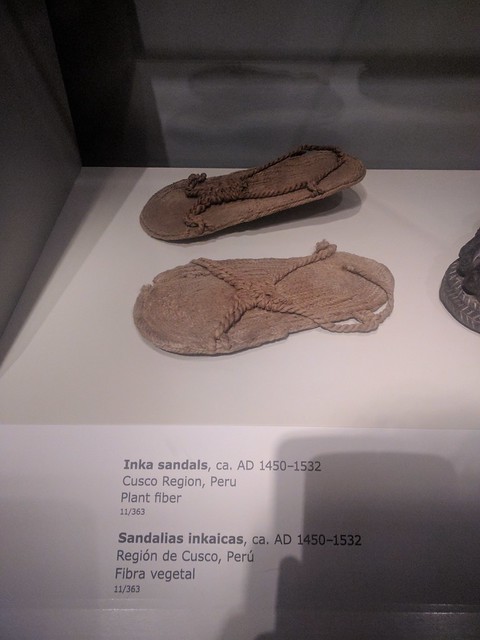
As you can guess by the photo these are definitely not from the frozen north. As it says in the display these are Incan sandals. I just really liked the construction and the soles made from plant fiber. They look like they'd actually wear fairly well. I thought I'd throw it in, just 'cause it's interesting.
There is of course a sober note to a museum of this sort as well. They had a large exhibit on the history of the U.S. treaties with American Indian tribes and a rather sad history it is (to put it mildly).
For me, seeing these pieces made me realize just how fixated on certain ways of doing things I'd gotten. They also had a fishskin jacket, which I'm more familiar with as an idea, but is still pretty interesting. I really got inspired again to keep experimenting and learning, there are so many ways to do things, and so many materials you can use, it's just amazing. I'm really excited to keep pushing on what I can do with more traditional types of gear.
non-synthetic water bottle + carrier
2017-10-29
I posted about making some leather gaskets recently
http://www.blog.smalladventures.net/2017/07/non-synthetic-waterbottle-gaskets.html
This worked well enough to be tolerable for some uses, but it still leaked making it annoying for others.
Since them I picked up a new water bottle that I thought would be a lot easier to seal using this type of gasket, a 40oz Kleen Kanteen narrow mouth (and metal cap). So I made a new gasket for it:
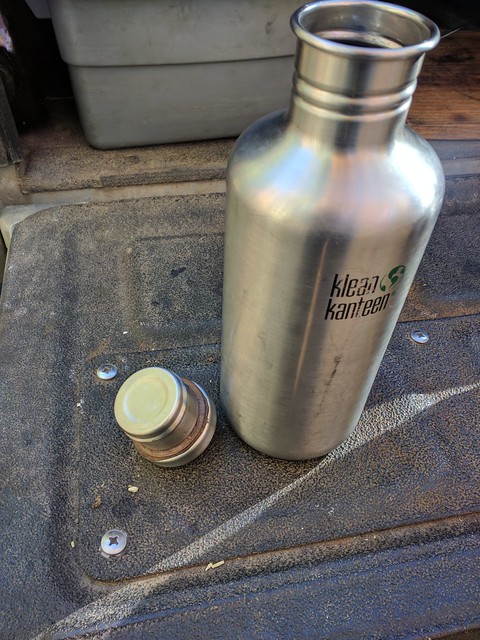
I used the same technique as my last gasket, where I cut it much smaller than the actual lid. Then I soaked the gasket in water and stretched it until it fit on to the lid. That done I let it dry most of the way while on the lid.
Just using this technique, it still leaked, so I decided to try something else. I repeated the above process, but with a thicker leather, then I made up a fairly strong mixture of wax in turpentine much like I use for treating canvas
http://www.blog.smalladventures.net/2017/08/howto-waxing-cotton-2.html
. I soaked the gasket in this mixture for a while.

The turpentine smell hasn't fully dissipated, but the end result is good enough I can carry the bottle in a waterproof backpack and find no water in the backpack afterwards, or leave it sitting on it's side on the truck platform next to me while I'm sleeping. I won't argue turpentine is great for you, but it should evaporate and thus not be a problem.
Alright! I finally have a GOOD waterbottle. So, the next step is to figure out how to carry this on my backpack. I've been carrying a bottle on a string slung over my shoulder, and this gets really annoying, especially on rough trails. So, here's what I came up with.
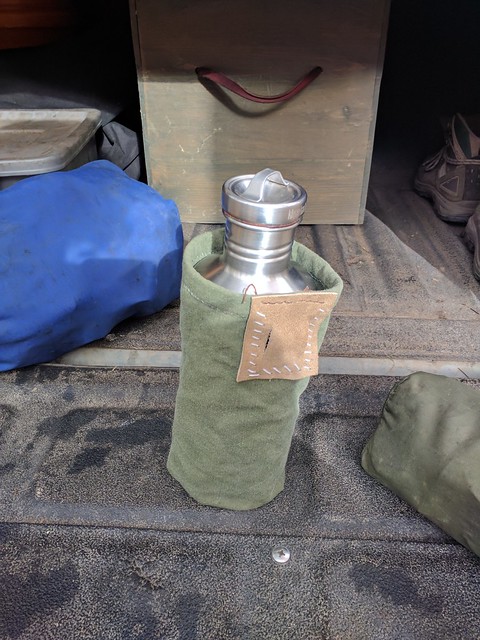
The fabric is from a torn American WWII military tent I picked up... it's a 6 ounce cotton canvas. I sewed a strip of leather in to the top hem to give the lip some stiffness so the waterbottle would slide in easer. Then I sewed a patch of leather to this, with slits cut in it. The stitches across the top were done with a speedy-stitcher, but it was breaking the threads on the canvas, so I switched to using a hand-awl to punch holes and then stitching with a needle and thread for the rest of the patch.
I used the patch to tie the holder to my pack frame. I can push up on the bottom of the bottle, gathering the fabric in my hand to slide the bottle out.
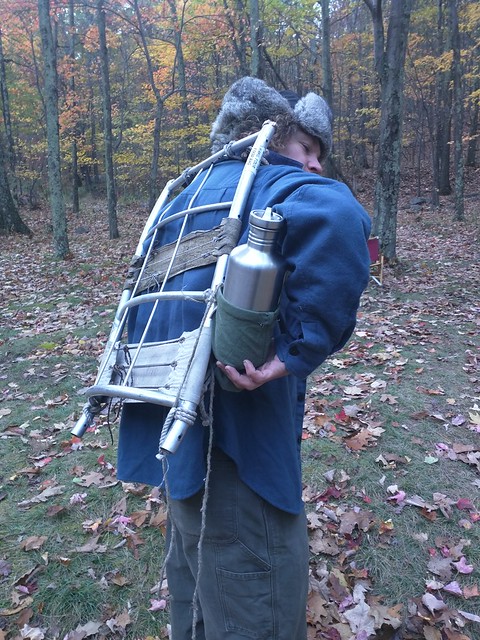
And with a little finagling I can slip it back in by pulling the fabric out just a bit first.

End result: I FINALLY have a way to comfortably carry water comfortably while backpacking without soaking my leg or using any synethetics! Woot!
Insulated Growlers: not just for beer
2017-10-29
After about a year on the road Angie and I decided we really wanted an insulated growler. The original thought was so we could drink cold beer. We wanted something all metal (excepting gasket), and Kleen Kanteen seemed like just about the only option on the market. Finally we bit the bullet and picked this up:
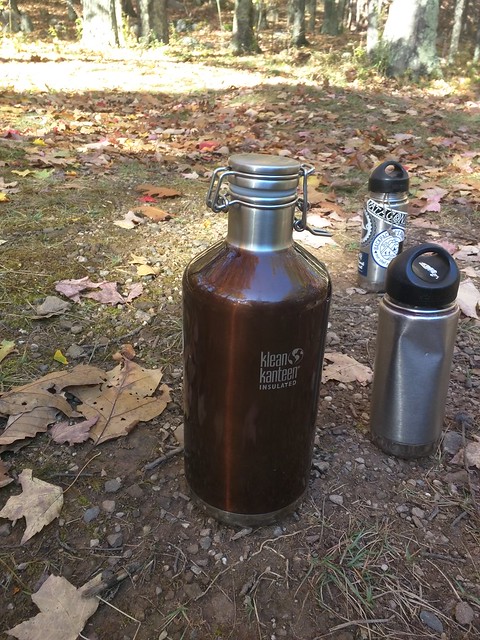
We've had a 1 pint Kleen Kanteen thermos each for some time, and we love them. We use them instead of mugs for drinking tea, and often use them hiking to carry warm drinks. I've found mine to be pretty great for water while skiing as well. We use these every morning (and many other times as well), making them among our most used utensils.
After we got the Growler we suddenly realized we could use it for storing MILK! It will keep something cold for ~48 hours. This means milk will still be tasty for ~72 hours, which is AWESOME. Yes we have tested this, and it works even in warm weather. We both adore milk. If we can find milk in a glass jug it's even better, we can walk out, pour the milk in to the growler, and then return the glass to be refilled. No waste, we get the deposit back, and we get good milk.
Next we realized we could use it for tea. In cold weather it's great to just drink tea all day, but boiling water over and over again gets annoying. Using the big thermos and our small thermoses together we can make 3 liters of tea at a go. Conveniently this is as much water as our largest pot (Angie's cast iron pot) fits anyway. As a bonus the flip-top (in contrast to a screw top) makes it easy to leave tea-bag strings hanging out while the tea is brewing. The silicone gasket still seals plenty well.
Of *course* we've also used it for beer as well :). It keeps the beer good to drink for long enough to drink it the next evening around camp and still enjoy it. Also, it feels good to walk in to a brewery and walk out with beer, and again... no waste.
Overall we feel really silly for not having bought one a year ago. Using it for beer turned out to be a bonus, with milk and tea being by far our favorite and most common uses.
For anyone on the road who loves milk or tea I HIGHLY recommend picking one of these up. In fact, I will probably keep using it instead of a tea-pot for drinking tea when we settle down someday.