
VA SAR conference
2015-04-29
In the interest of understanding search and rescue in Virginia and getting an idea of which team to join I went to the Virginia Search and Rescue conference. I was one of 2 people not associated with a team, but they were welcoming and awesome regardless. The conference is basically 4 days of classes related to search and rescue. Also, they bring out all the cool toys.
I'm not sure which groups were involved (helicoptor groups are usually not directly part of volunteer search and rescue, but work closely with them), but they did a demo/practice of a couple of water pickoffs by helicoptor. Below is a photo of a litter (with a person on it) that they lifted up out of the boat below.

That shiny picture though has nothing to do with what I actually did at the conference. Though each time I watch a helicopter work it teaches me something about how to interact with them should I ever be involved in a helicopter rescue.
Lost person behavior
I spent the first 2 days learning "lost person behavior" from Robert Koester who literally the author of the book on using statistical models to predict where to look for missing people. The book is creatively named "lost person behavior" .
The idea is that he, with the help of a lot of organizations and people has, and is continuing to gather a huge database of where various people are found and in what conditions. He can then take this data and split it up in to various groups like altzthiemers walk-aways, children under 4, downed airplaines, fisherman, etc. The statistical models tell us, for example, how likely someone is to be near a "linear feature" (e.g. a road or a river). How far away from the Point Last Known they are likely to have gone, etc. If you can bucket a person properly you can then use these statistics to help guide your search efforts and find people faster.
That was a pretty cool class. It's dry material, but fascinating. The book is available online, but it's not something you'd read for fun, or even read at all, it's intended as a reference guide to help search base direct a search.
http://www.amazon.com/Lost-Person-Behavior-search-rescue/dp/1879471396
Tracking
I spent most of the rest of the time taking some tracking classes from the pre-eminant tracker in Virginia. This is man tracking, for the purpose of trying to save people, and came in form of tests. In the first test we were given 4 basically perfect shoe prints in sand, a set of 20 2 foot boxes, and 2 hours. Each 2 foot box had either one of the 4 shoe prints in it, a different shoe print, or nothing and we had to identify which. We started by looking at the 4 shoe prints. Once we moved over to the 20 boxes we weren't allowed to go back. So this is a matter of recording the shoe prints so you (or other people) could identify the shoe reliably, and then trying to actually do it.
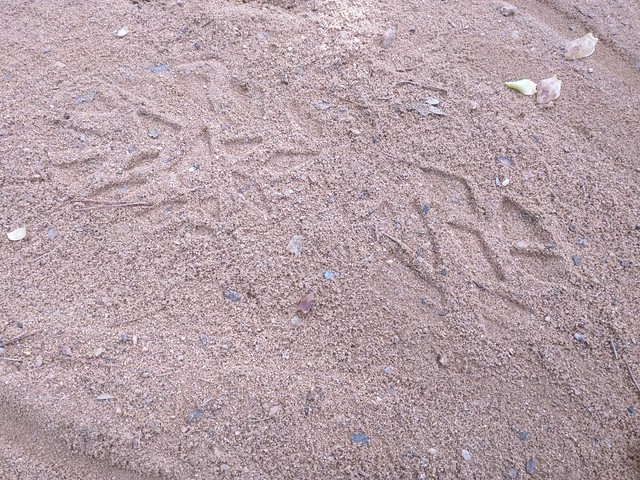
This is a nice easy to identify shoe, you can pick it out pretty reliably by a single lug in many cases. I managed to lose my measuring tape though frustratingly enough, and one of the shoes he used in a tracking box was this same pattern but in a different size.. so I missed those 2 boxes. Otherwise I actually did really well. Well enough that I'm thinking I might be worth pursuing becoming certified as a tracker for search and rescue.
We also did track aging. We were given 5 sets of tracks (around 8 or 10 steps long), and asked to identify how old each set of tracks were. We were also told they were less than 72 hours old. I did okay, but not well. I was consistently off by about 10 hours, and got one just completely and utterly wrong. This exercise was done on vegitation actually, and I realized I'd never practiced aging on vegitation (having learned my tracking in California and the Sonoran desert), so that's something to work on.
Lastly, we did less totally SAR related stuff... identifying what made various marks. Still, understanding that those 4 holes in the ground is dog sign, that funky track that's a little too close together is actually from a tractor, or that the sand configuration indicates that it rained recently can be extremely helpful.
I also went on an edible plant walk and learned a couple of new things, which was pretty cool.
Other stuff
I also did a little navigation refresher, and in the evenings I nerded out with folks on radios and the like, and we generally had a good time. I'm figuring out exactly what to do about joining a team, but I think I'll have it worked out in not too long. Virginia really really has their act together compared to most states. The training to become a basic ground pounder is standardized across the state and the next one is this fall, since I can't be active until that, there's no reason to push too too hard, but I want to figure out what team I'm joining in the next few weeks and start courting them.
Generally it was a blast. The people were great, and I learned a lot. Jess spent the whole time off with the dog people training Beau, who's making great progress. I'm really excited to work with the groups here.
Wheeling trips
2015-04-05
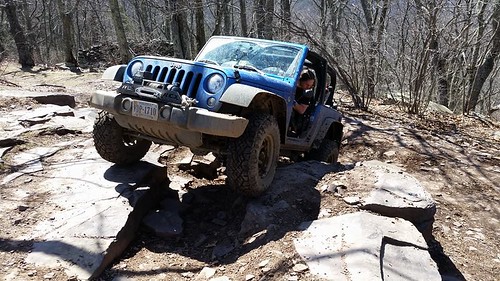
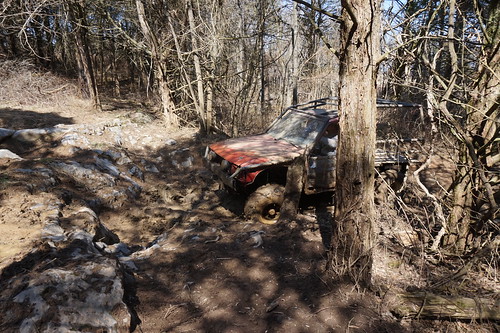
Today I went to Flagpole Knob near where I live. And a couple of weeks ago I went down to Big Boys Playground with a couple of friends and we messed around there.
Flagpole Knob
I actually got up this. This isn't part of the main trail, just something on the side of the trail that's fun to play on.
We had a good time.
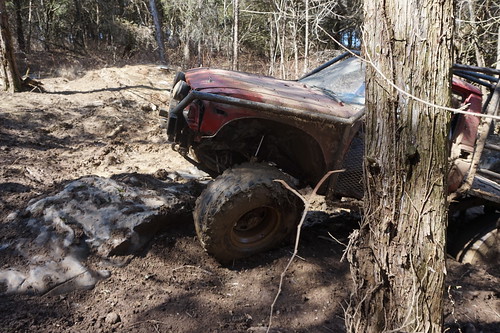
I was messing around with going door-less for the first time. It's a pretty interesting sensation. Humans perceive inside spaces as much larger than outside spaces. Removing the doors turned my Jeep into an outside space, and suddenly it felt 2 feet narrower... crazy.
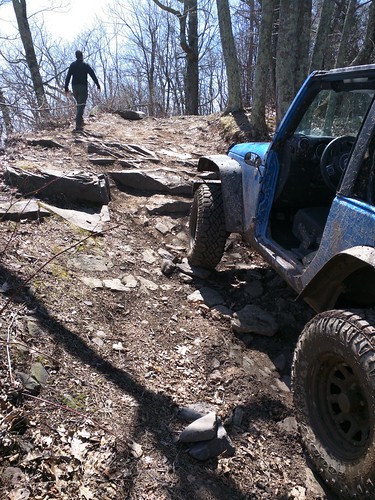
Most of the trail was pretty easy, The photo above was one of the harder spots.
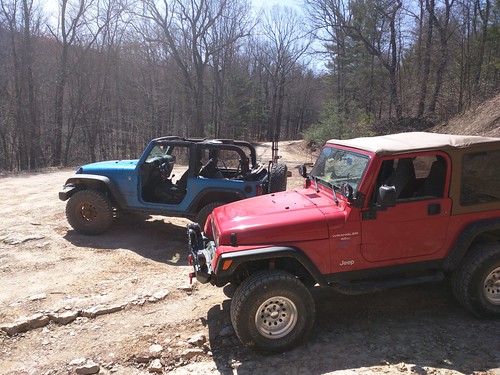
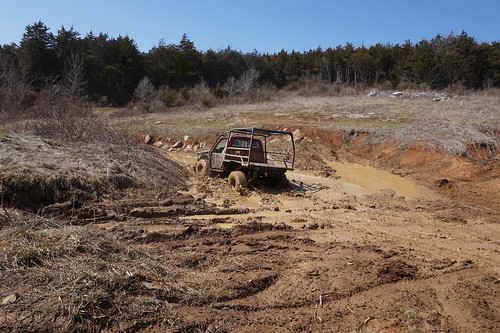
Big Boys Playground
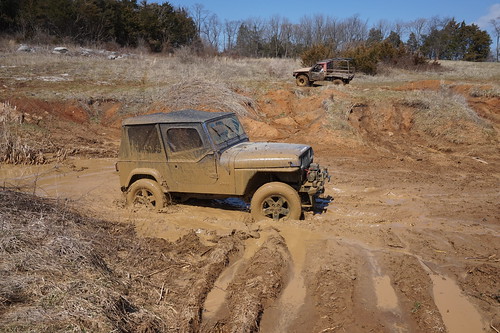
Big boys playground has some good mud holes. The folks I went with had a pure trail-toy, an old toyota with a huge lift on it, so we had a lot of fun with that in the mud. I actually went through the spot he's in though as well and didn't get stuck.
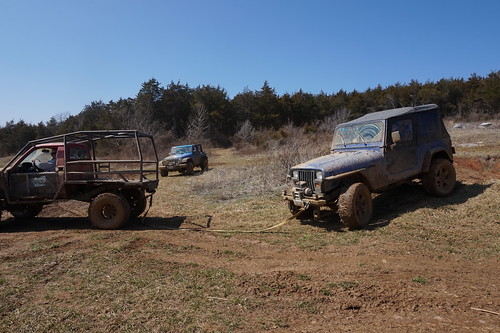
Here's their YJ going through that same hole
And here's the YJ after we pulled it out, it ALMOST made it, but not quite
My Jeep is in the background there. I actually winched the Toyota once as well, after they'd been playing in a deep spot. Though, the Toyota made it through another mud hole where it was clear up to the body. It's got an old 22R in it, something like 90 horsepower. He had it floored the whole way through the mudhole.
We tried the heck out of this spot, but with the mud on the rocks, there was just no way it was going to happen without some big tires and lockers.
This is a slightly different spot
Knock on wood, I haven't broken anything on my Jeep while wheeling yet. On Jane I once backed in to fallen tree which slide between the exhaust system and it's mounts, and I screwed several of the mounts. The exhaust is actually still tied on with para-cord - my hack at the time has held on this long. Jess knows about it.
Anyway, besides that *to date* I've avoided destroying anything (the dent in my front bumper doesn't count). It's part luck for sure. I'm also pretty careful despite occasionally trying some harder things.
Note, BTW, that the places I'm going here are frequented by vehicles. The first is a National Forest trail that's designated for this sort of use, and excepting just a couple of spots where people stop to play around on rocks or in a muddy spot, it's a strict trail that we didn't stray from. The second place is an offroad park. It's basically an old farm that someone has put to this use. So... if you're curious, I'm not tearing up random places in the forest, just keeping some nice roads from getting too overgrown to use :P.
DIY: linseed oil treated cotton sheet tarp
2015-04-03
Living in Virginia I ran in to some civil war re-enactors a little while ago. As I was looking at their stuff I got interested in the raw materials the used for rain gear, tarps, bags, etc called "tarred canvas". Tarred canvas is called that because it's literally canvas coated in tar. This material is very tough, and highly waterproof. Unfortunately, it also has an extremely unpleasant odor.
Upon doing a bit more research I discovered that the term is also used for basically any water-proofed canvas. For example, canvas that's been painted. Traditionally this was done with lead paint as the lead allowed the paint to flex rather than crack and fall off.
A 3'rd type I eventually discovered is linseed treated canvas. This fascinated me. Linseed oil is edible, and frequently eaten as a dietary supplement. It's also frequently used as a treatment for wood to help protect it from water.
Considering this, I decided to give it a try. I went to a thrift store and found a densely woven cotton sheet. I went to a hardware store and got a can of boiled linseed oil (boiled to make it thicker) and a can of mineral spirits. The mineral spirits thins the linseed so it comes out even when you treat the sheet with it, and then just evaporates off.

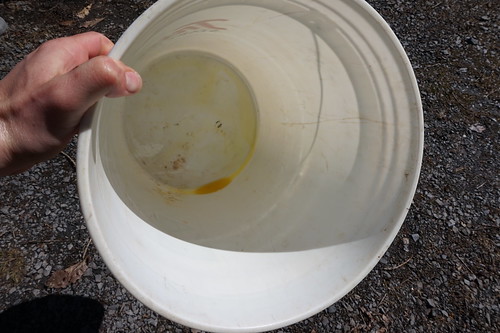
You mix these about equal parts. For either a double sized sheet I used 1 quart of each. Mix these in a bucket, throw your sheet in, and swoosh it around a bit, working the mixture into the fabric and making sure it gets on all of it. Amazingly, the photo below is what was left in the bucket when I was done. If I squeezed the fabric though I could squeeze some out, so it wasn't going to hold much more.
You need a double-clothes-line, if it touches itself as it's drying it kindof sticks and is annoying to deal with. So you want to hang it so no part touches itself. I suggest using clothes-pins to help keep it in place, something I didn't think of until half-way through it drying. Note that it takes a couple of days to dry, and if it rains the top flat part is going to collect water, which would be annoying.
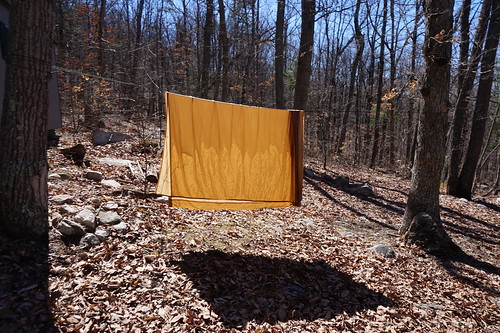
Last night I rigged up my new tarp by setting rocks against it and tying around the rocks. I made the mistake last time I was testing a new tarp material of doing all the sewing first, and I decided not to repeat that mistake.
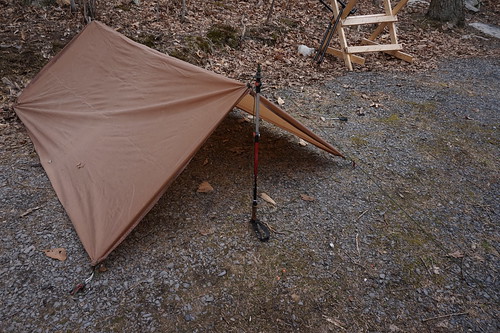
It wasn't an extra hard rain last night by any means, but I'd guess that it rained from around 2am until I got up this morning around 8, and there was a decently hard spell in the middle. There was no drip-age at all, and little dampness, the inside side of the tarp was the tiniest bit damp, but less so than I'm used to with plastic tarps. I would definitely use this as a tarp in the future and not worry about it.
The fabric feels like it might even work as a poncho. It's hard to know what the whicking behavior will be, so that will be an interesting test. That test is going to take some sewing first.
One downside of this tarp is that, being made from a double-sized sheet it's not quite big enough. It's okay, but I would like to have at least another foot of length on the tarp. I felt the need to stake out the middle of one side as well as the 4 corners, even for one person. I believe going to a queen would actually resolve this, and make it large enough to fit two people instead of one.
I'm really excited by this material. If I made a tarp and a groundcloth, and one of those doubled as a poncho (assuming the wicking works out not to be a problem), and the other doubled as bag I roll my gear in and diamond hitch to my pack frame, I could potentially get rid of most of the gear I have that needs to be plastic, opening the door to a more primitive style of backpacking. One remaining item is my sleepingbag, although I recently discovered that leaves will often work so I might be able to do some trips without it now. The last plastic item is shoe soles. After much consideration it's unlikely I'll ever give up rubber shoe soles, but if that is the only modern material I carry on some trips, that could be pretty cool.
UPDATE
My mother pointed out something really important that I forgot to mention. Linseed oil soaked cloth will spontaneously combust if not fully dried before folding, or even wadding up. I know someone who nearly burned down their house with a linseed soaked rag they tossed on the floor. So be careful.
Also, Linseed oil fumes are pretty hard on you, and this should all be done outside. Be careful you get the oil pretty dry before you crawl into such a shelter as well, to help reduce the fumes.
The above is true for linseed oil itself. But note also that "boiled linseed oil" is usually not pure linseed oil, so it has stuff in it besides what you would eat. Pure linseed oil is a common dietary suppliment, so it's safe to assume it's no big deal to get on your hands. Boiled linseed can be pure, but usually isn't. Usually it's actually got other not so great stuff thrown in there to help it harden. There's a more complete explanation here:
http://www.instructables.com/answers/Linseed-oil-health-dangers/
. When I've finished spoons and the like I've used pure dietary linseed oil, purchased from a health-food store. It's annoying and takes a lot of coats.
FURTHER UPDATE
Before doing this, please read the following post with more experiments:
http://www.blog.smalladventures.net/2015/11/linseed-oil-for-homemade-oil-cloth.html
ANOTHER UPDATE
I don't recommend using the methods from this article at all, this is a dated experiment now. If you just need it to stop rain while not touching anything, get 800 threadcount sheets, and don't treat it at all. If you need it waterproof while touching something (like a poncho) use this method instead:
http://www.blog.smalladventures.net/2017/02/waterproofing-cotton-poncho-experiment-2.html
. Lastly, for tieouts, grommets like these:
http://www.blog.smalladventures.net/2017/02/myog-plasticless-backpack.html
wear better than tieouts do.
DIY: PVC bike rack
2015-04-01
The trails around here are just too perfect for it, so I finally went out and got a mountain bike recently. 5 minutes up the hill by car and I'm at some of the best mountain biking I've ever seen, but I have a job and in the evening I want to spend my time on the trails, not climbing that paved hill. IMHO, this is what cars are for. So, I needed a bike-rack.
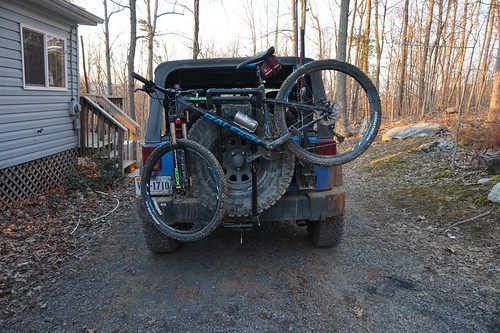
I've got a Jeep wrangler. I wanted to be able to swing the door open without the rack in the way so I didn't want to deal with a hitch rack. This was my plan from the start, and I installed new hinges on my swing gate as one of my first modifications, to accommodate the weight of a bike-rack and bike in addition to the large tire. When I went looking for a tire-mount bike-rack I quickly discovered that a decent tire-mount bike-rack starts around $200. That's insane for what amounts to a couple of aluminum pipes bent in a pipe bender, a bolt or two, a little rubber, and some webbing. I thought about making one and decided eh, I really just want to throw money at this problem and solve it.
But then I started reading more details and found that NO tire-mount bike-racks would fit my 33" spare tire with low backset rim. So, not only would I have to pay $200, but I'd have to modify it even still! That was just too much.
So, one day I went down to home depot (or maybe lowes, whatever) and stared at their pipe selection. I had originally been thinking metal, but when I saw the PVC I realized how much better it would be. It's lighter, easier to cut, easier to bond, and won't scratch the finish on my car, rim, or bike-frame. This means no need for all the complex rubber doodads, no hours of hack-sawing, etc. Perfect. Standing in the store I came up with a somewhat complex design involving a hinged bar that would lock open, like you have on the lid of a trunk, to hold the whole thing rigid. I bought all the stuff I needed for ~$30.0. Beat $200 by quite a lot!
A few days later I grabbed the stuff and just started building. With PVC you can test fit everything which is super helpful. So, I did only the most minimal of sketching and measuring and then just went by eye. I got it half-way built and realized my idea wasn't going to work. The hinged bar sitting at a 43 degree angle between the horizontal and vertical bars was going to hit the bike-frame... duh. Then I looked at what I had and realized it didn't matter. I didn't need the brace at all since the rope hold it at the right angle. I had made the design far more complex than it needed to be. In the end I only used maybe $15 in materials, probably a bit less. I drilled 2 holes in the wrong places, but that's fine..
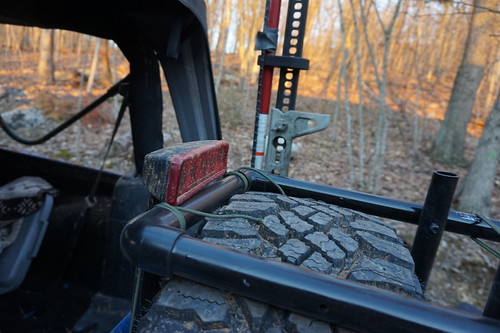
This evening I finally took it for it's first spin, just over the ridge for a nice evening ride. Because of my bike's very tight frame geometry it's a little bit harder than optimal to get on and off, I have to tip the wheels towards me, seat away from me quite a bit to get it over the "hook" at the end of the bars. Still it's well within reason, and it means it's really secure once it's on, which is awesome. I tied it on, but just for comfort, I didn't really need to since it has to turn almost horizontal to come off. Seems like a fair trade.
So, if you're looking for a cheap bicycle rack, here's a dead simple design you can build in an afternoon. The construction is pretty self-evident from the photos.

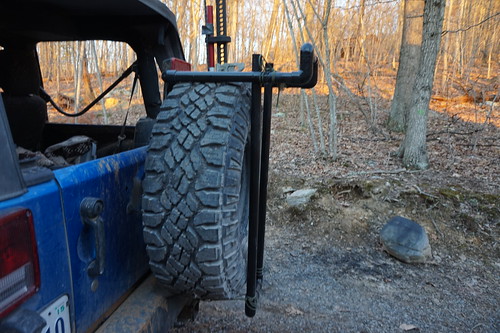
There are a few interesting details though. Note how the top bars sit over the tire so that the rear cross-bar is actually behind the tire. This means the rack is stable and kindof "on the tire" before you even tie it on. That's nice as it makes mounting it really easy.
The P-cord holding it on is tied to the top with double constrictor hitches on both sides, effectively making them permanent.
At the bottom under the tire I have an alpine butterfly in each side that I use kindof like a truckers hitch to help me get it tight, then I just tie it off with 2 half-hitches.
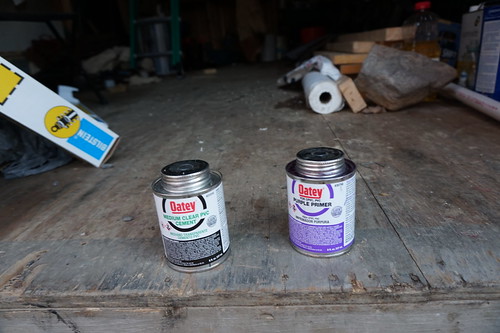
If you've never glued PVC together you may want to look it up. Note that I test fit everything and then knocked it back apart with a hammer. For the final fitting after gluing I also knocked it together with a hammer. Be careful as PVC can shatter, I did in fact shatter one elbow, a rubber mallot or a block of wood between the hammer and PVC may be in order. To actually glue it you use 2 different products. First you use a prep, then a glue. I used these
Note the of the materials in that picture, one is purple. It tends to run all over. So now I have white pipe with purple streaks covered in mud. Fine, and functional, but I decided it was worth a tiny bit of effort to make it not super ugly.
Most paint won't stick to PVC. I went to a hardware store and simply asked what would work and they pointed me at this stuff. It seems to have bonded okay, we'll see in a few weeks. I spent as much time painting it as I did building it. I did a lot of coats trying to get good coverage.
Oh, one more heads up. Note that I'm a small person, my bike has a tight geometry, and it's a 650b (meaning not that large of wheels). My bike's rear wheel comes out flush with the right fender. A bike with a more horizontal top-tube would have less trouble with this, but that gets offset by larger bikes or bikes with more open geometries. This property is not particular to my rack design at all and is relevant for any rack carrying bikes cross-ways on the vehicle, but it's a consideration. I personally hate having stuff hanging out to catch on trees and the like. So think it through for your bike and your vehicle. One advantage of making things yourself is you can make them custom for your needs.
No doubt I should throw some legal disclaimer in here to not be an idiot, bla bla bla... So... you know, be careful and try not have your bike and/or rack fall off your car, it'd be embarrassing. If you don't know knots, maybe use truck tie down straps or something.
So, there you go. A functional bike-rack for ~$15 bucks. Makes you wonder how they get away with charging so much doesn't it?
Fire extinguisher
2015-03-28
Ever wonder what it's like to actually use a fire extinguisher?
Well, the one in my Jeep got recalled. A few days ago the replacement finally arrived. As a concerned citizen and proper adult I wanted to make sure I disposed of the recalled fire extinguisher properly. It wouldn't be responsible of me to leave a possibly faulty fire-extinguisher lying around.
As it turns out the proper way to dispose of a fire extinguisher is to first discharge it, and then throw it away.
So, I was obliged to discharge the fire extinguisher. A tragedy:
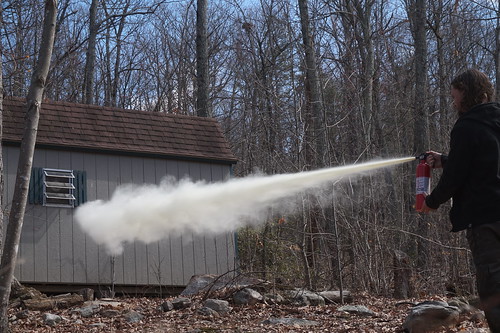
I think it actually shot a bit farther than that, and the camera caught the beginning of the first burst (it took 3 photos in a row, the first 2 had no burst yet). This is an ABC extinguisher I believe, using a powder, so the powder blew a short distance as a cloud like if you were throwing flour in the air to try and light it on fire (not that I've done that... no never, certainly not).
Again, this is my car fire extinguisher (I got a new one, since my old one is mounted in Jess' truck, and I figured she might need it too), so it's tiny. It probably shot stuff for about 4, maybe 5 seconds. I see why people say to use very short bursts, if you miss you want to get a chance to pause and re-aim, not use it up n the wrong direction.
That is all, I just thought I would share the amusing experience.