
Winter overnight
2015-01-18
Last weekend I had a free evening, so I grabbed my pack and lit out. I didn't go very far at all, maybe 2 or 3 miles in from a trailhead near my house. I was taking care of Jess' dog at the time, so she came to.
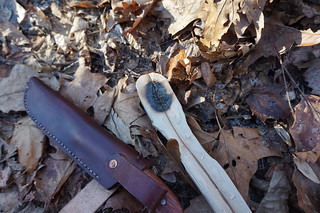
This was the perfect time to test some things and just muck around. I recently bought an Opinel folding saw, which I picked it up from the mailbox on my way out. I also grabbed my little Gransfors forest axe, and my new bush knife that I bought from the maker at a gathering.
Cutting implements
This is a lot of cutting tools to carry, but I thought I'd bring them all and play around, to see how each fared at normal camp tasks. I actually also have a true Nepalese Kukri, but I didn't bring that on this trip.
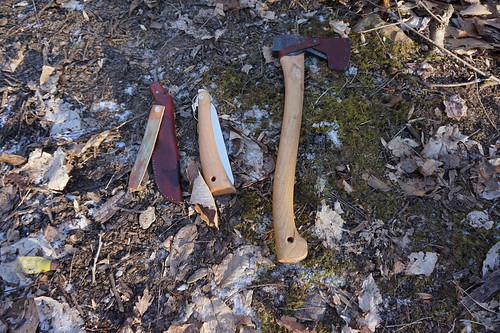
I usually carry your typical Mora knife. They are great knives, very easy to sharpen being Scandinavian grind, etc. But, while you can baton with them (hit them with a stick), the blade is a little bit thin for it. I got this bush knife with the idea that it could do heavier tasks more safely than the Mora is capable of... so, it starts encroaching on Axe territory. It's a great knife, and feels really nice when whittling and the like, but I haven't had it long enough to have a well informed opinion yet, but it's looking good.
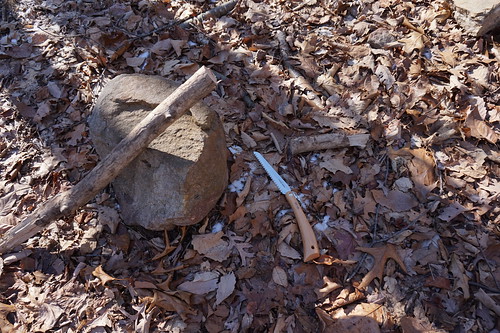
The Opinel folding saw was a new idea. Since it's winter here I've been reading and watching videos of people who do bushcraft in the Alps. One thing I noticed is that these folks often carry folding saws. Watching them and thinking about it I realized that almost everything you do in the winter involves cutting sticks, usually in the 2-3" diameter range. Being able to cut sticks cleanly to specific lengths makes things easier, building a quick shelter, building a stand for your fire, cutting really short pieces of wood for a small fast fire, instead of having to burn the pieces in half, etc. You can always cut sticks with rocks but the rocks may be buried under a bunch of snow making that less effective. You can break sticks for sure, but it just makes some things harder, and winter is challenging enough for me right now. So, I decided to give a saw a try.
Overall, I am REALLY impressed. This is an amazing saw. A saw is really the right tool to be using when bucking up your normal deadfall firewood, much better for that than an axe. As a result it was significantly faster than the Axe.
I cut about 2 armloads of wood with it, so I could keep the fire going most of the night (more on that later).
Axes and machetes and the like are quite heavy and bulky to carry. This saw is much lighter. It's just a little to big to stow in a cargo pants pocket.
If I was building shelters, I would prefer to have *both* though. If you take a small, say 18ft dead pine tree and lop off all the branches until you just have the trunk, a machete is by far the best tool for the job. Next best is an axe which is a bit slower, but compared to my machete doesn't wear out my pinky finger as badly. The saw would be a pretty distance 3'rd in that category. Given the choice of either the saw or the axe for shelter building, I think it depends on the forest I was in, but I'd probably pick the axe.
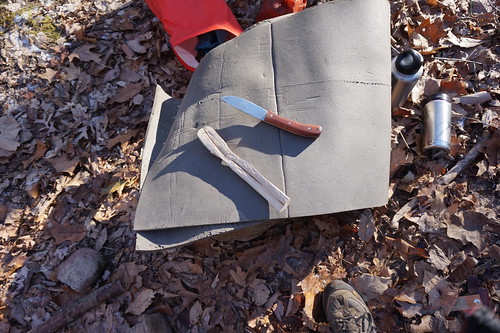
After I had a fire lit and was just hanging around I decided to make a spoon, because why not make a spoon right? The first step was to split a stick (if you're paying attention you'll note this spoon is not going to work very well). I could do this with an axe, but it's extremely gross. A knife, hit on the back with a stick, is an extremely accurate tool for splitting small branches. I then whittled this into the beginnings of a spoon shape to get comfortable with how I wanted it to come out.
Next I cut a green stick and split that, again using the knife (this step would be much much harder to do safely with an axe). I bent the stick over to make a set of tongs
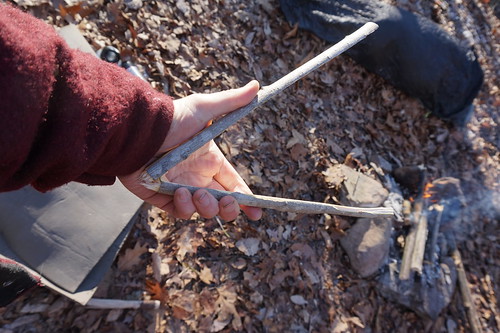
Then using these tongs I fished a coal out of my fire, placed it on the spoon and blew on it. After it got nice and chared I'd scrape the char out with a rock, and repeat. This is the process used to make what's often called a "burn bowl", this is a burn spoon I guess.
After a few iterations of this, with a little care to how you place the coals, you get a nice bowl shape
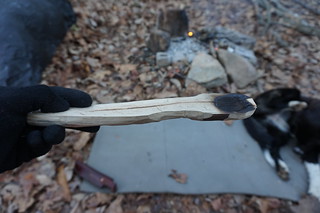
I carved it a bit more until it was sufficiently spoony that I could've used it... but there's a key flaw in this spoon which should've been obvious initially. It includes the very center of the wood, which almost always checks badly (meaning it splits while it's drying). As a result this spoon is already splitting badly, and will fail very soon, so I gave it to the dog to shred instead of saving it. Oh well, it was good practice.
Cold
To get the fire lit I first tried out a method I saw a video of someone in Switzerland using. It just made a lot of sense. It's called the "3 stick method". Well... it requires sticking the 3 sticks in the... snow... err... yeah, suffice to say that it didn't work in ground that was frozen solid. One more learning experience!
I had carried in a few bags of tea with me, since we have so few evergreens here, and I knew it would be cold. I also had 2 stainless steel water bottles (kleen kanteen brand). One is a 1 liter bottle, the other is a 1 pint thermos. This was great, as I could boil stream water in the 1 bottle, then transfer it to the thermos and sip tea while I was working on my spoon and whatever else.

Then I cooked dinner on the fire, and just hung out. When I left home it was ~15F and I believe it dropped to maybe 5F that night, so it was pretty chilly. Beau didn't care at all though, she was running in and out of the water until this happened:
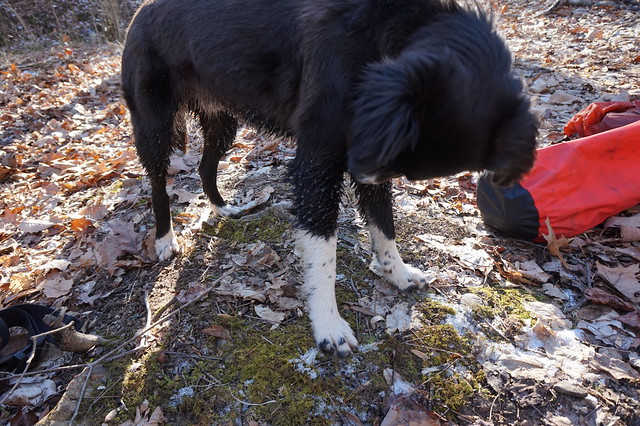
It'as a bit hard to see, but she has balls of ice on her fur all up her legs and across her belly, almost 1/4" across. She picked them out slowly, and didn't really mind much.
I was also experimenting with clothing. I decided to minimize my use of modern tech and was wearing a wool 260 weight ice-breaker sweater as a base layer, a 5.11 canvas shirt over that, with a thick wool jacket over that. My hat was wool. I had on underarmor running tights (I don't own wool tights, something I'd like to fix someday), and 5.11 canvas pants. Wool socks, and fancy modern waterproof hiking boots, lightly insulated. On my hands I had wool liner gloves and thinsulate lined 2 layer gortex mittens. In reality I would've been fine without the mittens... now I know!
Interestingly, even sitting around at 10F or so this was plenty of clothing. I was quite comfortable, especially sitting on a closed cell foam pad, and drinking hot tea. Very pleasent :D.
I carried in an extra pad for Beau, as I was worried about her getting cold at night.

She was definitely thankful and slept on it the whole night. Unlike this picture I had it folded in half so she'd get 2 layers of insulation.
While she was sleeping on an my old beat up one (this pad has done 1500 miles on the AT, 240 on the JMT, was my bed all last summer, and has been on countless other trips), I was sleeping on my much newer pad, otherwise identical. I also made a pile of of leaves to try and get some more insulationg, knowing just the 3/8" pad (even from gossamer gear, which are better than most) wouldn't quite cut it.
Well, the dog was just fine that night, she curled in a ball and slept great. I checked her ears and paws occasionally, and they were always warm, I never once saw her shiver.
Me on the other hand, I was cold... especially when I got nervous enough to bring the dog in my bag for a few minutes to let her warm up (which was totally unnecessary). My 5 degree quilt is well used and isn't really 5 degrees anymore. It also has a hole in the bottom of the foot that I usually plug with my down vest, which I hadn't brought. I was using the quilt and my ultralight MLD bivy, another piece of gear I've been experimenting with more lately. I was in no danger by any means, I just wasn't as snug and warm as I had expected to be.
I managed to keep the fire going for much of the night... except the coldest part of course. Oh well. I also melted a small hole in my bivy and sleepingbag. This would upset me more if the bag was new, or the bivy was waterproof, but I do need to do some patching. It turns out you can't use a down bag AND warm up by a fire. I knew this, but tried it anyway. I had build the fire in a pre-existing fire-ring that raised it up somewhat above the ground, this made banking it nigh impossible, especially combined with the ground being frozen solid. The wood there is a very fast-growing oak that burns almost like a softwood. So, that's why I failed to keep the fire going.
The next morning the dog had ludicrous amounts of energy and was so manic she was playing tug-aware with the backpack after I got it on her... it looked just as hilarious as it sounds, sadly I didn't get photos. I got enough sleep to be pretty happy, and had a nice pleasant walk out.
Conclusion
So, lessons learned:
- A good folding saw is an amazing tool, and I'll probably bring one on future winter bushcraft trips.
- To make a spoon, find an unchecked stick, or split a larger stick and use it off center
- The 3 stick method doesn't work without a soft substrate
- A stainless steel thermos and bottle is a wonderful combination of water bottles for winter trips
- Beau basically doesn't get cold, I won't worry about her again unless it's well below 0F
- Wool and cotton/nylon canvas blend layers are entirely reasonable for winter backpacking
- For colder weather, I could really use a warmer bag, and maybe a warmer sleeping pad
And... best of all, I got to spend a nice 20 hours or so outside instead of inside. It was beautiful both days. It feels so good to wake up in the forest, and have the first thing you do be to pack up your stuff and start walking.
Jess' new blog
2015-01-14
Jess has started her own blog:
http://wild-rambles.blogspot.com/
.
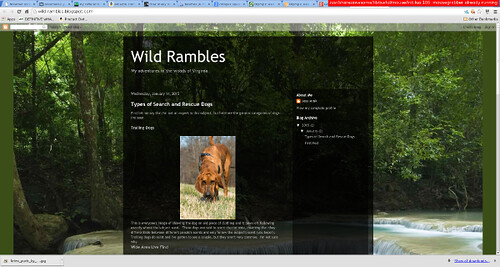
This part of a larger move. Jess will also be leaving SmallAdventures, since Jess and Brewer are no longer dating. We're still great friends and housemates, and I'm sure she'll be showing up here regularly anyway.
Best of luck to her and her blog.
Sharpening a great american saw
2015-01-05
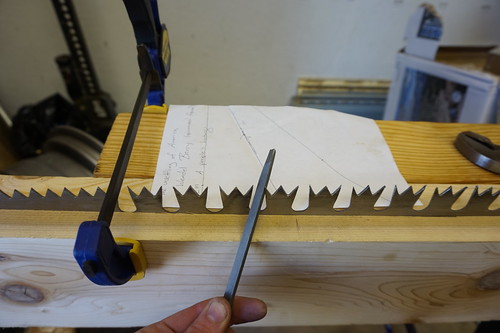
When I say a "Great American Saw" I'm not being flowery and philosophical. This is the technical name for the tooth pattern on my crosscut saw.
I got this saw a couple of months ago, and have since done a bit of cutting with it. I just wasn't happy with how it was cutting, so I decided to take a shot at sharpening it. I had never sharpened a saw, so this took a fair bit of research that I figured I'd share with you here.
Before going on with this post about sharpening a complex pattern you'll need the basics just like I did. These are important so you can understand what's going on and basic terminology. I could try and describe things but visuals are way better when trying to understand the angles involved. So, I suggest you do just as I did and watch these youtube videos. The first covers rip-cut saws, the simplest.
Well... that's a bit different. Once you get into bucking and felling saws. Basically, saws for cutting logs, there are a lot more patterns out there. Champion tooth variants are probably the most common. The tooth pattern above is called a Great American pattern. This also shows up as a "lightning tooth" (which I think is a brand name) or occasionally an "M" tooth, though strictly speaking I believe an M tooth should only have 2 points. M tooth patterns are really common on bucksaws (distinct from bucking saws).
In any case, it's pretty hard to find a resource explaining how to sharpen a Great American tooth pattern. After some digging I found some poorly photographed pages from a rather opaque book posted in a forum http://www.ukworkshop.co.uk/forums/post676349.html#p676349 . I used that, reading a few more forums, and the logic of how saw sharpening works in general I *think* I figured out how to do it.
The resulting saw certainly still cuts, and it seems to do so better than before so I think I succeeded. Here's how I did it.
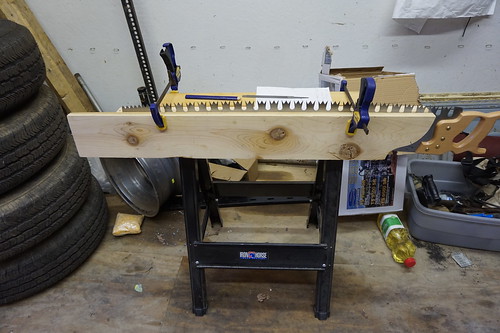
Tools
First, I lack a saw vise. I considered building one but in the end said to heck with it and used the setup you see above. This is a saw-horse, a 2x4, another piece of scrap wood, and 2 bar clamps. It's *okay* although the scrap-wood is thicker than ideal so blocks some file angles which is just a touch annoying.
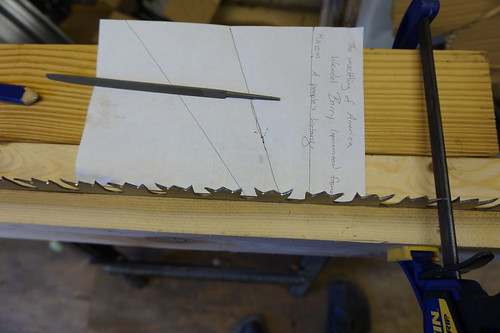
I picked up a simple triangular saw file as a file.
I wanted a 15 degree fleam. So, to get a 15 degree angle I used some basic geometry. I measured out a 3,4,5 triangle (6,8,10 inches actually). The smallest angle in this triangle is 30. I then bisected that angle using the standard geometry trick. Once I had that angle I folded the paper on the line so I could flip it over and measure -15 degrees easily as well.
Set
My saw is still fairly new, this is it's first sharpening, so I didn't worry too much about setting the teeth, I did a tiny bit of touch-up with a pair of heavy pliers.

I think the teeth could actually use a little more set. Everything I've read says the tips should hit at about double the width of the rest of the saw-blade. I figure I can add more set later if I need to and I'd rather not bend things too much on my first try sharpening a saw.
Fleam
It turns out that this saw was sharpened with basically no fleam at all originally! I found this rather surprising. In some other saw patterns (like a champion tooth) some teeth actually cut through the wood, and others clear away the cut strips. When that type of saw is working well you actually get strips of wood as your leftover, rather than dust. It looks like they sharpened it as if the center tooth of each set was a clearing tooth, and the two teeth on the ends of each group are cutting teeth.
This may have been intentional. In the Great American pattern all teeth usually serve both purposes, but this pattern is also well known for being difficult to draw through the wood. Extremely fast, but causing the user to wear out quickly. The sharpening they used did put a fleam on the outside (long) edge of each edge or cutting tooth. So it would cause the saw to slide over the middle-teeth.
The downside of this approach is you now have some cutting teeth, and some not cutting teeth. The cutting teeth will wear much faster. Wood is a tiny bit springy too and you want the cutting teeth to cut while the clearing teeth just skid along the surface a pull stuff away, if the cutting teeth are too short they won't be able to get into the wood much and each stroke won't cut off anything. If they are too long though the clearing teeth do nothing and the cut ends up full of "stuff".
My understanding is that the Great American pattern was invented before the concept of separating cutting teeth came about, and consequently the pattern clears quite well, even with no clearing teeth. Every tooth sort-of fills both roles. In this case the teeth should wear and closer to the same speed, and you don't have to carefully set the depth of your teeth every time you sharpen, making the tooth pattern fast and easy to sharpen.
So, I set every tooth at a 15 degree fleem, changing the pattern from how it was when I received it. In the future I may go up to 20 degree, but you start risking chipping bits of the tooth off and such, so it's a tradeoff, much like the angle-grind of an axe. I'm cutting mostly dead oak and hickory, so very hard woods, so I figured I'd try 15 for now... especially since it's more work to go higher since I have to reshape the saw.
Actually sharpening!
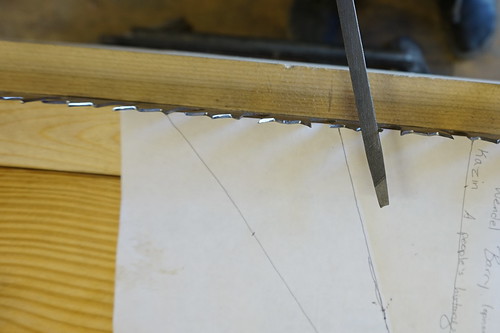
First lets talk about the simple part. If you watched the video above you saw how to sharpen a cross-cut saw (a saw with a fleam). Well, for the 2 notches in each set of 3 teeth I sharpened it just like that, putting a 15 degree fleem in. Note that the set of 3 teeth alternate the set. On the one I'm sharpening the middle-tooth might be bent away from me and the two end teeth towards me, then the next set the two end teeth will be towards me and the middle tooth away. You always want to sharpen it so the point ends up on the side farthest from the saw, the side the tooth is bent towards. If you work that out it turns out you *don't* alternate 15 and -15 degrees every time! When you switch teeth you keep the same angle... it's weird, but if you stare at it long enough it'll eventually make sense.
Here's kindof what this process looks like (photo is kinda upside-down I guess):
Then, you flip your piece of paper to do the other side of the M.
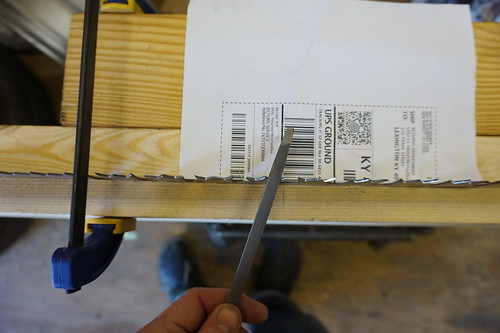
So, that's the middle notches. Now, for the edges of the teeth I kept my 15 degree fleem as well. Here I definitely will consider going to 20 eventually.
Reading through a forum I found mention of doing the ends by moving the butt end of the file downwards so the tip of the file is sticking up in the air at ~80 degrees. When I tried it I could see that by doing it this way you ensure a smooth transition into the rest of the tooth, if you do it horizontally it doesn't automatically take the right amount off below the tip. I could only hit maybe 60 degrees due to my jig, but it seemed to accomplish the task.
Note that although in my photos I am only using one hand, that's because the other is holding the camera. I found it far more effective to hold both ends of the file when doing this.
Overall it worked pretty well. I did get a bloody knuckle from ramming it into the jig repeatedly, and I stabbed hand a couple times on the teeth drawing a touch of blood, but nothing significant.
Because I was seriously reshaping the teeth, and at first was doing it quite slowly, this took a long time, something like 6 hours total. That said, I imagine that in the future I can do a touch-up in just a couple of minutes, just swipe the file down each side of each tooth twice and call it good.
Another surprising thing to discover is that many of the teeth weren't pointy! A lot of them had flat tips. I suspect this was actually manufacturing flaws. Nothing serious, but it was a lesson not to expect a tool to arrive sharp. It's also part of why I was willing to adjust the fleam. Had it been perfect, and sawn perfectly when I got it, I would want to sharpen it just how it was. I didn't get every point pointy, but almost all of them are now and the all have a sharp edge. Next sharpening I can probably get it sharper than I did this time, I ran out of patience I guess, and didn't want to use up all that metal.
Trying it out
I don't have a full report for you yet, as it was late when I finished. I did take a few quick cuts at a log and it appears to saw quite a bit faster than before. It's harder to push through the wood than before. This could just be because I'm actually cutting something off with each stroke now, because it's sharp enough to dig in. It could also be that the fleam I added to that middle tooth means now there are more cutting teeth that I'm pushing through the wood. I don't think I need more cleaning teeth, with dead wood you don't take off huge shavings that need to be pulled out, and it doesn't feel like it's clogging at all. The greener and softer the wood the more the cleaning teeth matter, because the more wood you can cut with a single pass.
In any case, I have succeeded in making the saw sharper. I'd love to get even better at this, but now I can at least maintain my tool myself, and thus use a sharp saw instead of a dull one. Awesome!
I have a book on the way describing how to do this, so I'm curious to see if it matches :D.
Lithics from New Mexico
2015-01-03
The term "lithics" refers to human made stone tools. The more colloquial term for this would be "arrow heads", though many of the tools often called such aren't actually for arrows at all.
My analysis
I am a novice flint-knapper for sure, so don't take this as coming from an expert. But, I 've broken a few rocks, and talked to expects and I do see a little bit more than just some arrow points here. So, let me explain what I see, so you can start trying to see things in points yourself.
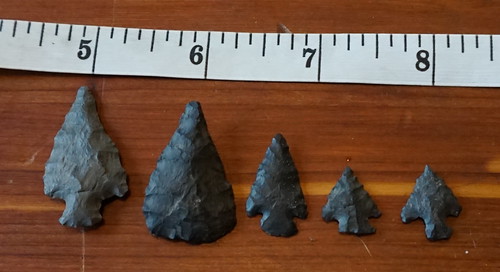
Size
The most striking thing is how small some of these points are.The smallest being only about a half inch across. She said there were larger ones in the collection, but lets talk about these little ones for a moment.
Small "arrow" points like this have been found basically everywhere on every continent. It was believed for a while that the pieces found in Egypt were "ceremonial". There are very clear exceptions, but anyone who's studies a bit of archaeology should get suspicious when they hear that... especially when the item appears virtually everywhere in the world.
A couple experimental archaeology experts I know are pushing the theory that these are in fact tips for blow-gun darts. This theory comes in part from a historical trend of ignoring everything but lithics at archeological sites, it's only relatively recently that organic matter (e.g. what might remain of a blowgun) would even have a chance of being found. Unlike a bow though a blow-gun is much harder to identify.
Stone
These are also made out of a pretty hard chert. This is a perfect "tool" chert, it doesn't make the absolute sharpest points, but they'll hold an edge for much longer. This is an ideal stone for making axes, drills, etc. that will see heavy use.
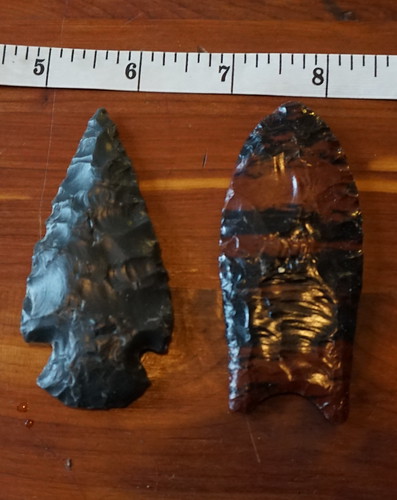
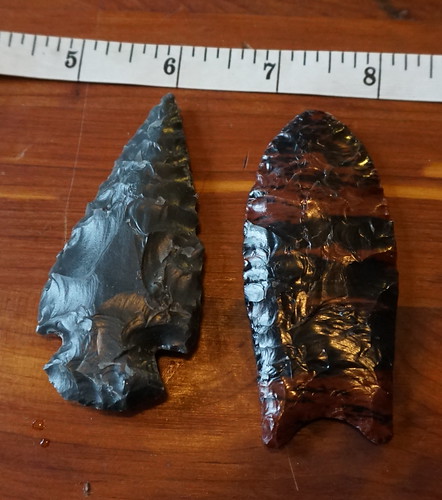
Now, lets talk a little about how these particular points were made. For comparison lets look at some other points. These points were both made by friends of mine.
Marks
The point on the left was made by a relative novice (who is still much better than I am). It took him something like a day to make. The point on the right was made by an expert, probably one of the worlds best flintknappers, and is a museum quality replica of a Clovis point. This probably took him a 2-4 of hours.
Both of these are made with obsidian. Note how much shiner they look. These points are going to be somewhat sharper, but also a little bit more fragile. When looking at how the stone is knapped this is something to take into account. The more fragile stone tends to be more "perfect" so it breaks a little more like you expect, but it also shatters more easily so you need good support for each break. It also simply takes less force to break.
In flintknapping your goal is to break off a perfect flake, and not have extra energy around to break anything else. If the flake snaps in half, it generally means you were just a little off. Now this isn't just about how much energy you use, it's also about directing it. You want the energy you do put into the stone to get carried just along the path you direct it to, not anywhere else. To direct that energy you need enough stone in the right places that it doesn't just crush instead, it has to carry the shock-wave without failing itself.
Okay now look at these two stones again. You may notice some interesting differences (besides their basic shape). The right piece is actually quite irregular. Remember that it's a reproduction. It is believed that cloves points were made large and resharpened repeatedly, as they got smaller they'd be used for different tasks. Part of why it looks more "random" is that this sharpening process puts more faces on the stone, and can't just be done by wrote. You read the stone depending on where it broke etc.
Despite the irregularity look at that edge, the final sharpening was done in a very very regular way. They walked down the edge and just knicked off a little piece at each spot. This would've taken the master knapper of couple of minutes. Also look at the breaks and find the longest continuous groove you can on the piece, the higher the ratio of length to width the harder the break was to do. A master does these with ease, the novice will botch them regularly.
Look at the spots where a break "scooped" up and out of the rock. You'll also see curved ridging running crossways across the break (parallel with the edge of the piece, the perpendicular riding is seperate breaks). These are generally spots where the person hit hard, and shot a little low (contrary to some experts it doesn't have to be direct concussion). My friend (the master) explains this behavior as the pressure wave and shock wave traveling at different speeds through the piece, the ridging is the waves interacting. These breaks tend to pop up and out of the rock stopping the break early in an edge, rather then propagating all the way through in a (near) straight line. When this happens it makes your later breaks harder, and is generally a mistake. A master may still do this when trying to get extremely long narrow breaks, but it'll tend to be rare, and small.
So, staring at the piece on the left, and the piece on the right, you can probably start to pick up some of the differences between what it looks like when a master is working fairly fast, and a novice is working slowly. Now imagine a master who works just a touch faster, because they are not making art pieces, they are making tools that they need, and "good enough" is the name of the game.
Looking back at the pieces at the top, to me they read a bit more like a master knocking out entirely functional pieces very quickly. I find this pretty interesting, and I believe it's indicative of probably not being some kid screwing around, but probably useful points made by someone who did this a lot.
To be honest, I have broken very very little chert, so I may be reading into these pieces completely incorrectly. Sometime I should try and get my hands on this type of chert and try breaking it to get a better idea.
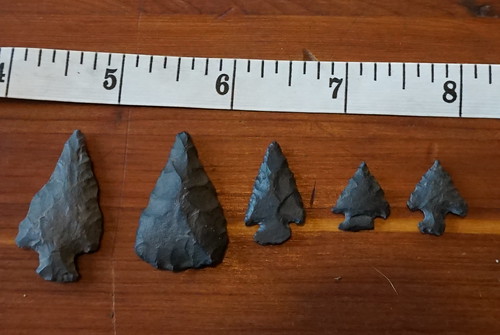
Shape
Most of these points do appear to be projectile points, and given their size the largest one (on the far left) is probably an arrow point. I've already talked about the smaller ones, but what about the one second to the left?
I find the one second to the left really interesting. Looking at this point I can't figure out how it would've been hafted. It's slanted all of the way up the sides.
If you look at the clovis point (the super pretty one my friend made) it's almost flat on the sides, and very thin at the base. To haft this you bind a stick maybe 3 inches down the shaft, split it down to the binding, slide the stick over the base of the point, and then wrap it with sinew. Works great.
The rest of the points are pretty obvious, you do a split shaft (or maybe even carve out a notch) and then wrap it just above the "ears" sticking out at the bottom, sitting hte string in the notch in the point made for that purpose.
That one point though has no ears, and is more slanted than I would've wanted to simply wrap. This makes me think it might be a different tool entirely. Maybe it was an arrow-point and broke, and what we see is a tool made from the tip that broke off? I don't know, but I'm really curious if anyone else can tell me.
Oh, one more thing. Some of these could be drills, there is something that makes me think they aren't though. The wide ones are wider than I've ever seen a drill made before, there is no advantage I'm aware of to making one like that, though it did occur to me that a repeatedly sharpened drill would slowly head towards this shape. Still though, I'd expect a drill to be used until the tip snaps off or is at least extremely dull (unlike arrow heads which are frequently lost). These all seem sharp.
Conclusion
I don't really know that much! Just a bit. I'd love to hear anything anyone else has to say about these points and why. Don't be shy, and feel free to disagree.
P.S. sorry about the comments section, I've been poking at alternative blogging software but just haven't gotten around to really doing anything about it.
UPDATE
My mom gave me some more specifics. These would've been gathered closer to 1930, and their ranch was a long-term lease on the Mescalero Apache Reservation, east of the Sacramento Mountains, about 15 miles south-west of Cloudcroft.
Jeep: finally ready for the trail
2014-12-15
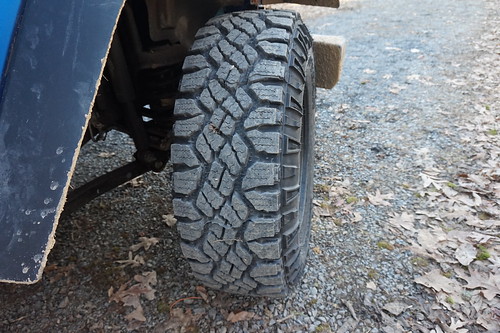
The new tires and rims came in today, so I went and picked them up. Here's my rig:
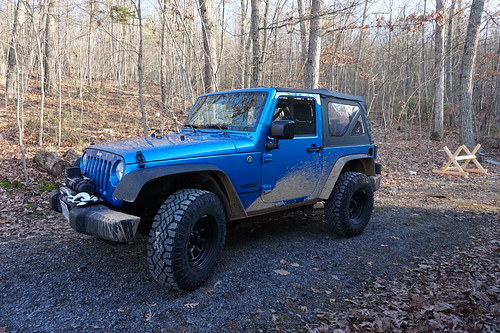
This is a 2015 Wrangler Sport 2Door w/AC (no other upgrades, 3.21 gears). Here's the modifications I've made to date:
- drains: drilled in plastic, floor plugs pulled
- hitch receiver: like factory, forgot the brand
- vacuum pump relo: OR vacuum pump relocation bracket
- fenders: trim, remove liner, spray bedliner coating
- programming: turn signal, light timeout, acc timeout, speedo
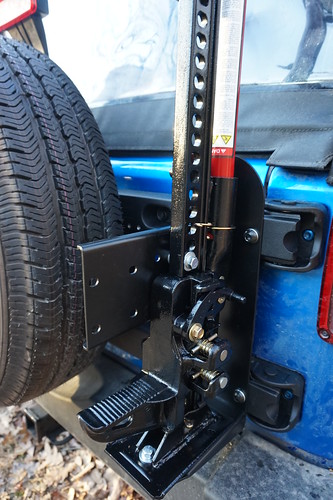
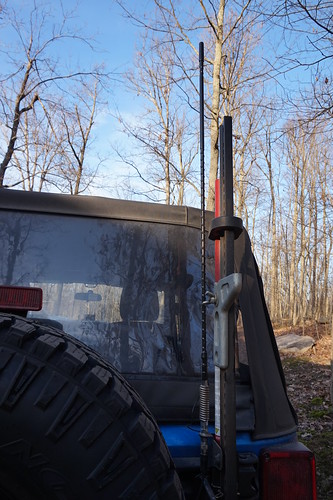
- spare-tire mount: teraflex hinged tire-carrier
- highlift mount: teraflex accessory mount
- headrests: bent back
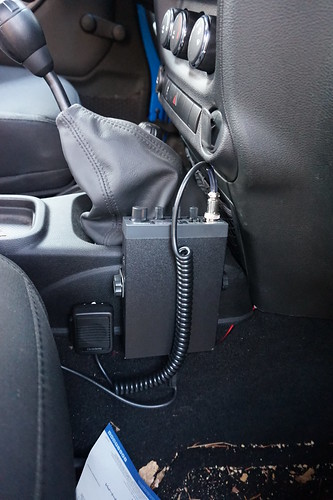
- CB radio: midland CB, Wilson 305-483 Silver Load
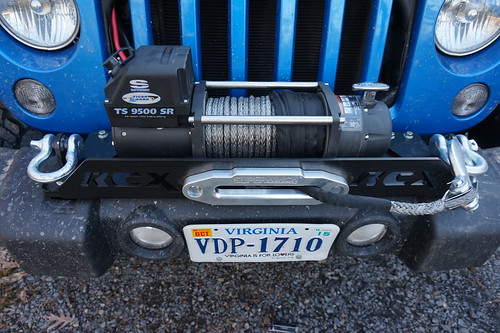
- Winch: superwinch 9500, synthetic rope
- Winch plate: Rough Country, with D rings
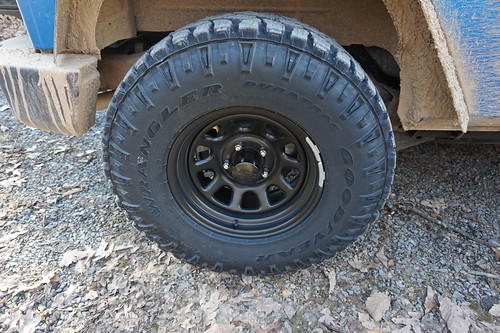
- Tires: duratrak 285/75R16
- wheels: 4.25" backset steel
- http://www.blog.smalladventures.net/2014/11/jeep-vacume-pump-and-fenders.html
- http://www.blog.smalladventures.net/2014/11/trivial-jeep-mods.html
Since my last post I added the tire carrier and jack mount. It basically replaces the factory hinge with something longer that goes all the way to the tire. This is necessary because the stock hinges are too lightweight for heavy tires. My new tires might just barley be okay, but I needed to reinforce it if I wanted to ever use a spare-tire mount bike rack. The carrier went on exactly as the instructions described just bolted on, it hardly took me any time at all so I'll leave out the detail. Anyway, I went from this:
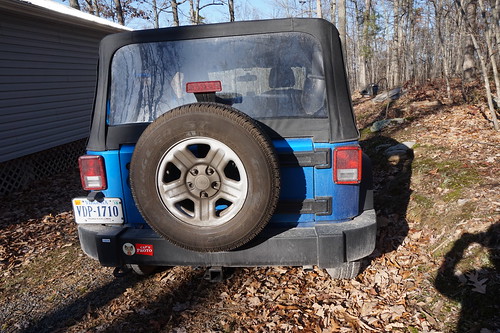
To this:
This also gives a place for the CB radio antenna I added next. I did some reading, and basically if you want to hang out with other folks at all, jeep clubs, etc. you need a CB radio. I always kindof wanted to really install one properly, so I did. The Jeep Wrangler is something of a rediculous vehicle inside, everything just pulls out, so I was able to route the antenna wire trivially, the only hard bit was fishing it through the tailgate, which I did with a little stiff wire, some tape, and little swearing.
I have a habit of doing stupid things, and doing them alone. It's a miracle I never got Jane stuck (the Toyota Tacoma I sold to Jess). A Jeep Wrangler is just more encouragement to do stupid things. Given that I figured I really need a winch. Also, I was dragging trees with this Jeep before it hit 200 miles, and a winch makes a lot of that type of work easier and safer. General advice everyone says is around 2x to 3x the weight of your vehicle. My Jeep is ~3600 lbs (I know, modern cars are HEAVY), and that's before I weight it down with heavy tires and other junk. Given that I got a 9600 lb superwinch.
If you know about winches and ropes you'll know why I got a synthetic winch rope. Steel cable stretches significantly more than synthetic winch rope, and as a result can be extremely dangerous if it breaks, quite capable of killing people. Synthetic winch rope is so non-elastic that it will reportedly drop to the ground safely if it breaks. Additionally sharp kinks in it don't affect it much, and it doesn't rust. It does get damaged by UV over time of course, but oh well. Before the winch I've always kept 16000lb synthetic winch rope in my car, to use for vectored pull and the like (look it up if you are curious, you can move VERY heavy things with just a rope if you know what you are doing, and can capture your progress).
Anyway, THIS was the PITA project. To mount the winch plate
- Pull the plastic air-dam below the front bumper
- Pull off the front bumper
- Strip out the plastic screws on the plastic piece behind the front bumper, try and saw it off, finally pry it off with a giant screw-driver.
- Disassemble the bumper and swap the tow-hooks for winch-plate mounts
- Put the bumper back on, drive to the store and buy a dremel
- Remove the front bumper again
- Cut off the vacuum pump mount with the dremel, paint over the raw metal, and bolt on the mounting plates
- Reinstall the bumper, forcing the nuts on, assuming it's because the bolts were crappy (after spending a long time on youtube looking for help)
- Realize you used the wrong nuts and they gave you new ones (standard instead of metric) and thus stripped some of the threads. Disassemble everything, swap back to the tow hooks and put it mostly back together enough to drive safely
- Come back, remove the bumper again, swap the tow-hooks for plate mounts again, put it back together with the right nuts.
- Bolt the winch mounting plates back on again, realize you have no way to tighten the bolts as they are enormous, and one is completely inside a frame member... decide to ignore it for now.
- Bolt the winch-plate to the winch
- Open up holes in the winch-plate using a dremel (burning out 2 bits) because the bolts for the aluminum haus are too large, and bolt on the haus
- Loosen all the nuts on bumper so everythign shifts around loosely.
- Bolt the winch-plate to the mounts... except two bolts.
- Shove on the thing for an hour finally realizing where you can shim to hold it all in place while you get the last 2 bolts in.
- Tighten the bumper bolts and winch-plate mounting bolts down again
- To tighten those impossible bolts, buy a socket that's a little too lose, and an extender to match. Get the stocket up inside the frame member and over the bolt, there's a hole that doesn't quite line up that just barely fits a 1/4" drive, use this for the extender, tighten the bolt
- Remove a nut from your battery so you can get the right size to bolt down your groundline
- Drop the nut into the engine bay
- To get it out without serious electrocution remove the groundline
- In the process pop the clamp off the groundline... be sure to completely lose this in the engine bay.
- Look for the clamp for 2 hours in the engine bay and on the ground, give up, go home and fabricate one the best you can from an old license plate.
- Replace the plastic air-dam
- Oh yeah, and use that nut to attach the groundline
To explain the tires. I wanted something that was reasonable on the road with no too much road noise, something that would be fun offroad, and something that would handle both snow and ice (totally different things), really well. For one, I want to be able to get in the driveway this winter, and I want to be lazy about shoveling :P.
As it happened, on Saturday Jess and I were out hiking in George Washington National Forest. We had decided to go somewhere different, so we were a little ways in on some mostly pretty smooth dirt roads. It was only exciting at any point due to the ice patches, which I was sliding on a bit. In any case, on our way out we blew a tire on some dinky little rock stuck in the dirt. It tore a slash in the tread of my left rear tire, firing the TPMS sensor. I took a shot at patching it, but to no avail given how it tore. If you were in any doubt, the stock wrangler sport tires really are just crappy street tires, just ignore the M+S rating. Happily though, I already had my new tires on the way, ordered almost a week prior.
After much reading I found that 33" tires run really well on the JK. The rest of the components are generally up to snuff so you don't tend to break things too much. 35" tires lead quickly to a long list of modifications such as reinforcing the front Dana 30 axle and things like that. I'm not looking to build a monster here, just something that's a lot of fun on the trails, and at least as capable as Jane was.
I really wanted narrow tires or "pizza cutters". Narrow tires would keep my gas milage up. In shallow snow like VA tends to get they tend to punch through to the bottom giving better traction than wide tires do, similar for mud. They fail hard in bottomless mud and snow, but I figured that's okay.
As it turned out though, I couldn't get 33" pizza cutters (say 235/85R16) in the tread I wanted, that is something with lots of siping but an open almost mud tread. I was also searching for something around 8 ply, but these tires only come in 10 ply in this size, oh well. So, I gave up and got what I could in the tire I liked 285/75/R16 10 ply. Driving home they felt pretty okay. Jeeps are a little flighty at highway speed, and the new tires make it worse than the old ones did, but it's definitely drivable. I'm tempted to fiddle with the toe-in to try and stabilize the new shoes a little. We'll see.
The rims are 4.25" backset. I got paranoid at the last minute, as it turns out I probably could've gotten away with a fair bit more backset (backset is the distance from the inner edge of the rim, to where the wheel bolts to the axle, so more backset moves the wheel more inboard). More backset has the advantage of making your vehicle narrower overall and fitting your wheels under the fenders to make them legal in more states. A lot of folks like the look of less backset, and it's less likely to end up rubbing, and I will say... I'm not even close to rubbing anywhere, especially with the fender trim. I kindof want to try going to full flex just to see if it rubs then, but I doubt it will.
I'm so used to "underpowered" vehicles, I actually like the feel of the engine and transmission a little better with the larger tires and 3.21 gears. It's easier to keep static friction and not overtorque - I know I'm breaking some terrible rule of 4x4's and MORE POWER. Right now I'm thinking rather than re-gear if I feel I need more low-end torque I might consider swapping the transfer case... Not for a while though, that's a lot of money to drop and she's built enough to be pretty darned capable. Besides that I still haven't tried things like pulling my trailer.
I can't wait to get the rig out on the trail. It should be a lot of fun.