
Gravity filters
2014-10-05
I just got back from a four day backpacking trip with my parents. We were playing with a lot of new gear this trip, and had a few difficulties as you usually do.
I had a new sawyer squeeze mini, and my dad had gotten a new platypus gravityworks system, and then substituted in a rapid-pure filter. This did not work well as it turned out, but for hilarious reasons.
Let me back up a bit and talk about some of these newer filter technologies. For years there have been 2 primary filter types, carbon and ceramic. Carbon filters have short lifespans and don't remove viruses, but they are cheap and relatively robust. Ceramic filters are fragile, often require a bit more pressure, but are quite sensitive to being dropped.
More recently the technology used in dialysis machines has made it in to water filters. The first major production filter to incorporate this was the MSR hyperflow. It got great reviews initially, but was generally a disaster. Requiring back-flushing every couple of gallons it just wasn't usable. The pressures required to push the water through caused problems for the seals, and in general they screwed up on the valve designs. Everyone I knew who had one was plagued with problems.
A bit later the sawyer squeeze came out from an independent company. This filter using the same tech took the ultralight community by storm. It's simplicity of being *just* the filter unit with no pump complexity made it lightweight, and tempting for minimalists. You could put it inline in your drinking system, or squeeze through it using a bag. It mostly works, but the pressures occasionally cause the bags to bust... annoying, but not deadly. You still have to backflush all the time though. The mini is just a newer miniature version of this filter with a little bit slower filter rate. I picked one up after my polar-pure bottle (purchased in 2009, and chipped the same year) finally shattered on the kitchen floor while prepping for a recent trip. This was it's second trip actually, so I've filtered maybe 4-6 gallons with it now... and it's annoyingly slow.
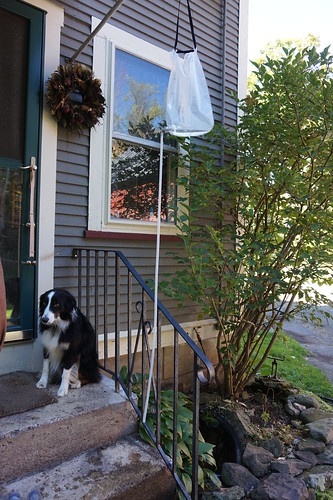
My dad is a bit of a gear-head, and found out about a newer technology. Instead of being based on super-tiny tubes, it uses more of a mesh. It's still small enough to remove viruses and such, but due to the mesh shape supposedly achieves a better flow rate. Dad's idea was to use the platypus gravity-works filter system, which includes all the bags and hoses in a nice configuration he didn't have to figure out himself, and then swap in a faster filter. Sounds good in theory.
But: ALWAYS TEST YOUR GEAR
On our trip, water barely flowed through his filter. He could filter 3 liters overnight after half an hour of fiddling to remove all the air-bubbles. My sawyer squeeze was too annoying to use to filter everyones water, but the combination got us by. In retrospect we should've hooked his system through my filter, but at the time we didn't think the pressure would be enough... it didn't work with his super-high-flow rate one after all, why would it work with mine?
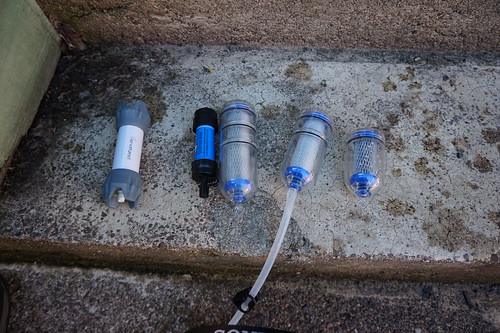
Well, today we decided to test it. He hooked up his system and water just didn't flow. We hooked up the sawyer and it dribbled, like okay... this is annoying and not really usable but kinda what you'd expect. It certainly implies that his is somehow faulty though. Dad had read reviews (on Backpacking Light) that were VERY detailed, so it all just didn't make sense. So, we hooked up the smallest of his 3 filters from rapid-pure, and a STREAM of water shot out! Wait... what??!!!
Next we hooked up the mid-sized one, it was even faster. We timed both, the small one is just under 1 liter a minute, the medium is more like 1.1. We didn't get the 1.2 and 1.6 they advertise, but it was fast, and we may not have hit the requisite PSI for the advertised rate. In any case, it's way faster than dad's old sweet-water pump! In fact, it's the fastest backpacking filter I've ever seen.
Finally we hooked up the original gravity-works filter, it absolutely shot out of the far end as I hooked it up, so much dad jumped out of the way. We timed it at over 2 liters a minute. We're not sure what tech this filter uses, but whatever it is it seems to be more fragile. It's possible it clogs faster or something than the newer tech, we don't know, it'd probably be interesting to try both for a while and see how they last in practice.
These filters are starting to peak my interest a bit more now. I decided on this trip that the squeeze isn't really worth it. It's too slow and annoying. The first half-cup comes out okay when I set on a 2 liter bottle, but it's just annoying to use. It doesn't take forever, but it's too slow for my liking. It's not that I'm in a rush, but I don't want to spend all my time filtering water. I like to spend it wandering, starting fires, building shelters etc. In fact, I think I drank less than I needed sometimes because getting water was annoying.
The squeeze mini though threads directly on to a standard soda bottle, which for me is a big deal since I use standard soda bottles and stainless steel bottles to the exclusion of all else these days. The day one of these faster ones comes in a form-factor that's that simple, so i can use it on top of a bottle, or as an inline filter, or as a squeeze filter, I might finally switch off iodine. Maybe I can fashion something myself. In the meantime, I recently found more polar-pure on Amazon. Jess and I purchased 5 bottles of it in fact, since we're not sure we'll ever find it again. My last bottle lasted me 5 years before I broke it, so I should be set until these filters come in the form-factor I want. BTW, If you want polar-pure, I'd get on that fast.
For those who are okay with a little bulk, complexity, and fragility of bladders though the future is now. These things are impressive. I might get something similar to store in my car and use when car-camping, where these things matter less to me.
Update:
My dad called the company he bought the filter through, and they contacted the manufacturer. The manufacturer asked for the filter back so they could understand the problem, and sent 2 replacement filters as thanks.
When they got it back they tested it and found that indeed it is faulty and appears to be a manufacturing defect, and they're looking at how to improve their processes. So far this is the only incident I'm aware of of this kind.
Update:
After a little usage I gave up gravity filters again. I just can't keep them from clogging for long enough. They are fine for a week or weekend, but for long-term use they just don't cut the mustard. I've gone back to not treating water at all, or using polar pure iodine.
Butchering Rabbits (photos
2014-09-20
Recently Jess and I met a friend of a friend. We were talking about long distance backpacking and primitive skills and that sort of thing. At some point the conversation turned towards animals, using them, eating them, etc. Partly as a meat-eater she was very interested in trying actually slaughtering and butchering an animal with us.
Jess had already been planning on getting an animal to put up some meat for ourselves. Partly because we like the meat better, and partly because as uncomfortable as it is, we both feel a lot more comfortable knowing exactly how the animal lived and died. We figure it's better than the unknowns.
So, one weekend our new friend came by our house. Jess had found a source of rabbits on craigslist and that that evening we drove out to their house to pick them up. We got 3 rabbits. A little younger than optimal for meat, but we decided to roll with it.
We had brought 2 rubbermaid bins that we'd carefully drilled holes in the tops of. We put the rabbits in these and went home. At home we tried to make the rabbits comfortable in our shower.

After not long they were hopping around pretty chill. We don't particularly believe in avoiding feeding animals before slaughter, it might make our jobs a tiny tiny bit easier, but I'd rather the animals are happy. We had some sprouts we grew that we'd failed to eat soon enough, so we gave these to the rabbits, they enjoyed them thoroughly
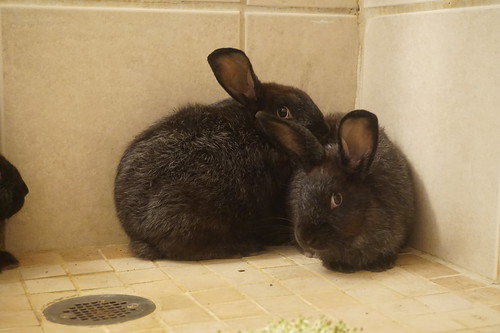
Overnight they didn't even hop out of the shower. Domestic rabbits are kindof ludicrously relaxed.
I should mention here that this was actually my first time taking part in slaughtering an animal. I've processed animals before, but they were roadkill. I've spent a lot of time thinking about hunting, and considering taking an animals life, and somehow for me hunting is notionally more comfortable. It sounds weird, but you get a chance to "ask" the animal, and in many cases it gets a chance to kindof decide to leave or not. It sounds crazy, but I know people who take game this way, and yes, they do take game in the end.
Anyway. The next day we talked for a while. We went to the rabbits and held them, petted them, got to know them, and we thanked them. Once we all felt (or at least said) we were ready, we slaughted the rabbits.
To actually slaughter them we used the "broom-stick" method. There are tons of good youtube videos of this method. Basically, you put the animal on the ground. You place the broomstick behind the animals head across the neck. Then you push down on the broomstick with 2 feet, and pull up on the rabbit's hind-legs until the rabbit dies. It takes only about a second.
We went one-by-one each doing one rabbit. I went first. I pulled to hard and popped the head off, out of fear that I might not kill fast enough. That wasn't a problem though. Afterwards I cried... it's hard to explain, I had done this with intention and knowledge, and I wasn't sad. My emotion was "crying", not sadness.
I explained to our friend that to me, it's important that it's a little hard every time you do it. If it wasn't hard, it definitely would not be okay by me. It would be creepy and weird and wrong.
Anyway, we all took a little time to deal with it, and then got to butchering. Jess had both processed enough animals that this part was just not emotional anymore. We were looking at meat... dinner. It took a minute before we realized our friend was not of the same mind and was still seeing the animal she had just killed; though she was pushing bravely on anyway.
We were so caught up in it that I failed to take any pictures. So, a while later we had this:
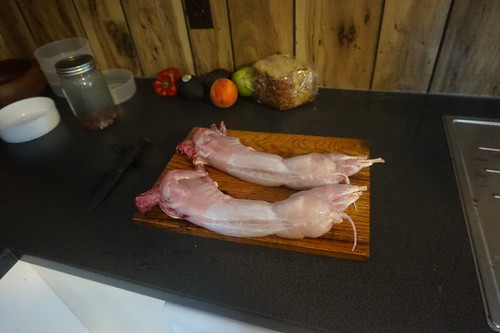
And this
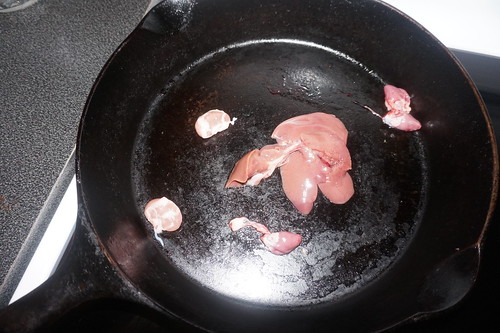
Oh, and blood pudding which I failed to take a picture of. We ate the blood putting and the organs as lunch.
We dried the pelts for other uses. Jess is going to try to tan hers. I tried to tan a wild-rabbit pelt and ended up tearing it up quite a bit due to it being so thin. So I declined. Domestic rabbit skin is much thicker though, so Jess stands a good chance of success.
That evening we roasted one of the rabbits for dinner. It was good. It was odd to eat domestic meat that I had butchered, I'm used to the meat being very rich, wild meat. This was much richer than commercial meat, but not nearly as rich as wild.
Jess and I made a soup with the rest of the carcass that made several meals. We used the meat in probably 3 subsequent stir-frys as well. We took the other 2 rabbits and chopped them up and froze them for later use. We'll make a minimum of 2 more soups, and the meat should be most of what we need for a few months.
So, now we can meat for a while where we know where it came from, how it lived, and how it died. There are few things I've found so grounding as eating meat where that is the case. It makes you turn and look at the rest of your world the same way. Is it comfortable? No not entirely. Does it make me feel better about myself than eating other meat? Definitely. Would not eating meat make me feel even better? No... it wouldn't, and explaining that I'll leave for another time.
Sorry this post lacks the technical bits in the middle. We'll try and get more photos the next time we need more good meat.
Canning over a fire
2014-09-20
Now that Jess and I are finally settled in a place again we're starting to get into the rhythm of working on projects.
Jess through a housewarming party, and a farmer friend brought us some spare produce, mostly tomatoes and cucumbers. So we decided to can them.
Jess picked up a nice canning pot, but when we tried to use it we realized it didn't work on our stove, because our stove is electric glass top. The air-gap between the pot and the stove was way too large, so the water never boiled.
Our next thought was to use the propane camping stove. We canned a few jars of pickles on the propane stove, and it worked great... except that we used most of a canister of propane! That makes for expensive pickles!
After much consideration we realized that we could just do it over a fire, so we got to work. I gathered firewood and built a tripod while jess finished the preperatory steps, built a fire-circle, and attached a wire to the handles of the pot as a bail.
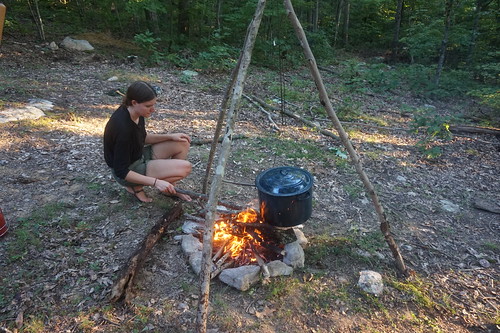
Most of the forest around us is oak, so we didn't have too much trouble getting a good fire going (cheating with a lighter). Two evenings of canning and we had canned this:
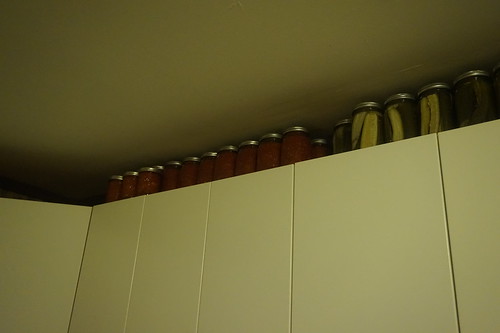
Not bad!
Today I opened one of the jars of pickles... Crunchy and delicious! The recipe we used was hotpack with a bit of mustard in it, and a nice balance of garlic and dill.
DYI: Chair seat
2014-07-26
I inherited two chairs, both partially broken. The chair frame were solid, but the several of the slats in the seats were broken. As luck would have it I was able to build one complete chair-seat using the two existing ones. Then came how to make a seat for the other one.
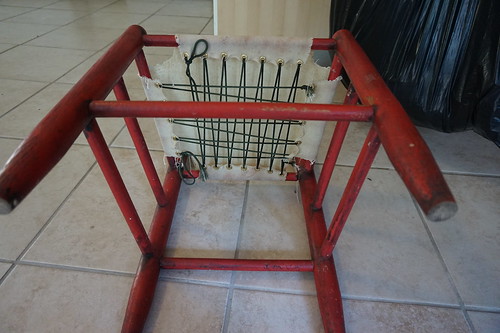
I have no idea how this is normally done, but rather than look it up I decided to try my own idea. I had some 7 ounce canvas from my tarp experiments. I also had grommets, and 550 paracord. My idea was to make a canvas seat, laced on the bottom, and that's about what I got:
And here's what the bottom looks like:
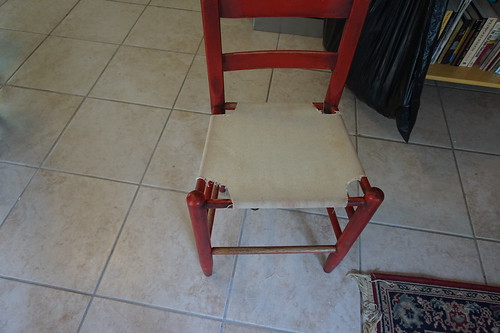
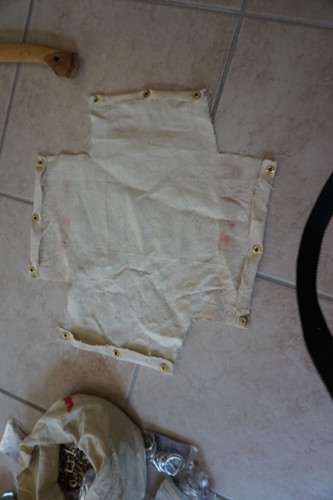
It took me two tries to cut the right shape. I was WAY too lazy the first time. Second time I measured much more carefully, then checked it against the feet of the chair as a sanity check. Based on that I caught several measuring mistakes. I did a test fitting actually before putting in all the grommets (it's a lot of grommets). Here's what that looked like:
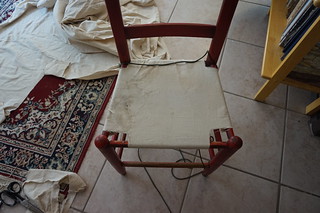 Notice all the dirt on the seat. Before the final fitting I soaked it for a while in some non-chlorine bleach and warm water to get the stains out. I mounted it wet, As it dries it should also shrink a little helping with the fit.
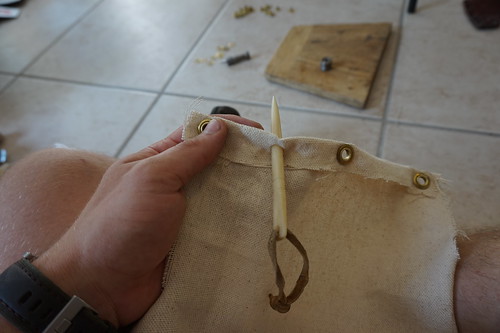
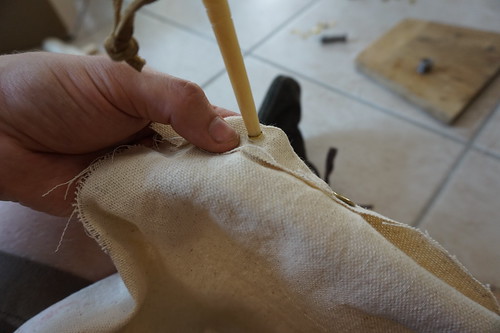
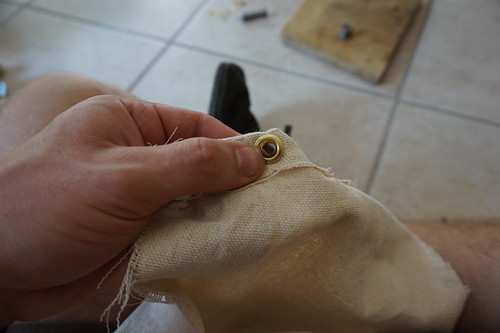
Besides cutting the right shape there as only one tricky setp to this project. The grommets are not totally trivial. This fabric is a very loose weave, so it turns out you can push the fibers out of the way rather than breaking any, this should help retain the strength. But, it's hard to get the grommet between the threads. To solve this I discovered if I used my elk-bone awl to create the hole, I could slide the grommet up on to the bone-awl, and just work the threads off the awl and down over the grommet. Here's a series of pictures to help.
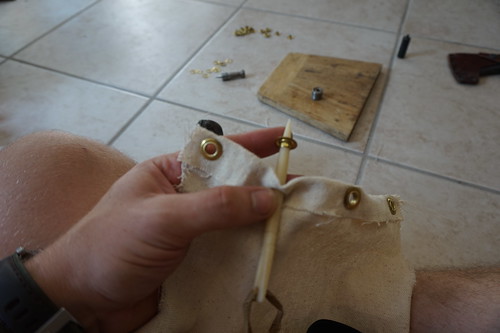
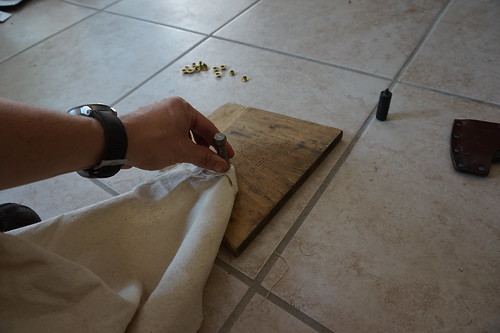
After I had these locked in I actually finished setting them all out on the deck, as hammering that hard might shatter a tile.
Overall I'm pretty happy with the result. The unfinished edge on the corners is a little rough, and may shorten it's lifespan. If I do it again I'll see about finishing those. I can crank it pretty tight, and I expect it'll take a couple of tightenings before it really stays taught. A tight as I can crank it though it seems good enough for my somewhat indelicate rear :P. I'm very curious to see how well it holds up.
Update
Tore out one grommet in the back trying to crank it really tight. This canvas can't hold up to that kind of abuse. It's at the back-side where it doesn't get much stress during use, so I faked a hacky repair (just wrapped over the chair frame instead and skipped that grommet). It may just be that the canvas is too weak, but I'm going to wait and see.
Oh also, you can definitely feel the front bar, it's still usable, but definitely not as nice as the slat-seat of the other chair.
MYOG: Canvas Tarp Experiment
2014-07-20
While we were in Vermont I got the idea to make a canvas tarp. The idea was to 2 pieces of canvas that we could use to roll our gear up in and tie it to our pack frames, then attach the two pieces to make a nice tarp to sleep under.
I spent a while looking up various types of canvas. What I wanted was 8 ounce cotton duck canvas. Duck canvas has a weave that makes it quite water resustant. I wanted 8 ounce because that's the lightest duck has ever been made.
Well, 8 ounce duck is basically unavailable, 10 ounce is the lightest you can get. I'd like linen duck even better, but good luck finding that. If you touch canvas the water will tend to wick onto you, so I wanted a larger tarp then normal, I figured 10x9'. At 10 ounces a yard this comes to 6.25 lbs. At half that for each of us (plus a little for ties and overlap), we'd each be carrying ~3.25 lbs of shelter. That's not terrible, but it's not light either. At 8 ounces that would be ~2.6 lbs, which is sounding a lot nicer.
Not being satisfied with what I could find I decided to try getting raw 7-ounce non-duck canvas, and seeing what would happen. I got raw because I don't like the carcinogens in the flame retardants. If it didn't work out I'd have canvas for other projects, so it wouldn't be a total loss. This comes out more like 2.3 lbs each. And I made this:
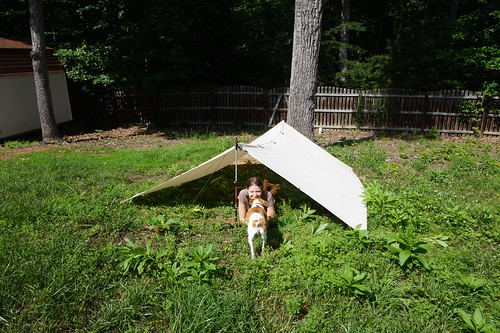
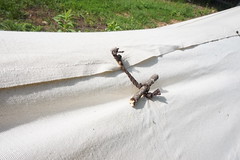
This is made entirely of cotton and linen. It's stitched with a cotton jeens thread, and the tie-outs are made from linen twine I plied into cord for this purpose. The joints along the ridgeline work like below, a large loop goes through a small loop and a stick is stuck through the large-loop to join them.
Both halves also have 8 tieouts themselves, so each can be used as a smaller standalone tarp.
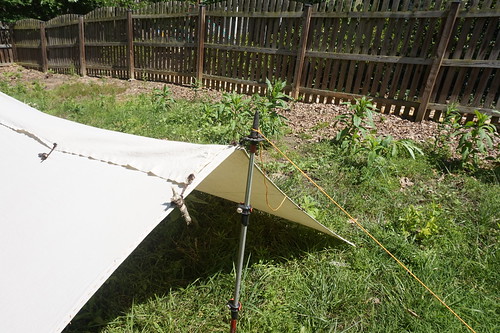
When we pitched it we immediatly found one flaw in my design. I hadn't provided a way to pull *both* tarps taught with the guyline, only one. so we ended up having to join them with a rock like so:
You can see where the normal ridge joint is, it's down the side a bit, the problem is that this didn't attach it at the actual ridgeline itself, only several inches down at the edge of the overlap. The rock worked fine though.
We slept under it like this in a decent thunderstorm in Vermont. The ridge-joint worked very well, but the fabric did not. We did not get soaked, but we certainly did get wet. We were using a blanket, rather than down sleepingbags, so we stayed out all night and were fine, but it simple didn't cut it. The rain would hit and mist through the fabric due to the weave simply being too loose.
Recently I ran it 3 loads through the washer and dryer on hot, to see what we could do. The tarp was originally 11 feet long and about 10 feet wide. It is now about 10 feet long and 9 feet wide (my target dimensions, I knew it would shrink). The hope is that this has closed the pores enough... sadly we've yet to get a good rainstorm.
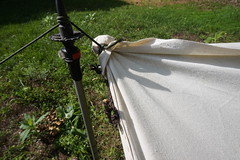
I also fixed the end joints very simply. I just added 2 more ties, one small and one large, that join the ridge right where the tieout goes. Rather than a stick we just use that loop as the tieout, like so:
This design is simple and gets good ridge tension.
I have been stalling on writing this article for some time, waiting to sleep in the tarp post shrink, in a real storm, but it's going to be a while longer yet before that happens as we're in the middle of moving (again, but for a while this time!).
Overall conclusion:
- The idea of canvas seems to be good (no issues besides the misting), but 7 ounce canvas just isn't dense enough preshrink, and unlikely to be dense enough shrunken, but I'll try and update
- This method of joining works very well. It's a little slow to rig, but not bad, and as a result we have a tarp that's 100% biodegradable made of nothing but cotton and linen, and I think that's pretty cool.
- The plied linen cord works very well, and is plenty strong. We did ride out a storm, there was significant wind, and that wasn't an issue.
- If you use raw canvas keep in mind that it changes shape quite a bit, this canvas is not really a rectangle anymore
- Untreated canvas does mildew, this tarp has a little on it from not getting it totally dry for a couple of days. Be careful about this if you invest a lot of time and money.