
Gear Teardown
2014-07-04
A friend of mine, planning to hike the JMT sometime soon, asked me for some gear advice, and was kind enough to let me post the gear teardown to help other folks as well.
Now, before we dive in: My friend is very fit, a fairly experienced outdoors-men, and a moderately experienced backpacker looking to cut weight off his pack. He's looking to do a summer hike of the JMT in around 20'ish days. He's already spent quite a bit of time and energy trying to cut his pack weight down and is coming to me for additional advice
The Gear list
https://docs.google.com/spreadsheets/d/1WKs24v3VA01skngICO8gyIYfQMrbU9D_PZLfc4KRzIY/edit?usp=sharing
His gearlist is fairly typical from what I've seen. He's making very reasonable and safe choices while trying to get the weight down, and his pack comes out to just over 20 lbs. I met at least 4 people on the AT who asked for help cutting weight and varying versions of this formula.
You may also want to take a glance at what I carried on the JMT:
http://www.blog.smalladventures.net/2012/08/gear-for-jmt.html
And what I carried on the AT
https://docs.google.com/spreadsheet/ccc?key=0Apo-hhseGKc2dFluS0syZkg3RkpiTkdNYUZjVHVJMGc&usp=sharing
Most of the weights here are based on the two spreadsheets.
Target:
So, how light should we be aiming? It's all personal preference. My friend wants to gut his pack weight, and has decided he's willing to sacrifice to get there. I can hem and haw all day about different tradeoffs, but instead let me lay down a few approximate numbers that I, personally, think are reasonable, and that I've seen a lot of thru-hikers achieve with reasonably safe and kits and reasonable cost.
IMHO, summertime in the continental US, doing something most folks would call backpacking, ~14lbs is a pretty doable target. As an example, here's my end of AT weights:
https://docs.google.com/spreadsheet/ccc?key=0Apo-hhseGKc2dFluS0syZkg3RkpiTkdNYUZjVHVJMGc&usp=sharing
8 lbs is doable if you do go crazy, and have a lot of background knowledge and skills. Personally my through-hike pack is heavier 14 lbs, because I have a habit of getting myself in sticky situations (if you read this blog, you know what I'm talking about), I hate having to ask for help, I like robust gear, and I often carry a few non-essentials.
So, there should be 6 to 9 lbs we can shave off that initial pack list without things getting too dangerous.
Clothes
This is often one of the easiest places to cut.
| Spare socks | Darn Tough | 59 | 2.08116 | 0.13007 |
| Synthetic Longsleeve | typically worn on hike | 270.4 | 9.53808 | 0.59613 |
| Spare underwear | ExOfficio | 100 | 3.5274 | 0.22046 |
| Longsleeve Base Layer Top | Smartwool 100% merino | 265.3 | 9.35818 | 0.58489 |
| Base Layer Bottoms | Smartwool 100% merino | 204.5 | 7.21353 | 0.45085 |
| Puffy Jacket | Mountain Hardwear, 100% Polyester fill | 480.6 | 16.9527 | 1.05954 |
| Fleece Pants | REI, 100% polyester | 339.9 | 11.9896 | 0.74935 |
| Fleece Gloves | Mountain Hardwear, 100% Polyester | 58.6 | 2.06705 | 0.12919 |
| Fleece Cap | generic (Army Surplus store) | 83.3 | 2.93832 | 0.18365 |
| Rain Pants | Columbia (Omni-Tech) Unknown model | 311.7 | 10.9949 | 0.68718 |
| Rain Jacket | Marmot (Unknown Model) | 348.7 | 12.3 | 0.76875 |
| Mesh Sack for Rain Gear | SeaToSummit Mesh Stuff Sack (6.5L) | 10.9 | 0.38449 | 0.02403 |
- Spare underwear: People always leave this off their list, so I'm super happy to see it included. I wear compression shorts (which I don't change, I'll wash them occasionally though to get out my unusually caustic sweat), or go commando personally, so I don't carry spare underwear. It's not much, but it's something to consider. -3.5
- Puffy jacket: His puffy jacket here is ~1 lb. I carry a very puffy and warm down vest that weighs about 1/2 lb. It's varied what I use, but for a long time it was a Columbia I got for ~$60.0. My current one is warmer for about the same weight, but something like that Columbia would be plenty. I actually dropped my vest entirely, and wasn't sad about it, but I'm a very warm person and carried a warmer base-layer than he has (icebreaker 260). I would never discourage someone from carrying an upper-body puffy layer if they think they might need it. -8 ounces
- Fleece pants: Fleece is very heavy for the warmth. Given a nice wool or synthetic base-layer, and a shell layer, a "puffy" layer (synthetic probably for pants), is far warmer, and far lighter. That said, I hike, ski, and dig snowcaves in the winter with just a base layer and rain-pants. I only use the "puffy" layer on my legs when sitting around, or when it's well below freezing -12 ounches
- Fleece gloves: I have found that I rarely use gloves unless it's very cold. Good pockets in a puffy jacket work well for me. Agan, it's not that cold on the JMT, and fleece is very heavy for the warmth. Swapping these for a pair of glove liners would cut both weight and bulk. If he goes to smartwool gloves at 1.5 ounches, that's -0.5 ounces... meh not worth it
- Rain pants: Normally I would say you don't need these. For the JMT I carried only a pair of warm running tights, and Jess carried just a pair of merino tights for bottoms. That said, my friend gets cold easily. Rain pants in addition to a base layer is very warm. If he's a little uncomfortable dropping the fleece pants, keeping the rain-pants might be a good plan for now. Maybe if he doesn't use them he can drop them later.
- Rain Jacket: I actually dropped mine for the hike (note that doing so goes with dropping the vest too, since I can't keep the vest dry now). His coat is a half-pound, which is pretty good. I carried a poncho which dropped a bit more weight. On the JMT you do get rained on, but it's fairly warm and dry so you dry quickly. I got wet, but I was never uncomfortable on my hike.
Total cut: 23.5 ounces = 1.47 lbs
Shelter
| Big Agnes Fly Creek UL 1 Tent | 0 | 0 | ||
| Tent Body | 290.5 | 10.2471 | 0.64044 | |
|
|
Rain Fly | 270.9 | 9.55572 | 0.59723 |
|
|
Footprint | 104.7 | 3.69318 | 0.23082 |
| SeaToSummit Mesh Stuff Sack (4L) | 9.1 | 0.32099 | 0.02006 | |
| Poles w/ sack (store outside pack?) | 207.6 | 7.32287 | 0.45768 | |
| Stakes w/ pouch | 127.8 | 4.50801 | 0.28175 | |
| E-tarp | 5x7 tarp, orange one side, reflective other | 337.6 | 11.9085 | 0.74428 |
|
|
|
|
0 | 0 |
| SUB-TOTAL : | 1348.2 | 47.5564 | 2.97227 | |
For a tent, this is very light. 2.16 lbs is entirely reasonable. The extra tarp and footprint are definitely not needed we drop those and we're down to 2 lbs even
Footprints are for car-camping. Modern tents are surprisingly tough. Even silnylon, which is less tough that what most tents use, holds up fine on rocks without a foot print if you pull the really sharp stuff. There are many reviews and testimants to this. 1/4 lb is a lot.
After discussing this some my friend is seriously considering going towards a tarp. Why? Because with a silnylon tarp (~$60.0) and gossamer gear groundcloth, this could be 1.4 lb. With an expensive tarp (like Jess' from zpacks) this could be under a pound. The cheap tarp option is thus -1.6 lbs.
total cut: 28 ounces = 1.6 lbs
Sleep system
| sleeping bag (or quilt) | REI Lumen (25* synthetic) | 1230.6 | 43.4081 | 2.71301 | looking at upgrade options | ||
| sleeping pad | ThermARest NeoAir Xtherm | 484.6 | 17.0938 | 1.06836 |
|
|
|
| bag liner |
|
256.9 | 9.06188 | 0.56637 | options: 354 or 256.9 | ||
| water-proof sack | SeaToSummit UltraSil Compression (20L) | 97.6 | 3.44274 | 0.21517 |
|
|
|
| SUB-TOTAL : | 2069.7 | 73.0065 | 4.56291 |
|
|
|
|
It's heavy, but well thought out. You can definitely do better on the sleeping bag, especially if you go to down, but there are all sorts of trade-offs to be made there. I dry out down, but not everyone does. Also, cutting weight in your sleepingbag is expensive.
The Xtherm is great, and I've considered getting one myself for winter. It's way overkill for summer (I used a 1/8" pad for my trip), but if your bony it could be well worth it. I asked why the liner, and he said to extend the life of the bag. It's heavy, but I can understand that seeing how fast I wear out sleeping bags.
Two notes on the UltraSil compression sack:
- First, silnylon bags are great for the JMT where there is little rain and things dry, but keep in mind that they are not trustworthy. I dried out my brother's sleepingbag after it got wet through 2 layers of UltraSil bags, a packliner and a drysack.
- Second, compression sacks are extremely useful for people who aren't good at packing a stuff-sack, but those straps and stuff are heavy. Without a compression sack, I can pack tightly enough to burst ultrasil bags, and to over-compress the down to the point it doesn't spring back well. Every ounce counts.
Cooking
| JetBoil Sol (but not Ti) | pot, stove, lid | 317.6 | 11.2030 | 0.70019 |
| spoon | SeaToSummit Long Handle | 11.9 | 0.41976 | 0.02624 |
| sponge | part of reg ScotchBrite kitchen sponge | 10.9 | 0.38449 | 0.02403 |
| food storage sack +trash bag | 0 | 0 | ||
| hanging kit | 137.2 | 4.83959 | 0.30247 | |
| water filter | Katadyn Hiker Pro | 414.8 | 14.6316 | 0.91448 |
| Water Bottle (1L) | GSI DukJug | 185.9 | 6.55743 | 0.40984 |
| Water Storage | 2-48oz Nalgenes | 308 | 10.8644 | 0.67902 |
| SUB-TOTAL : | 1386.3 | 48.9003 | 3.05627 | |
- Jetboil: Swapping to an alcohol stove would save a bit here. There's a great backpacking light article that shows that although the energy density in alcohol is lower, that difference is made up by the weight of the canister, and the fact that you rarely can exactly use up a canister on a trip. Mine (with pot etc.) weighs 5.57 ounces. So -5.63 ounces
- Sponge: I've never in my life carried a sponge, I use my finger and a bandana. -0.4 ounces
- Food storage sack and hanging kit: This is *mostly* his JMT kit, but that particular point clearly isn't. He'd be swapping that out for a bear-can
- Water filter: The JMT has unusually clean water. I won't push people to drink water straight, just point it out as an option. For my opinions See: http://www.blog.smalladventures.net/2013/08/in-defense-of-drinking-unpurified-water.html. That said, my friend is thinking of switching to a sawyer squeeze. I have several friend's with them and they seem quite good. I believe you can even rig them as gravity fed. Lets say we go to the sawyer, that's -11.63 ounces
- Water bottle: Nalgenes and a fancy GSI thing are heavy and overkill here. Two 1L soda bottles are much lighter, and you probably don't need the hot-water ability on this trail anyway. If you really need the extra capacity (hint, on the JMT you don't), a squashed 2L bottle works great, and it's light, cheap, and at least as trustworthy as most of the bladders out there. A 1L soda bottle is 1.5 ounces. Lets call a 2L 3 ounces, so -11.4 ounces
Accessories
| Trowel | GSI, plastic | 88 | 3.10411 | 0.19401 |
| Toilet Paper | 43 | 1.51678 | 0.09480 | |
| Soap | Dr Bronners, .25oz | 78.5 | 2.76901 | 0.17306 |
| 550 Cord | 45 ft | 90.9 | 3.20640 | 0.2004 |
| Baggie Assortment | 65.4 | 2.30692 | 0.14418 | |
| Repair Kit |
|
157.1 | 5.54154 | 0.34635 |
| Camera | cards, batteries, case | 0 | 0 | |
| Multi-tool | Leatherman Juice | 130.6 | 4.60678 | 0.28792 |
| Headlamp |
|
0 | 0 | |
| PLB? |
|
|
0 | 0 |
| First Aid Kit |
|
0 | 0 | |
|
|
|
|
0 | 0 |
| SUB-TOTAL : | 653.5 | 23.0515 | 1.44072 | |
- Trowel: sticks and rocks work great, -3.1 ounces
- Toilet paper: sticks and rocks work great (no, that's not a typo), -1.5 ounces
- Repair kit: We talked about this a bit. Because he's carrying a self-standing tent with bending poles, he's also carrying a pole-sleeve to repair a broken pole. One of the downsides of more complex gear is that repairs are also more complex. A torn tarp is just torn, you push a rock against it to fake a tie and use it anyway. (jess' old tarp has been missing a gromet for years, it doesn't really matter). -5.5 ounces
- 550 cord. He's already got bearbag code, and tent cord, 45 feet of 550 is probably unnecessary. We could also go with something lighter like triptease, between the two we can cut most of it. -2 ounces
- Camera: I'm only so-so on camera's in the woods in general, but on the JMT, this is *really* worth the weight and the mental cost of taking photos. I have so many amazing photos from that trip. Maybe it's not what matters to you, but whatever you are out there for, don't ruin it trying to cut weight. Your pack feels lighter when you are happy then when you are sad about the 2 lbs you came out there to use but left at home. +5 ounces
- Multi-tool: A bit excessive, but reasonable. I like to carry a leatherman PS2 (or PS4 since PS2 is no longer available). It's a very small multitool with plyers and screwdrivers and the like. -2.6 ounces
total cut: 9.7 ounces = 0.6 lbs
Emergency
| pouch |
|
7 | 0.24692 | 0.01543 |
| Space Blanket | SOL | 73.1 | 2.57853 | 0.16116 |
| Matches | UCO Waterproof (15ct) | 16.9 | 0.59613 | 0.03726 |
| Duct Tape | ~2yds | 21.4 | 0.75486 | 0.04718 |
| Wire |
|
74 | 2.61027 | 0.16314 |
| Sparker | Light My Fire Scraper | 28.4 | 1.00178 | 0.06261 |
| Knife | Gerber Mini Paraframe | 41.7 | 1.47092 | 0.09193 |
| Iodine+ 1 qt baggie | 39.7 | 1.40038 | 0.08752 | |
| Tinder | Plastic case w/ waxed cotton balls | 32.6 | 1.14993 | 0.07187 |
| Band-Aids | 2.1 | 0.07408 | 0.00463 | |
| Mirror | SOL | 16.4 | 0.57849 | 0.03616 |
| Whistle | Fox 40 Mini | 5.5 | 0.19401 | 0.01213 |
| Lighter | Bic Mini, waterproofed | 11.9 | 0.41976 | 0.02624 |
| Safety Pins | 3.3 | 0.11640 | 0.00728 | |
| Compass | REI keychain-type | 9.9 | 0.34921 | 0.02183 |
| Headlamp | Petzl E-lite | 26.2 | 0.92418 | 0.05776 |
| Emergency food |
|
0 | 0 | |
He and I have talked quite a bit about this section. About what sort of things Jess and I carry. An emergency git is *very* personal, it reflects not only the level of risk you are willing to take, but also your personal knowledge and skills with various tools. Carry things you know, and will use. Also, your emergency kit isn't for emergencies. It's for *avoiding* emergencies. You should be perfectly willing to pull out any piece of gear in there if it will help you with your situation, before you are in any trouble. Because of these two properties, the gear you've used in the past should weigh very heavily on what goes in your kit. My advice is based on my experiences, skills, and other gear, keep that in mind.
- Space blanket: I highly recommend the small bivies instead, they are far nicer to use, and the same weight. The exact model is listed here: http://smalladventures.net/store/Emergency_Kit.html
- Matches: I asked him, and these are the real ones that light underwater. Again, like the ones listed in the URL above.
- Knife: I carry 2 or 3 knives usually as non-emergency gear. I have a knife-blade I made from a file some time ago that I carry as emergency gear, the idea is that I can haft it if needed. Carrying a real knife that's nice and light like this makes a lot of sense though.
- iodine+: For this particular trip I'd say backup water treatment is excessive, but I can't fault the idea in general.
- band-aids: I never use them, I use duct-tape instead if I'm trying to stop from bleeding on things. Direct pressure and patience works well otherwise. On the other hand, I don't get heal blisters.
- headlamp: I'm comfortable hiking without a headlamp in most circumstances, so a spare headlamp seems excessive to me. If you really want one, maybe switch to a photon to save a little more weight and bulk.
Conclusion:
So, first pass, relatively easy , our total cut is: 5.46 lbs
I was trying not to spend much money, or change the style much with this breakdown. There are a number of things you could do to keep going lower.
- Spending more on sleepingbag could easily cut 1lb.
- Dropping the xtherm pad in favor of gossamer gear's closed-cell foam 3/8" pad would cut 10.29 ounches or 0.64 lbs.
- Going to a 1/8" like I carried, cuts another 0.28 lbs
- Dropping the puffy jacket, and rain pants would cut ~1.1lbs
- Swapping the rain jacket for a poncho like I did would cut ~0.3 lbs
- A more expensive tarp would save 0.75lbs
- Dropping the tarp for just the poncho would save an additional 0.8lbs or so
- Dropping the water filter would cut 0.18 lbs
- Dropping the bulk of the emergency kit would cut ~0.6 lbs
- He has a nav kit I didn't include in the breakdown, none but the map is not srictly needed. That could cut 1.1 lbs
That's over 12 pounds cut.
I would be willing to hike the JMT with every one of the adjustments listed above. It takes some knowhow, but that gear would be sufficient for me.
I'm noticing as I read this gear-list over and over, that I can't quite get the weight as low as I'd expect. I think there are two reasons for this. One is that I don't want to stare at this list that long (which I would for myself). The other is that at some point it's a lot of smaller things that get hard to see quickly. To keep cutting weight you get to weighing different pieces of gear, and trying to replace each each with something lighter. Do I want those shorts, or those other shorts? This is part of why I tend to end up in the 12-14 lb range myself, at some point it gets expensive, and I just don't care that much. As an example, on the AT I wore a pair of women's running shorts for decency over my compression shorts. They were much much lighter than normal men's shorts would've been.
Remember that my friend *asked* for this breakdown. Hike your own hike, bring what you want and have fun out there. I backpack many different ways myself, a blanket around my waist, classic ultralight gear, or heavier weight with an axe and guitar. The things I'm suggesting are not intended as a judgement in any way on any of those items, or people who carry them. The point is to give advice on how to cut weight where that's someone's priority (as it is for my friend).
Anyway, I hope people find this breakdown useful. Happy hiking!
Virginia HO!
2014-05-31
Jess and I are moving to Virginia.
Jess had decided to try Vermont, and we were having quite a bit of fun, but one morning as we were making breakfast Jess said "I want to move to Virginia". I knew what that meant, and so 2 weeks later weere packed up. Amazingly all our stuff fit in the truck (barely). We're in migration right now, but on our way. We'll be looking probably to find something near Shenandoah, rent for a bit to make sure we like the area, then find a place to buy hopefully backing on the park.
Other pieces of news:
- Jess got a job at a tiny startup called Parzival as their 2'nd engineer, has been experimenting with remote work, and so far loves it
- I got a job again. I'll be working remote, 80%, for Meteor, a San Francisco based company that develops the Meteor javascript-based thick-client web-app platform. I'll be working on the reliability of their current systems and on helping them develop Galaxy: cloud infrastructure for web-apps.
- I started another blog, this one for computer stuff called Computers are Hard . It's intended to run the whole gamut of computers and computer science. So, if you are interested in hearing the ramblings of an overly opinionated software engineer please follow along.
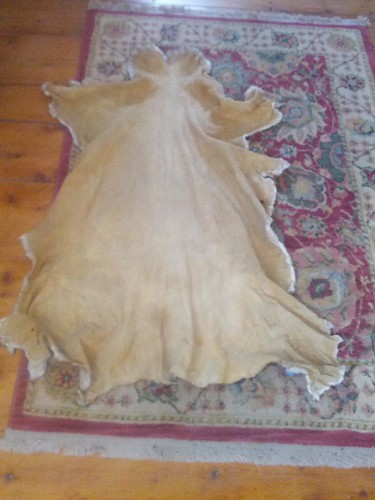
Right now were moving, so kinda busy for the next month or so. But, I have a sheep-skin and another deer-skin ready to smoke and we've been experimenting with a canvas tarp. So, once we move, with luck, we won't be changing states again for quite some time and we'll have time for more interesting projects and experiments. I'm looking forward to it!
Brain tan
2014-05-15
I just completed my first full solo braintan hide. Our friend Red taught us how to soften hides some years ago, but doing the entire process yourself is different. Jess has done several, but this is my first.
The goal is to go from a green deer-hide (exactly what you'd have after skinning a deer), to a piece of fabric ready to make clothing, bags, or other equipment out of. Like this:
The materials I used are:
- A bar of steel (as a scraper)
- gloves (for the bar of steel)
- rope
- elmers glue
- clothes-pins
- axe
- shovel
- a few downed trees
- a small plywood board
- bucket
- vegetable oil
- dawn and dr.brauners soap
I got the deer-hide from a friend in Washington. She skins deer every year for a game processor. Basically, people hunt deer and don't want to process it themselves, they drop it off at a game processor and the processor gives them meat back a couple days later. Jess and my friend skins the deer for the game-processor in exchange for the deer-hides.
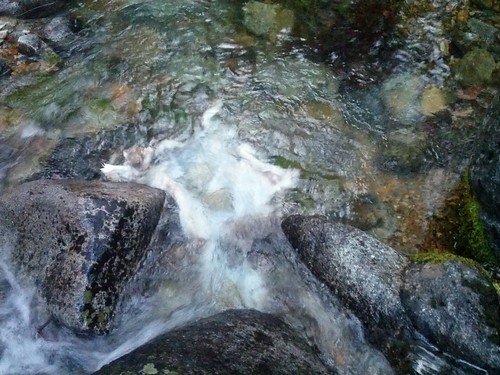
I took that hide, which was "wet salted", meaning it had been salted before the hide was dry. After washing off a bit of the salt I put it in a stream for a while to rehydrate.
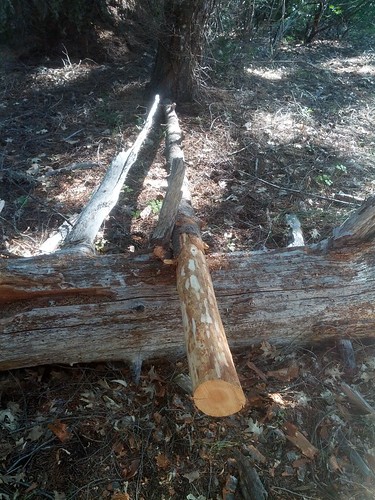
Then, I put it in a bucket and basically let it rot for several days, changing the water every day or two. Eventually when I reached in and pull the hair, the hair slid out easilly. At this point I put it on a scraping beam (a log) and scraped the hide until all the hair was off. Here's the beam I used.
The other hide I was working on (not yet complete) was being a bare, so I decided to "buck" this hide. That's where you soak it in a lie solution. I dug ash out of an old fire-pit in an area with softwoods. I mixed in water then let it sit until the junk had settled out, and scooped out the junk. After a couple passes I had a weak lie solution. It's weak because the ash was old and was from softwoods. I then soaked the hide in this solution overnight.
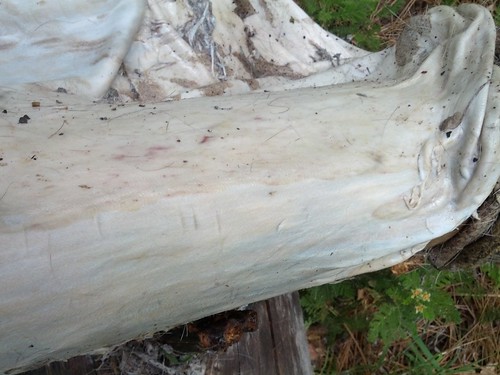
I pulled the hide out and rinsed it a couple of times to get the lie out. Then I scraped it again, this time on the other side, to take the grain off (or most of the way off). The following picture is of a different hide, but this is the idea:
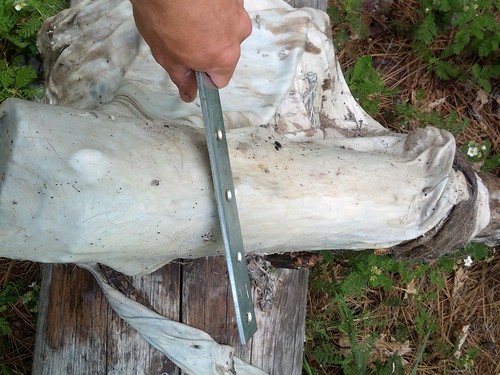
The following picture shows the difference, the part on top is unscraped, the part on the side of the log has been scraped and the grain removed.
Then I mixed up a braintan solution. This can be any oil with a surfactant so it goes into solution. I used canola oil and initially Dr. Brauners. The solution was just too oily though (because Dr. Brauner's isn't a surfactent), so I added some dawn.
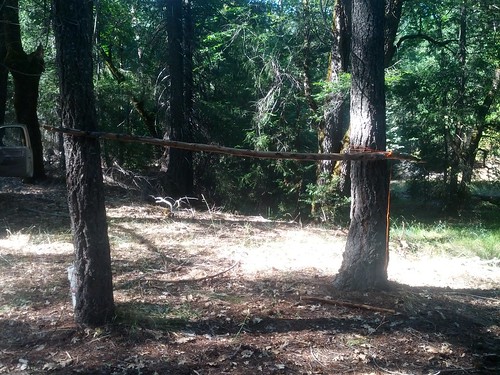
Then I worked the hide stretching and opening it up. There are other ways to do this, but I did it on a horizantal beam, lashed to two trees.
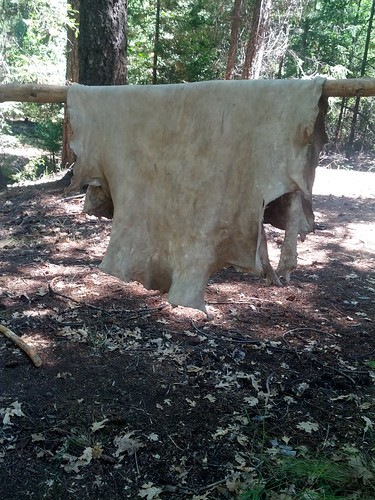
Now it felt soapy though, when I squeezed it or stretched it soap foam came out of the hide. So I rubbed oil into the surface, just a bit, until the two were balanced again. This worked extremely well. This was a thin doe-hide. I believe it was mule-deer, but it just happened to be an easy tan. It came out really soft even then. I couldn't smoke in California easily due to the fire-ban I figured putting off tons of smoke was just pushing it too far, so I waited.
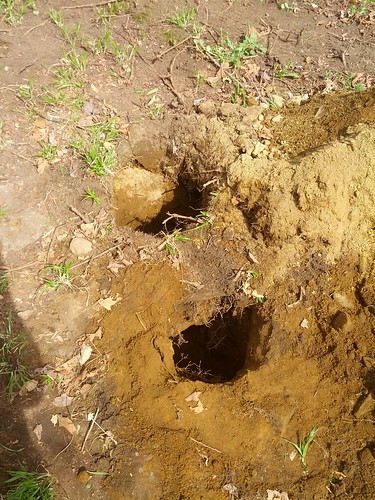
In Vermont we finally had a place to smoke. I made a call to the fire warden to check that it was okay. I dug a pit about 2.5' deep, and then another pit next to it. I dug a hole between the pits to connect them.
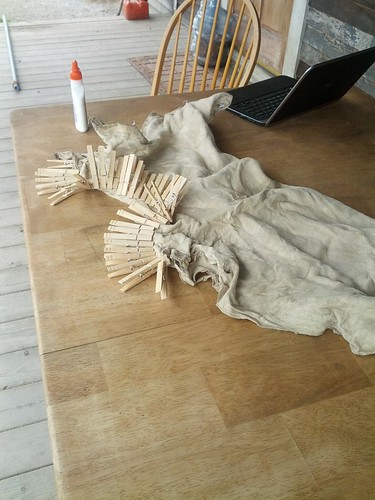
I took a 3'x3' square of canvas and stitched it into a tube. I took my hide and glued it once side to the to the other, also into a tube, but with one end closed. To the open end of the tube I glued the canvas. This was done with elmer's white-glue (which is basically hide-glue, so it bonds really well). The clothes-pins in the photo are to hold it in place, given a full package of clothes-pins you can just continuously glue, it will set up fast enough that you can just pull the oldest clothes-pin and place it on where you are gluing now and keep going.
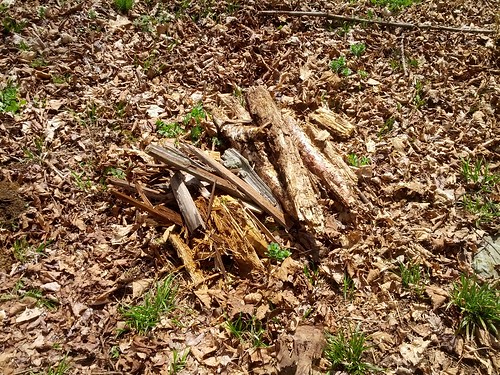
I lit a fire in the pit to dry it out and get some coals going while I worked. I took some downed trees and made a tripod. I left stubs of branches so they'd sit together securely and I could be lazy about lashing. A little more rope-work and I had my hide hung up. It's held open inside by sticks jammed in one way and then the other, so it stands up an as a tube. I made a pile of the punk I'd gathered the day before (this is just a bit of it).
I dumped the punk in on the coals and put a board over the main hole so the smoke would have to come out the side-hole where the hide was hanging. This worked well because the heat still goes upwards, thus it's hard to accidentally char your hide, even if the fire burns instead of smoldering.
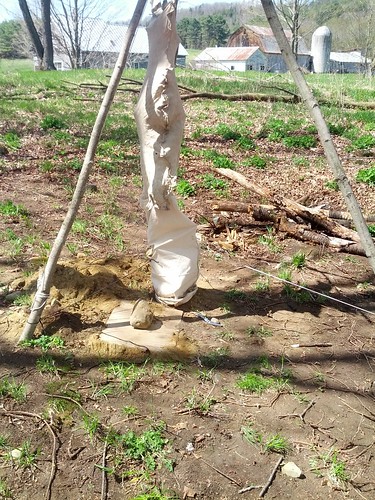
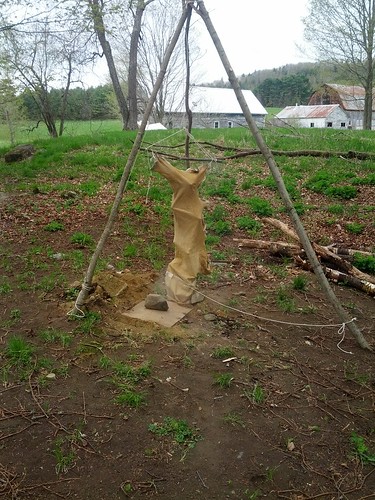
The whole thing kept swinging in the breeze, so eventually I tied the skirt out to all 3 sides of the tripod. This was my first smoke, so it took a while. 6 or so hours later I was getting frustrated. The smoke was all getting carried away in the breeze. The canvas was pretty permiable so most smoke blew out of the skirt before it even made it to the hide.

I'd been waiting for the color to come *through* the hide. When Jess got back from her trip I showed it to her, and she said you only need to go until color shows on all of one side of the hide, then flip it and do the other.
So, I flipped it, smoked it again and washed it. This time I shortened the skirt to only 1.5 feet (cut the one I had in half). I also cuffed the bottom a lot to act as a baffle. I'd been paranoid about the heat originally, but it turned out that because of the side-hole it was never even nearly hot enough to cause problems, I probably could've used no-skirt from a heat perspective. This went *much* faster, and I had a minimal smoke in maybe 1.5 hours.
Again I tore it apart. Then I threw it straight into the washing machine. When it came out, it was just a touch stiff. This is just how buckskin works. After a quick pull in each direction it felt pliable and soft again. I can't wait to make some clothing out of this.
Possibly surprising notes for tanners:
When I completed smoking the second day the hide was downright *wet*. It was so humid and the punk wasn't dry I was pushing water through the hide. This seems not to have had a negative effect. Even the first day the smoke coming off the fire was very humid.
Also interesting, this hide was stored in the truck for many months after being softened, but before being smoked. In the time it rained many many times. The truck spent a couple months well below freezing, then crossed back and forth many times causing extreme humidity. For whatever reason this appears not to have been a problem. The hide was never *wet*, it was in a duffle bag near the cab, so well protected, but the humidity has to have gotten to it.
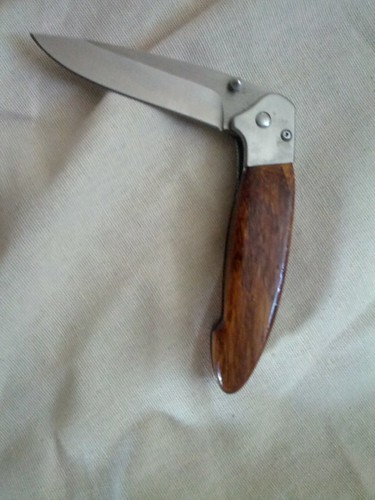
Folding Knife handle
2014-05-06
Sometime last year I lost my favorite belt-knife. This is one that I'd done a day-hike once to recover after leaving it in the woods. I loved that knife, but it was pricey. Jess was looking for ideas for me for christmas and discovered that knife blanks made of good steel are surprisingly cheap, so she got me a couple blanks, some wood, and a few other related tools. One's a folder, and one's a belt-knife.
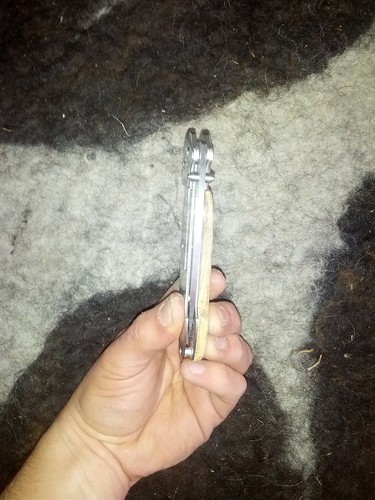
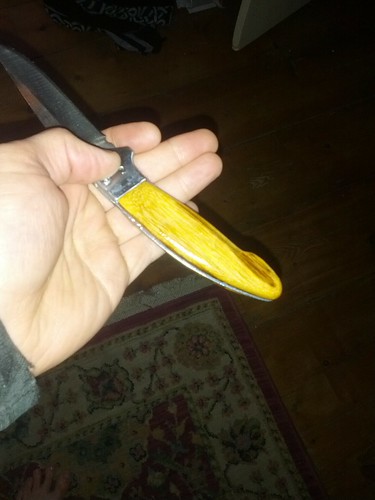
I just finished the folder:
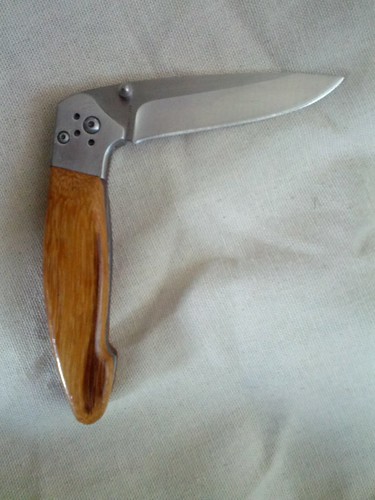
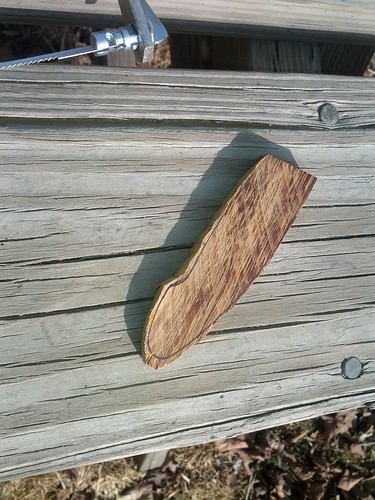
The handle is zebra-wood, which I think is pretty neat looking. It's also a very dense wood which is kindof nice.
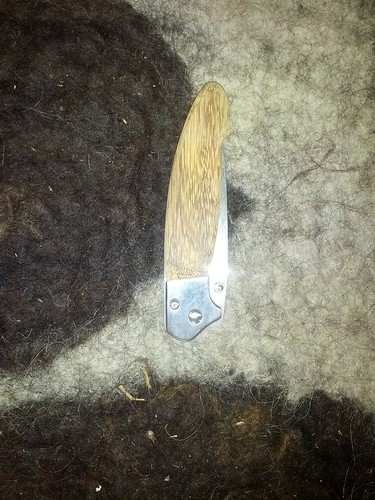
I started this knife at my parent's house over the holidays. Stupidly, I didn't take pictures of a lot of the steps, but I'll go through them here anyway. Note that the handle of a full-tang knife, where the two sides don't touch, are called scales.
Cut the scales to approximate size
The blocks Jess gave me were maybe 18" in length and about 4" on a side. So the first step is to get something of around the right thickness and vaguely the right size. On the knife above you'll notice a significant bevel to the end of the handle where it meets up with the side of the knife. My first step was to cut this bevel so I could lay the block against the knife tight against that bevel and the knife would be approximately parallel to the block of wood.
Since I was at my parent's house I cheated and used a table-saw. I inscribed the bevel on a piece of wood, then measured it, and used this to set the saw. I then cut a section off the block a bit longer than the scales I wanted, using the angled blade.
Next I straitened the saw blade, set the depth adjustment on the rest and cut off a couple of slices.
Then I lay the scales against the knife and traced the edge of the tang.
And finally I *attempted* to cut it out vaguely. I used the wrong type of saw though, and split my piece... darn.
So I cut a couple more out with the table saw, and moved on. shape
Screw the scale to the knife... or don't
I decided to try again, this time I figured I would screw the scale to the knife *first*, then inscribe it so it came out perfect. The knife blank came with screws to help hold the handle on. If you are astute you've already noticed that my final knife does not have screws in the scales. I carefully drilled holes for the screwed, and recessed holes for the heads of the screws, tried to screw it on, and the screws stripped... oops! So much for that plan. Of course now my scale had holes in it, so I needed yet another one.
cut them to approximate shape
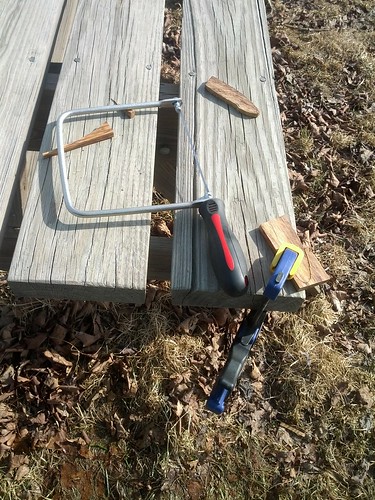
The above setback stalled me for a while. So, after we had moved to Vermont I finally got around to picking up a coping saw. I then carefully traced out the shape of the knife again on the two remaining scales, and cut them out with the coping saw.
Shape them down with a rasp
If you recall the bow I made for Jess some time back, I used a Shinto Saw Rasp. Well, I still have it. So, I took this and carefully shaped the scales down until they were getting close to the precise shape of the knife tang. Then I used the rasp to round down the sides of the handle so it would be nice and comfy in my hand. As it came close I realized they were too thick, so I thinned them by taking wood off the outside of the scales (I didn't want to ruin the flatness of the inside). Finally I had them pretty close.
Repeat steps 1 through 4
When I came back a couple days later to continue work, I could only find one scale. After some poking around I found the other one in two pieces. Placing these together I saw tooth marks... oops! A lot of dogs love to chew wood, and I had failed to take this into account. Usually they like it best when it's nice and thin so it crunches as they bite it - just like my scale.
This time though, I didn't have a table-saw. I first tried to cut the scale blank out with a coping saw, as it's the only fine-toothed saw I have right now. It worked for the bevel cut, but not for making the slice. I switched to a larger toothed saw for that cut and just did it carefully and it came out alright. This time it only took me a couple of hours to get something back down vaguely close to what I wanted
Final shaping
Repeatedly holding it up to the knife, looking at it carefully, fitting it to my hand, and comparing the two sides I worked it down a bit more with a rasp. For the concave section near the back of the handle on the blade-side I used a mix of a round bastard-file and the knife's own blade to carve it to shape. Then I switched to a somewhat fine sandpaper, then to a finer sandpaper.
Coat the scales in epoxy... or don't
I was thinking about using the knife and getting it wet by accident and the like and though that it'd be good to coat the handle in epoxy. This would also help bring out the wonderful grain of the wood. On one of my old wrecked scales I did a few tests. First I tried using a q-tip to spread the epoxy, but it left fibers all in it... ick. Next I tried a stick, but this left some plant fibers behind too. So, I decided to abandon the plan and move on.
Glue on the scales
I carefully mixed epoxy and spread it on the scale that doesn't have the liner lock under it. Then, using two bar clamps, clamped it in place lining everything up carefully. I tried to clean up the epoxy that leaked out, but some ended up on the knife-handle. I then left this for a full day to really set up hard. This scale was very slightly warped, so I was extra concerned about getting a really good bond before removing the clamps.
For the second scale I didn't want to accidentally glue it to the liner-lock. So, I spread the epoxy on the tang rather than on the scale, and again I carefully clamped it really tightly, and left it for a day.
At this point I had a usable knife with a handle! But, I looked at it and I'd gotten some epoxy on the handle, making the appearance look inconsistent and ugly. A shame for such a beautiful wood.
Epoxy the scales
So, I decided to try again. This time I used my finger to spread the epoxy on the handles. It's not perfect, but it worked well enough. I considered sanding it but decided to leave well enough alone, I'm not sure this epoxy set up hard enough to be sandable. That's a good thing for gluing the scales down, but not so good for coating the scales. I think I might use two seperate epoxies for that in the future if I can find a harder-drying transparent epoxy.
I did 2 coats on each side, letting it set up decently well between coats. The epoxy I used is 5-minute (part of the stuff Jess gave me), so I did the handle in about a day and a half.
Conclusion
I'm pretty happy with the results. It took a fair bit of time, but mostly because I kept cutting too far out and thus spent way too much time shaping, much like the bow I made. I'm learning through and the last scale I made took a tiny fraction of the time of the others. The final result feels good in my hand, has very good grip, and is pretty. I expect it'll withstand water pretty well, though the part of the scale next to the liner-lock has no epoxy on it, so it'll be interesting to see if that matters.
It's certainly a lot more fun than a normal blade... A lot more work of course, but also a heck of a lot cheaper. As I get better at shaping wood it's taking less time. Someone skilled, even using all hand-tools, could probably do the shaping in a day, and the epoxying with another hour of work over the next day or two. For me, I could probably make this in about 3 days now. The knife I have here represents more like a week... but I got a lot more than a knife out of it.
Why I want to be a Trapper
2014-05-04
I never thought I would say this, but I'm taking a trapper's education class, so I can get a trapping license. That's right, animal trapping. The purpose of this article is mostly to try and explain the philosophy that brought me here. I want to give people an opportunity to see another perspective that is getting rarer and rarer, and an opportunity to understand - especially those in more urban environs.
I'm not trying to defend a view, or convince anyone of anything, I just want to explain.
Childhood
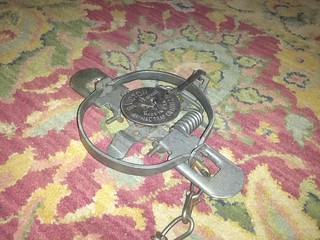
My generation was raised with the basic idea that wearing fur was wrong. So, getting to this place philosophically has been a long and circuitous trip for me. Organizations like the Humane Society and PETA ruled the discourse and the culture I was raised in. Breaking out of that discourse has been a long process.I had a strong emotional reaction just to an image like the one below... a basic 1.5 coil-spring foothold trap. A trap that causes no more than bruising (Note: this one is unmodified. It needs a lot of filing down sharp edges, rusting, staining, waxing, a new chain attachment point, a pile of swivels, and maybe a spring on the chain). I'd guess a lot of people have that extremely negative gut reaction. Then I handled one for an hour...
I had one thing many people don't though these days. I was raised on a homestead, and we raised goats for milk. When we raised goats we sold the kids to families that would stop by near holidays. I understood back then that these kids were eaten. We also raised pigs for food, who supplied the bulk of the meat we ate. We raised chickens for the eggs, and of course there were too many roosters, so sometimes we'd eat those. We had geese to help guard the other animals and sometimes we would end up with too many and eat some of them as well.
I should note that my dad is the sort of person who can't sleep for a couple of weeks after he shoots a raccoon, which he'll only shoot if he has to because it's already taken a lot of chickens. Foxes scare off, and we never had to kill them, but raccoons do not.
I was also familiar with death. Animals die sometimes. They get old, they loose the ability to walk, they get sick, etc. It happens, and it's sad every time. My parents didn't shove it in my face by any means. Dad would try and do in old/sick animals, when he had to, while I wasn't around... but it was still there, and I understood what was going on.
And... I felt bad for living. I felt that merely by my existing I was a problem. I was making the world worse. For many years I felt significant guilt about my existence itself.
Farming practicies
Anyway, after college Jess and I were getting very interested in farming and homesteading. We started researching how to do it. Green manuring just doesn't work that well, animal feces just works WAY better for growing crops. A pig's most valuable product to a homesteader is not bacon, but feces. Pig poop is one of the worlds best fertilizers. Better yet, pigs can be fed mostly on scraps. It gets even better though. After you dig up your tuber crops you can let pigs run on the field and they will til it for you, while turning the tubers and roots you couldn't get out of the ground into perfect fertilizer! Bacon and ham is just a bonus. Cows are similar, cow poop is incredible stuff. Milk is wonderful.As we considered all this it started to sink in that animals are part of the cycle. It's very very difficult to remove animals from the natural cycle and still keep a healthy farm. I also started reading more about industrial processes and realizing just how AWEFUL they are. How bad for the animals, the environment, and even the resulting products they are. We take the pig poop, the pigs most valuable product, and throw it aside as waste, then generate fertilizer on the side. Both eventually end up in the river.
Primitive Skills and History.
Well, on our search we got more and more interested in more primitive ways to live off the land. Inevitably we eventually discovered the book "tending the wild" (offered in our store actually). I started reading about the land historically, and how it was managed 5000 and 10000 years ago within the US. I then read 1491 and found even more. Indians were not such pure hunter-gatherers as many believe... they were low intensity farmers. Rather than planting things they encouraged what they wanted, picking in ways that helped the plants they wanted, burning back, cutting etc. those that were less helpful, and encouraging things to grow in a way useful to Natives. Rather than directly feeding animals like a farmer the left them loose, but they managed the animal populations and their forage.They did this so much in fact, that many of the plants we think of as "wild" in fact do not survive well unless they are tended, or even require regular harvesting for health. Sedge is a classic example in the west used for baskets, another one is oak which were carefully pruned, fertilized, burned beneath, and likely even planted.
To be clear, it wasn't a panacea. There's a lot of debate about this, but there's definitely evidence that they screwed up. And American Indians are anything but one culture, there are many. In fact, most were moving quickly towards farming practices around the time that their populations were destroyed by western diseases.
As I read about this I realized that I wanted this relationship with the land. I wanted to try and relearn some of what they knew, to expand on it, and figure out how to encourage this using, but not abusing, relationship with the land in modern times. I realized that I could make things better by being a human within this system, not just worse. I could actually help.
I blame John Muir for the still dominant view towards environmentalism. He didn't like the natives, he felt cheated by their wearing of modern clothing, and their land management practices. They didn't fit the noble savage image he wanted. He believed in the concept of "wilderness" and impressed it upon the U.S. extremely effectively. To be clear, it's a good thing he did, we wouldn't even have the National Park system if it wasn't for him and his friends, but he also did a dis-service. He convinced many that we have to live seperate from our environment. That it is a thing to protect and go visit.
A lot of native cultures had terms for wilderness... and they were not positive terms. They had strong negative connotations. This is non-productive land, non-cultivated. Land that isn't particularly healthy or fruitful.
In other words... the land in the U.S. is unhealthy not just because human's ruined it, but because human's ARE part of the ecosystem themselves, and they removed themselves. It's just like removing wolves from Yellowstone, the river's started meandering, the fields became overgrazed (there's much research on this). Human's too are part of the ecosystem, and without it the things that we co-evolved with don't flourish.
The more you study these things, the more you realize that we are part of the equation, and just like sedge, or trees, we can make things healthier by harvesting *some*. Often not the ones people want to harvest, you have to pay very very close attention, and be very careful, but it can be done. Now let me be clear, there are a lot of bogus arguments thrown out by pro-hunting folks. It can't be true that we have to kill the deer to keep them healthy, AND have to kill the mountain lion for the deer population. Similarly killing prime bucks being good for the herd is bunk from what I can tell. On the other hand, taking weaker does and bucks has been repeatedly shown to have a benificial effect on the herds - and consequentially on everything else. Put your emotions aside and do the research: biological, ecological and historical. Toss away arguments that are simply inconsistent or nonsensical, but look with the critical eye of a scientist and see where you end up.
Animal Rights
Okay, all of that is interesting, but you're killing animals? And fuzzy cute ones even?Lets bring this back to axioms. There are two common angles to take on ethics in relation to animals. One focuses on the population, the other on the individual. I think it's important to address both. So far we've been talking about the population. But what about *this* animal, the one I'm looking in the eye down the shaft of my arrow. I'm going to hurt it, kill it if I don't screw up (and if I don't think I will kill it I better not take the shot).
Some people draw a simple line... no. Killing the animal is wrong. Some even believe more wrong that killing a human. Other's say sure... it's just a deer, it's stupid anyway. They'll claim a lobster can't actually feel pain, and thus ignore the question entirely. There are other arguments of course, but I'll stop there for now.
I have a suspicion frequently that the first view is an extension of my philosophy as a child. That by existing I caused pain and made the world worse, that all human's do. But not always, I think it's possible and reasonable to simply have "don't kill animals" as an axiom. That animals have rights as human's do. I don't have that axiom, but I respect those who do. The second I suspect is often laziness really, the unwillingness or inability to think through actions in the first place. But again, some come to this conclusion after a lot of deep thought and knowledge.
In college I heard Eustace Conway, the author of the Last American Mountain Man, speak. He tried to explain his relationship with the deer; that he revered them, that they fed him, that he loved them and cared for them deeply on a personal level, every animal. He also seemed massively frustrated at his inability to communicate this, to communicate the emotions of caring for a deer, and killing the deer, and wearing the deer. The vegetarians in the room just looked disgusted. He tried to explain how disgusted he was that people used pulped live trees to wipe their butts without stopping to consider that fact. He tried to explain that he liked toilet-paper too, but being used to using leaves he saw it as a luxury with a cost that one had to always have in mind. He tried to explain that he usually didn't pick a leaf for that purpose, he used dead ones from the ground instead, because it wasn't usually worth it. Leaves, while we're using tree trunks. I think he made a mark, but still most of the people in the room clearly didn't understand. I won't presume to be better at explaining than he. It's deeply spiritual and as difficult to explain as anything of that sort, but like other spiritual things minor changes there can have a huge impact on how we act. Best I can do is to ask you to withhold judgment until you've seen it and experienced at least some piece of it.
My moral beliefs
I am in the same camp as Eustace. I feel it is very important to honor an animals death. This is why I believe, morally speaking, in eating roadkill so it's death is not in vain. I believing using it is a way to thank it, and that keeping present in my mind the cost for what I am eating is important, both towards the individual and species it impacts, so that I do not take too much of something and I stay careful. This is as true for vegetables as for animals to me. But, I believe that it is also my job, as a human being, to take my place in the world and carefully, caringly, and humanely, to take life to feed mine... whether animal or plant, and to make the environment as a whole healthier in the process. I also think that a maybe higher cost I understand is better than a maybe lower-cost that I don't. When I kill by my own hand, a tree, a vegetable, or an animal, I know the cost and the tradeoff on a personal level. I can't know that as deeply for something I purchase. Even when I buy food from a farm that I go and visit for a day it's not the same.This belief is why before I even considered getting my first hunting tag I learned to skin an animal out, to make bone tools, to process sinew, to cook the meat, and to tan the hide.
What trapping actually IS
Now, I was dubious when I started this class. I wasn't sure if even wanted to trap, but I wanted to learn and understand so I did it anyway. The deer hunter lines are what you hear most often, which as I noted earlier are often bunk. At least with the group I'm learning from, trapping is different. Trappers long ago screwed up and nearly eradicated all their favorite species. What many aren't aware of is that it's also trappers that have worked hardest to re-establish these species and carefully manage their populations such as to keep them healthy. Hunter's say this kind of thing all the time, and it's kindof true but more of a stretch.Trappers here in Vermont work very closely with the state furbearer biologist. If they harvest a fisher, otter, or bobcat (particularly carefully managed species here), the entire carcass goes to fish and wildlife. Fish and Wildlife tests the heck out of these carcasses, how many babies did a female fisher have, or how much mercury is in this otter. All of this they trace back to maps of where the catches were made so they can track it. They keep an ongoing dialog going about where the animals are, and in what numbers, and with respect to that how many they need to take, or can take to maximize the populations health. That's the primary goal.
The trappers teaching my class have said that they will pull their fisher traps if they catch a female, because the population can't stand many females being removed. They never catch out an area, they'll only catch an animal in an area where they are plentiful.
One thing I was most surprised by is how humane foot-traps actually are. Live-catch foot-traps aren't toothed anymore, and haven't been for ages. When otters were reintroduced into 18 states, foothold traps were used for the catches. 2400 otter were carefully caught this way, by the trappers in the source state. They were held for a short time to check health, then transported and released in the other states. This program was probably the most successful re-introduction program ever.
Traps usually need to be modified so the chain is attached to the center-middle, and to add 3-5 swivels minimum. But, with these modifications, contrary to popular belief, the trap doesn't injure the animal. Trappers snap live-kill traps on their fingers all the time, it smarts and I don't recommend it, but it doesn't cause injury. I watched someone trip a small kill trap on their finger during our class, and even that just smarted a lot. You have to be careful with your sets and traps and everything else to not injure an animal, but the focus is always on keeping animals in "releasable" condition. Prior to the otter story I was dubious about this, but if it's good enough to re-establish a healthy otter population, it's pretty good.
Obviously you kill the animal eventually, if that's the goal. Your first line of defense against catching the wrong animal is careful placement of traps and selection of bait, second is careful tuning of traps so they won't trip on the wrong animals. When all this fails non-injury traps give a last ditch "shoot, wrong animal" opportunity to release something. They also make the animals last hours a lot more comfortable. This is why the two types of traps used are ones that keep an animal in full health, and those that kill instantly.