
There's cold, and there's cold
2013-12-23
I grew up on the east coast, in Massachusetts. I go snowshoe backpacking up in the Sierra every so often in the winter. I've built a snowcave in 7 degree weather. Jess is pretty similar, though she also spent a couple of years in northern Maine. Anyway, despite this we had a bit to learn in Montana.
At the Buffalo Field Campaign it was cold. It turns out that that valley is one of the 3 coldest spots in the lower 48 states. -40F is a routine daytime temperature. It was only -10F to -20F while we were there. Also the wind there is a major factor. Dealing with cold is one thing, but doing it routinely is different. My boots weren't quite warm enough but worked okay. It was amazing to learn that pack boots will actually keep your toes warm and comfortable at -10F with no trouble at all, and probably down much colder (if you dry the liners out every day).
Next though we went up to the North Entrance of Yosemite (many hours of driving on Ice. Montanans basically go the speed limit on Ice because they are used to it, on the flip side it's consistant ice and rarely glare due to the cold. Luckily I have a lot of experience drifting corners on dirt roads so this wasn't that big of a deal)
For various reasons we ended up getting there in the evening, so we found a dirt (snow) road up into the National Forest. I carefully parked the truck on a bit of a hillock facing downhill, so we could roll start her if the battery had issues (or ran out of juice before it started). We bundled up and made a quick dinner using some of the more instant food we had around.
In bundling up I put on my tights and a pair of puffy pants. I also put on a thin marino wool shirt, my normal marino sweater (usually all I use), my down vest, AND my backup warm jacket. I also had on my balaclava and hat, and puffy mittens with gortex covers. I was not overly warm. Jess did a little better as she has a ludicrously warm vintage down ski jacket from the 70's That was passed down to her.
We just wanted to get in and warm up, so we didn't light a fire this evening, instead we pulled out the alcohol stove. After a number of tries we realized it simply wasn't volatile at this temperature, there was NO vapor at all to light on fire, so the sparker didn't work. As I reached for the lighter I realized that wasn't going to work either. I have a few emergency matches (the truly light-wet type, not just the "waterproof" ones), but not many. Instead I stuck the lighter in my armpit ::BRRRR:: and waited for it to heat up. I then used this to light a candle, and used the candle to heat the alcohol until I could get it to very slowly and carefully light with the lighter (still wouldn't light with the sparker).
Now, I always knew lighters were not a great plan for this sort of weather, but what I didn't know was that a sparker couldn't light alcohol. I ran into this once before actually on my first backpacking trip over 10,000ft. There I sat trying to get my stove to light for something like 20 minutes as the temperatures plummeted. I had believed then that it only got to about 20 that night, in retrospect I think it probably got below zero that night (I'd spent it behind a rock to block the wind, in a nearly new Feathered Friend's 10F sleepingbag with some extra clothes on). So, if you use alcohol I HIGHLY recommend carrying a few backup matches. A sparker is not a good backup for truly cold weather.
We ate and drank some hot tea sitting in the cab of the truck, so we wouldn't get too chilled. Then we crawled into the back of the truck. I have a 5F down quilt that needs some futzing to get the down to the right spots, and Jess has a 10F down bag that really needs to be washed and is kinda flat. I'm using a gossamer gear sleepingpad, Jess has a thin one from them and a thicker but crappier foam pad. We were both also on top of a 7.5 lb felt blanket Jess made that we had spread across the platform of the truck. Lastly, the truck was closed up of course, giving us another 10 degrees or so, and blocking the wind.
We both slept fine, but in almost all of our gear and not too toasty. Our cores were fine, but both of us had numb toes come morning. As we got up we looked and realize neither of us had managed to keep our feet on our pads overnight... no wonder!
(3-inch long ice-crystals hanging from the ceiling of the truck cap)
Miracles of miracles the car turned over. The starter motor wouldn't reliably engage (glad I was on a hill), but it'd engage to turn it over once or twice and then disengage. The momentum jerk of starting it spinning again seemed to re-engage it, so it took a number of key turns before the truck started. I didn't want to roll-start it except as a last ditch, as we were on a steep snow-covered hill.
-40F is really where everything breaks down. We didn't so have to deal with this temperature, only ~-25F. Propane boils above -40F. Toyota red antifreeze in a normal mixture fails at -34F. Isobutane boils at -10F, and butane boils at 10F.
We ran into some other interesting problems too. When it's only getting really cold at night you can keep liquid water around. If you've got a large container and it's in the cab of the truck for instance it won't usually freeze overnight. There's some insulation there and a lot of heat from when we had it comfortable, it'll last through a 10F night no problem. When the day's high is -15F or something this doesn't work. Even with the heaters going much of our stuff in the front stayed solid frozen for days, even with driving for hours and hours. While we were sleeping the night it dropped to -25F I had some hot tea in a thermos, I drank some of it and what remained froze solid... in a thermos.
I learned a lot, and ironically this made me want to be in the cold MORE so I could learn more about how to deal with it. Good clothing is critical, glove *liners* are a must. Mittens to go over the liners are also a must. It turns out that having a properly shaped balaclava is crucial. Jess' worked well, but mine is unshaped around the nose. This meant that my breath escaped between the balaclava and my cheeks, thus directing it over my sunglasses which subsequently frosted over. This was okay but only because when we were in high wind it was only -10F, so I could leave the balaclava off my nose. Had it been colder with that kindof wind my nose would've been in danger.
Oh, I should mention that had the alcohol not lit we had a whitegas stove around, which is designed for using in cold weather. We just didn't want to dig it out. I assume we would've had to preheat that as well though of course.
Anyone else have some tips for cold weather? I mean really cold weather, when things like insulating your water bottle don't really help you for long.
Fire and snow
2013-12-04
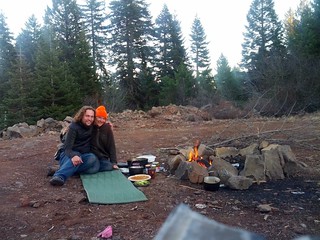
Jess and I were camping up in the mountains on our way out toward Montana, and the good spot we found was quite snowy. We wanted to cook up some meat that evening and thus really wanted to start a fire. So, that's what we did:
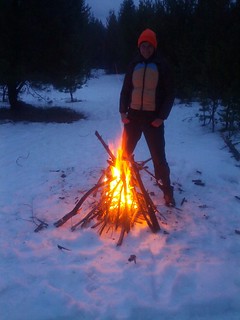
ALL of the wood was wet, there was no hope of finding dry wood. There also wasn't much tinder around.
A quick primer in starting fires in the snow. The first step is to make it so the the melting snow doesn't sap all of the energy straight out of your fire. Fundamentally fire is about getting a chain reaction. When trying to get it to light up you want as much of the heat from what you have burning so far to go back into the stuff you want to burn as you can, to keep the chain reaction going and building. The easiest way to do this is to lift the fire up out of the snow so it doesn't sap out all that energy. To do this we started by building a platform of sticks. This is just a layer of sticks layed side-by-side, and then a second layer on top of that. 2 was plenty. In really deep snow this platform may slowly work it's way down into the snow, I've heard of using green bows under it to keep it up, but I can't say as I've tried it yet.
Next I stripped some of the driest needles I could off a dead branch still attached to a tree. These needs were *just* dry enough to actually burn very very slowly. I placed these on the platform. Jess had gathered the driest tiny twigs she could find off some nearby fallen trees (for some reason the sticks on the standing trees were like rubber that day, totally soaked). I piled these twigs on top of the pine-needles and lit the needles. There was little wind, so it required a little blowing to keep the needles going.
Next we started piling on more and more twigs, worrying less and less about dryness and more about volume as we went. The more outer layers should be dry by the time the fire gets there, and there's more energy to spare to dry them out. Then we started going to larger and larger wood, and building up more of a Tee-Pee shape. The classic "Tee Pee" approach to building a fire is *extremely* effective, but I find that if I build it all up before lighting I usually knock it over and get really frustrated. Instead we usually start with a heap of smaller stuff, often we just keep going with the heap, but in more difficult weather such as that day the Tee-Pee really helps.
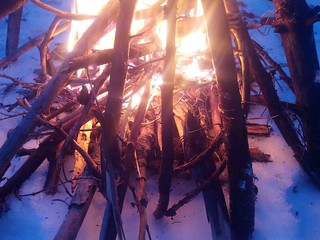
One of the tricks to making all of this work is to use LOTS more wood than you think you need, at every stage. Build it several stages past where it's burning at the time. You need the wood to start drying long before you expect it to burn. The extra layers also serve as a bit of a shield holding a bit more heat in the center to help your chain reaction. Normally this would just be a waste of wood and you'd end up with a ridiculous bonfire that you can't cook on. But, if your wood is really wet and keeping a fire burning is hard, something closer to a bonfire is exactly what you want. Once you have some really hot coals you can just collapse it all and use it like a normal cooking fire (unless say, you're in pouring rain and a bonfire is the only way to keep it going).
We *did* use a lighter on this one. But using only a lighter, when everything was wet, we were soon burning logs we were literally digging out of the snow. Maybe someday we can get an on-the-spot built hand-drill to work in this weather... getting closer!
Buffalo Field Campaign (BFC)
2013-12-04
Jess and I went up exploring into Oregon and then shot East out across Idaho and up to Yellowstone. Some friend's Jess met this summer work for the Buffalo Field Campaign
http://www.buffalofieldcampaign.org/.
So we figured we'd drop by and say hi for a couple of days. To be clear, the "Buffalo" field campaign is about the American Bison (not technically a buffalo, though that's it's common name)
https://en.wikipedia.org/wiki/American_bison
.
I'll be honest. I kindof expected a cool group of folks, but a pretty heavy dose of the sort of environmentalists who think anyone who isn't Vegan is a terrible person, and that sort of thing. I was completely mistaken.
Turns out it's a pretty varied group, and in particular a good portion of involved folks are not only meat eaters, but hunters themselves. The organization has been around for a while (and made a real difference in that time) and as a result they really have their ducks in a row. The BFC's reasons for being against the Buffalo hunt are much more nuanced than simple "don't kill the fuzzy things", and their way of fighting is by 1) gathering hard data through rigorous field work and 2) educating people (hunters, ranchers, lawmakers, park officials etc.) about the issues and being involved in the debate. The site here at West Yellowstone is one of their jump-off point. People stay here all year, including Yellowstone's extremely harsh winter. It's early December and is likely to hit -40F (-40C) this week. They gather data every single day on the buffalo's movements, and actions taken by agencies, hunters, etc. involving the buffalo.
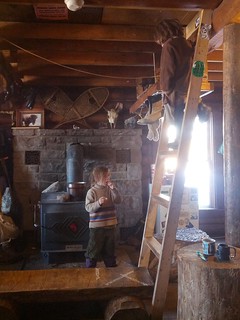 (This is a couple of kids Jess met this summer actually, who were also at the BFC).
I'm sure I can't do it justice, and the arguments get pretty complex, but here's the short short sinopsis of the general points:
The Yellowstone Buffalo are not allowed outside of Yellowstone. If they leave they are driven back in with paint-ball guns and the like, a process called "hazing". If driving them back fails, they are killed. The National Parks manage the number of buffalo precisely, taking any "surplus", through a combination of hunting permits, and slaughtering the buffalo themselves. What the carrying capacity is seems to be one point of debate:
http://www.buffalofieldcampaign.org/faq/howmanybuffalo.html
The other major point of debate is Brucellosis. A disease which slightly reduces the healthy birth-rate of calves in cows, and has less impact on Buffalo. Brucellosis is the primary "reason" that Buffalo are killed when they leave Yellowstone:
http://www.buffalofieldcampaign.org/faq/whatisbrucellosis.html
. However, the scientific backing for this seems to be slim to none. The real issue is more likely that ranchers don't like buffalo damaging fences and competing with cattle for range. A reasonable thing for ranchers to dislike to be fair. The ranchers then put pressure on the government toward this end. Unfortunately to date no-one has come up with a functional/practical way to make it beneficial for landowners to let the buffalo range.

A bit of quick background for those who don't know. The buffalo were intentionally nearly made extinct in the United States as a way to win the battle against the plains Indians. By removing their primary food supply the U.S. government hoped to force them into submission. To accomplish this they payed hunters to by the head for slaughtering buffalo in an attempt to completely exterminate them. http://all-that-is-interesting.com/post/5631232781/the-near-extinction-of-american-bison-in-the-1800s . Most of the results of the hunting (meat, bones, hides) went unused, though hides were often sold for a small amount of money.
Here's a timeline (though a cryptic "extermination began" describes the program) http://www.fws.gov/bisonrange/timeline.htm. Here's a great explanation and set of pictures http://www.environmentalgraffiti.com/news-near-extinction-american-bison
Sorry I'm lacking cool photos of Bison. Jess did go on a patrol and saw 26, and we went on some awesome hikes, but we both forgot to take pictures. Anyway... The Buffalo Field Campaign is a pretty neat organization if this is the set of issues you care about.
Thanksgiving on the road
2013-12-04
Jess and I were wandering up towards Oregon and decided it would be really fun to have a thanksgiving dinner. We stopped by a grocery store and picked up some brussel sprouts, 3 types of pickles, some apple cider, some hard apple cider, and some sauce for meat we already had in the truck.
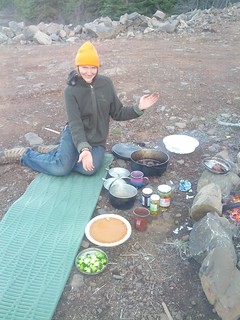
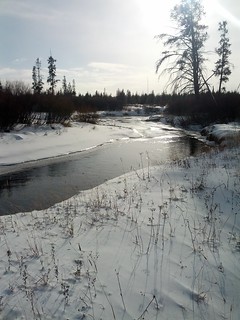
Near ashland we found a road out to the National Forest called "Dead Indian Memorial Road"... sadly appropriate. Down this road we found a good spot to camp. It was pretty chilly and there was ice on the ground when we got there. We lit up a fire, and had a wonderful little feast out in the woods. The sky was super clear and we watched the stars as they moved through the sky that night.
We both agreed that listing out what we were thankful for was pretty pointless. It's all so good.
DYI: new backpack
2013-11-20
A while back I noticed that my backpack was on it's last legs. See
http://www.blog.smalladventures.net/2013/11/review-granite-gear-serrano-25l-daypack.html
After some minor foibles I decided I should just make a pack myself. So after an afternoon of thinking I dove in, and here's the result so far.
I just got it to a usable state, there's certainly more to do to really make it nice.
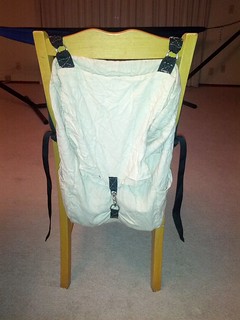
My goal was a day pack around 30 Liters, large enough for a good-weather weekend backpacking trip, or a week of civilization travel with a laptop and change of clothes. I had a painter's drop-cloth lying around, so I took a shot with that and some webbing I picked up at a hardware store.
This is a simple 3 panel pack, 2 side panels and one panel that wraps around as the front/bottom/back. The side panels fold over at the bottom creating a side pocket, and a lid is stitched to the top. There's a drawstring around the top as well. My eventual plan is to add drawstrings to the pockets for water-bottles, and compression lacing up the sides of the pack. I also want a second ring to attach the lid-hook to for when the pack is overfull.
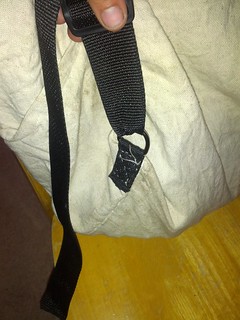
I attached the shoulder-straps with D-rings both top and bottom in case I decide I don't like my first quick-hack design. The shoulder-straps are stitched over the D-ring on the top, and the bottom is a standard slider (sadly plastic, it's what the hardware store had).
The top of the pack is rolled down several inches and stitched again, this gave me extra reinforcement for the shoulder-strap attachment that I knew would be one of the most stressed spots on the pack.
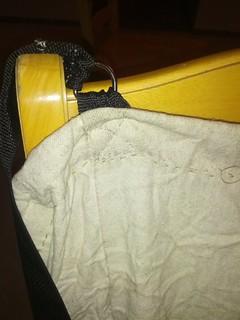
(Front of pack)
Note also the shoulder strap D-rings are stitched to the pack over seams, so for example the attachment points on the bottom of the pack are actually sewn directly to the bottom as well, not just the side. I'm hoping this helps keep it form tearing out of the fabric.
So far I'm a little sad that I didn't use canvas for the straps instead of nylon webbing, just for my own aesthetics and generally avoiding adding more plastic to the world when this pack wears out. Otherwise it's looking like a pretty good first attempt!
This is the first backpack I've made, and I have no illusions that my first pack is going to be anywhere near perfect. This is an Alpha pack made quickly out of cheap materials (
We will see!