
Truck Hammock: A failed experiment
2013-01-20
Backstory
I write a lot here about things that work. I'm amazed sometimes at how often things we try work out, but... they most certainly don't always.
You may remember this post some time back: http://www.blog.smalladventures.net/2011/06/jack-camper.html . We love that sleeping platform and it's been really really useful. On the other hand, after using it for a while we've found a few flaws with it.
- It's not tall enough. This severely limits how much gear we can fit in the truck. As an example, a 5 gallon bucket doesn't fit upright under the platform.
- The openings to the boxes are too small, this means we don't use the space in the boxes efficiently.
- They are a lot of wood, this means they are heavy and they take up space.
- The splits in space that the boxes make severely limits what *shapes* of gear we can fit
- The space that remains is long and narrow, meaning there isn't enough "front" easy to access space
- The boxes do take time/effort to remove and reinstall right now (particularly due to needing to be tied in place).
These are minor gripes overall, but, we thought worth trying something else, in hopes of solving some of these problems. If it doesn't work, we can just go back to the boxes we have.
Idea
The basic idea is simple, build something with no underlying structure that just sits on the lip of the truck cap/bed. This way we have more space underneath, the structure is much simpler, and takes a lot less material.
We got to chatting with a friend who was hanging out at our house, and came up with an idea. What if we went father, what if the platform could be made *really* light... What if we made it out of fabric! This seemed cool enough to be worth trying. I went to the store and bought 10 C clamps and a bit of wood. I also went to the army surplus store and found some sports netting. With these bits I constructed this:
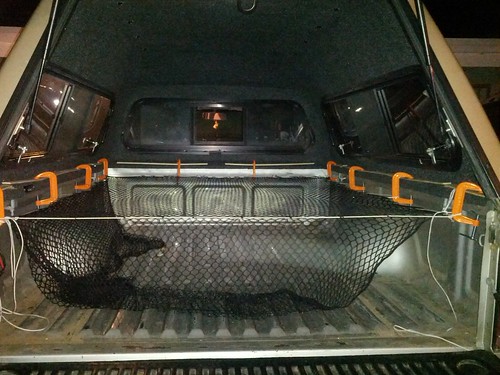
The problem is that currently, if I get in, my butt touches the floor. With this setup if I retensioned and fiddled I'm confident that I can make it so one person is fairly far off the ground. The goal though is to hold up *2* people and to maximize cargo space underneath. Tension is exponential with respect to droop under load. In other words... this would have to be *ludicrously* tight to have sufficiently little droop and to be useful. 5 inches would be a big loss in space. Even if we could get everything else to hold at that tension (the hammock strings, the clamps, etc.) there's some danger to the truck bed and cap as well.
We *could* build a very solid frame and use that for the tension, this would work just fine. But, that's complex to build and getting somewhat heavy again. I think this can be done and it would be really cool, but right now I want a new platform that's easy to build, deal with, and repair, not a difficult engineering project. So, I think my next attempt will be a much more mundane solid sleeping platform. I have some sketches in the works now.
One thing to keep in mind if someone else embarks on this journey. If you have gear underneath the hammock, note that that gear may be dangerous. Imagine your hammock giving way and you landing with an ice-axe through your right lung... Yeah... This is an additional reason why I decided to abandon the project.
Archery: Carpet and silencers
2013-01-14
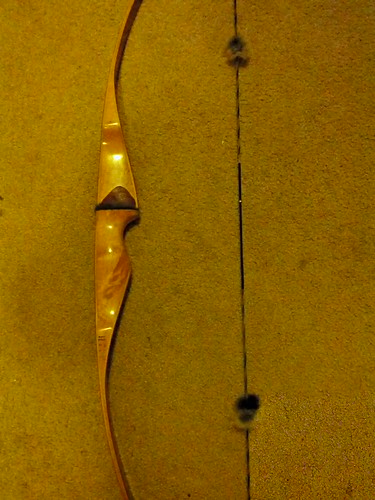
I decided I need a new carpet on my bow (I shoot off the shelf) and for some time I've been thinking I should really put on some silencers.
Well, this evening I finally got off my butt and did it.
We had a road-kill squirrel pelt in the garage that Jess had been meaning to tan. A little while ago she finally declared it wasn't worth it and she probably wouldn't tan it. It's got a bit shorter fur than the rabbit, so we decided that it might make a good carpet. For this use, we also figured rawhide would work just as well, maybe better.
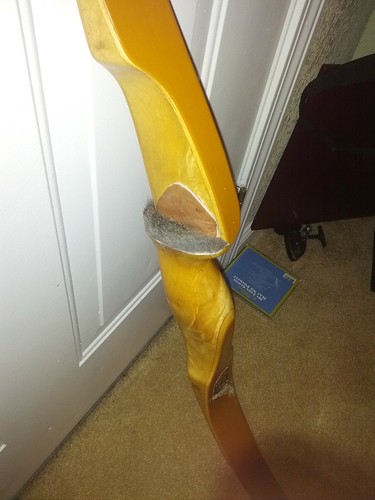
After scraping off the old glue and carpet with a pocket knife, I glued a bit of the squirrel pelt onto the the shelf using barge cement. Then I trimmed it down flush with the shelf with a pair of scissors.
Now for the silencers. A little while ago we ate a roadkill rabbit. When we did this we of course saved the pelt. Along with the primary pelt a few bits and pieces came off as little tufts. We set these aside then, thinking maybe they'd make decent silencers. These are also rawhide, but we'd salted it as we didn't have time to clean it on the spot. We put on a lot of salt, so the hide was actually a touch fragile. I tore one piece a bit so I had two strips maybe a half inch long with big tufts coming off them.
I wrapped them around the string, and then them on using a bit of linen twine. The twine is tied with a half-knot, then wrapped to the backside, halfknot, back to the front and a reefers knot.
We'll see how they work next time I go shoot! I didn't add a spacer under the carpet, I figured I'd give it a try straight first. I figure the old carpet probably caught somewhat randomly throwing off my shot, I'm excited to see if my aim improves. The silencers should just help take away the "twang" after each shot.
Update
Well, I lost some fuzz off one silencer, apparently I missed the tiny bit of actual rawhide the fuzz was attached to when I tied it on... not a problem.
Otherwise, I *love* the way it shoots now. The silencers did reduce the "buzz" in the string and bow after release, it makes it easier to feel everything else. The squirrel skin seems to have worked extremely well, at least compared to the cruddy carpet I've been shooting off of. After I got to the range I took a few shots dialing in my technique since I hadn't shot in a while. I quickly realized my brace-height was wrong and tweaked that. From then on it was like the bow was telling me what I did wrong. When I shot way left it was my balance, every time, when I missed badly and my arrow didn't hit the target straight it was my release. I realized that I've had such bad whip in the past that I'm used to aiming left-right differently at 10m and 20m... Youch, that was quite a realization.
In any case, this should really helped my shooting. There's something funny in my release that I need to work on... especially up close my arrows always hit crooked, except very occasionally when everything works and it flies perfectly straight. I just need to figure out what that is.
Ultralight Gear Builders
2012-12-24
Today I was looking for an ultralight backpack Jess and I thought was cool, and I had a heck of a time finding the site. It occurred to me that finding the really good ultralight gear manufacturers is HARD. So here's the list Jess and I have built over some time with the help of some friends:
-
General gear makers
- Gossamer gear: http://gossamergear.com/
- golite: http://www.golite.com/
- ULA: http://www.ula-equipment.com/
- MLD: http://www.mountainlaureldesigns.com/
- Cuben gear:
-
Sleeping bags/down:
- feathered friends: http://featheredfriends.com/
- nunatuk: http://www.nunatakusa.com/
- enlightened equipment: http://www.enlightenedequipment.com/
- western mountaineering: http://www.westernmountaineering.com/
- Hammock sites:
Look for another post coming soon with more traditional non-ultralight gear :).
Netting
2012-12-10
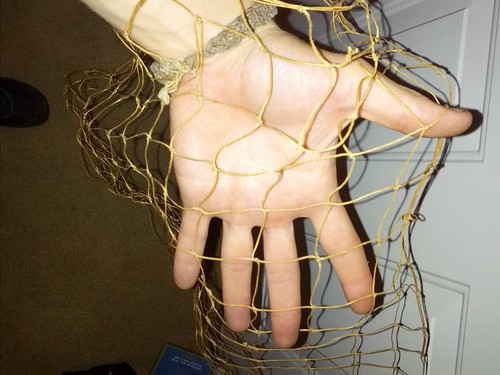
When I was at the Buckeye gathering a while back Norm Kidder mentioned that some of the natives had carried around large nets. They'd use these nets to gather things into, to catch game, to throw over trees to pull the trees down, etc. Recently I found myself wanting a gathering bag. So, with this in mind, I decided to give it a try.
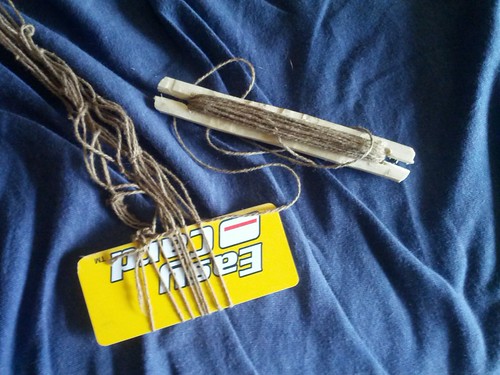
I did't happen to have a bunch of flax or nettle around, and didn't want to wait to rhette it and start from scratch, so I cheated and started with twine. I read a few websites and fiddled around, here's a good video for the basic knot http://www.youtube.com/watch?v=WW6VlflNbTU.
I didn't have their fancy little board or their fancy netting needle, but after a little poking around I realized I *did* have an old laundry card... bending this back and forth I made a netting spacer the size I wanted.
Next I needed a netting needle. Jess has a very small loom with an appropriately sized shuttle, so for my first experiments I used that. With that kit and some waxed linen twine I made this:

Instead of using a door or something I tie the far-end to my toe. Tension is critical, so I'll adjust the length of the tie-out cord occasionally to keep the net smooth. Your first net will have extra confusing loops on it... but after a couple feet of netting you'll figure out how to control the size and when you get extra loops. Growing the net is easy, shrinking was a bit less intuitive for me.
I'd used a shuttle I didn't make, so next I had to try making my own. I grabbed a buckeye stick we had lying around the house (yes, we keep sticks lying around the house). I spread a blanket in my livingroom to catch the shavings, and carved the stick down to a short flat board. Then I took the tip of my knife and drilled through the board about 1.5" from the each end, going through from one side, then from the other side until the two sides met. Once I had holes, I widened the holes out, and then cut/split notches going down to the holes.
The end result was a pretty passable shuttle. To make it really easy to use it'll need a bit of sanding (right now it catches a touch when passing it through the twine). But, it's completely functional. A bit of rock could be used to do the sanding, it's also possible to smooth something like this with just a knife, if you're more skilled than I. Anyway, here's the final kit:
I haven't yet made the size net I'd need to use it for all of the things Norm talked about, but that's on the agenda. Using this technique you can make flat nets of any size, bags, hammocks, etc. It's very general. By tying it to your toe it's also very portable and can be carried around like knitting. I made a 3.5 foot net while listening to a series of presentations in search and rescue training.
So... give it a try. I'd love to hear any ideas anyone has for what to use nets like this for. What size would be the most useful to carry around in an ultra-minimal kit (say, in a blanket roll on your waste), how big of holes? What would you use it for? I'm hoping to try some uses myself soon!
Felted Winter Ghillie Boots
2012-11-05
This weekend after getting back from a lazy camping trip Jess decided she wanted to felt. I haven't felted since I was a little kid and made felt balls, so she showed me the ropes. For my first project I decided to make boot liners, that I could wear with ghillie shoes or something similar... like this:

I made the shoes some time ago at a gathering where I learned from this guy: http://paleotool.wordpress.com/. I wore that pair of ghillies until I wore throught the sole, then glued on the rubber sole seen in the photo.
The felt liners took about 4.5 hours all said and done to make, including setup and teardown time. You will get a touch soggy while doing it, so we worked in the back-yard and bearfoot, and I worked shirtless. It's wet, and it takes a relatively long time, but think about it, 4.5 hours of work to turn wool into thick warm boot liners given nothing but a net, a flat surface, soap, and water. That's the fastest and easiest fabric you'll ever make. Combining this with the ease of ghillie boots and a pair of serviceable winter boots that's lighter and warmer than most of what you'll find commercially feels like it's within my grasp.
In the world of doing everything yourself, felting really is like magic! This was just a first project, something I thought I could use where I didn't care how it looked. Vests, pants, hats, and mittens are all doable with these techniques. In general the process is very forgiving so give it a try.
The process
I started with a large'ish sock that didn't have to stretch all that much to fit my foot. On a guess I added about half the width of the sock all around, and traced this onto tyvek on Jess' direction. I cut out that trace, this was my pattern.
Next I took my pattern and placed it on a flat surface that could hold a little water. We used the plastic lids for our gear storage boxes. We had some wool batting bought from a very nice lady at the Buckeye Gathering who raised sheep. I took pieces off of this and layed them onto my pattern, intentionally letting it extend about 1 inch farther or so outside the pattern. I did 3 layers like this swapping directions so fibers would go both ways across the final fabric keeping it strong. The pile of wool was maybe 4 inches thick at this point.
Next I took fairly soapy water (we used Dr Brauners pure castile sope, but anything works) and poured it onto the middle of the wool, the goal is to get it slightly matted down and wet out to the edge of the pattern, while leaving the wool outside that fluffy. I also patted it just a bit with my hand to encourage it to smoosh down and dampen.
I then took the pattern out and placed it on top of the wool. Then, I pulled the wool sticking out around the edge of the pattern in over the top of the batter. I did this wrong the first time, but the right way to do it is to get that edge just damp enough that you can get the wool to bend around and largely stay there somewhat fluffy sticking towards the middle of your pattern. This bend will be part of the final fabric so you want to make sure you get a fair amount of wool here.
Next I layed on another 3 layers of wool about 4 inches thick on the other side, this time (unlike the last layup) not letting it stick out. I then damped this down as well and laying a pice of fine mesh netting over it began to pat it. We used a cut-up laundry bag.
I then patted it for a long time until it started to get a little bit of body to it, enough that I could rub instead.
I then rubbed or a long time until it got enough body to it that I could remove the netting and pat the wool directly without any fibers lifting up out of the fabric.
Then patting again until you can rub
Then rubbing until you have a fabric.
For the whole time you want to keep checking that the wool is staying pretty close to the edge of the pattern. If it wanders too far out you'll end up with what looks like a seam later because it'll felt too a wide strip together. If you pull it in too tight accidentally pulling too many wool fibers off the edge though you can end up with a thinner part of the fabric there. Making both mistakes I found it preferable to err on the slightly too far/slightly too much wool side. I suspect it would come out best with lots of wool pulled around the edge, then pulled quite tight.
In the last phase it goes through several stages, at one point I found that I could pull the fabric around a then smooth out wrinkles easily. This is the perfect time to make sure it's tight around the edges and fix up anything you don't like. You can often kindof shred the material back out and get it to rebind in (especially if you use lots of soap), allowing you to fix mistakes.
Once it's all good you flip it over and repeat on the other side.
When that was done I cut off the top of the super-massive "sock" a bit at a time until I could find the pattern inside the felt. I then carefully flipped the felt inside out, removing the pattern. On the second time I found this to be slightly easier if I squeezed some of the water out of the felt before turning it, to reduce the weight and thus the stretching that it caused. Once it was flipped I reinserted the pattern to keep the layers from felting together, and then repeated *yet again* the felting procedure of petting/rubbing on the inside, this time it's much faster though as the felt is mostly felted already from rubbing the other side.
And now I had a massive soaking wet lump of sock-shaped felt that might fit an ogre... :P. So now comes the fun part. I squeezed it out and rubbed it, as you rub it it shrinks, especially in the direction you rub it in (you'll figure it out playing with it). After rubbing it a bit I stuck it on my foot and continued rubbing (and occasionally squeezing out the heal where the water ended up). The felt slowly shrank down as it dried and was rubbed until it fit my foot just about perfectly.
I then carefully slide it off my foot, keeping the shape, and let it dry overnight.
DONE!
Things I'd change
If I was doing this again I would triple or maybe even quadrouple the thickness of the wool. What I have now are somewhat warm, but at triple this thickness they could be used as packboots for things like snowshoeing given a trivial leather covering (like a ghillie) to make them robust. That means that the initial pile of wool would be about 1 foot thick before I began felting it! I'm not sure, but I might have to do that in layers. The thickness I made would be pretty good though for mittens or other clothing.
On the second boot liner I didn't use enough wool at all (I tried to get a picture to demonstrate, but it's hard to show the thickness in a photo). On the first liner I'd ended up with thick "seams" at the edges that I had to cut off, so on the second one I erred in the other direction, thus ending up with very thin seems. The combination means that some spots on the second liner are *far* too thin for these to work really well as winter boots. I still intend to test them in snow at some point, but I don't trust them like I would if they were 1/4 thick of solid dense felt.