
Diamond Hitch and a Blanket
2012-09-10
This weekend Jess and I decided that we just wanted to get out, but we wanted a bit of a twist too.
Recently, while in Seattle for a friend's wedding, we saw a couple of old pack frames for sale on the street. Unable to resist we bought them for $8.00 total (we actually already had 1 each :P).
The pack
So, this weekend, we decided to take them for a spin. We've played with blankets tied around our waists on a couple of trips now http://www.blog.smalladventures.net/2012/07/backpacking-without-backpacks.html and found it to be *okay* in nice weather, but a bit uncomfortable. So, how about something in between? My mom told me stories about how she used to backpack with a piece of canvas tied to a pack frame using a diamond hitch. So we decided to give it a try, but with a large blanket instead (larger than is comfortable around the waist).
So... why was this idea appealing to us? We're always aiming to carry less *stuff* and be more dependent on and involved in the environment we're in. We've also seen some great designs for pack-frames made out of sticks. If you can make the frame, the string, and the straps, and you have something warm to sleep under... You have a pack that can carry a few more items.
Here's a descent description of how to tie a diamond hitch, and the one I learned from on friday, I found this by doing a quick search. http://www.itstactical.com/skillcom/knots/hitches/versatile-option-for-securing-a-load-with-the-diamond-hitch/ I feel like it's *almost* right but I feel like you should complete the diamond. So Jess and I both ran the twine back up the far side at the end making the whole shape balanced.
And what we got was this:
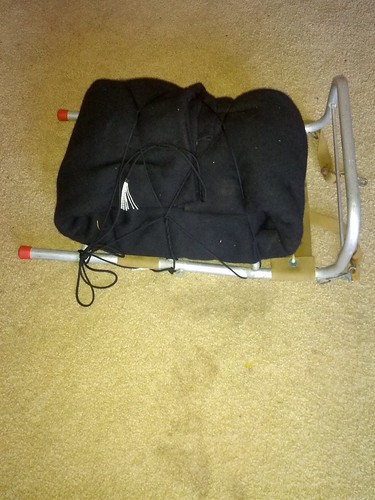
FYI: This frame is unusually small, which is part of why I bought.
That was my first attempt, after tying it several times a day over the weekend I got a bit better and much faster. We discovered in using it that it works slightly better if the strings go over the bottom panel. Note that the flap on top is also on top of the pack, this lets you "open" the pack and re-close it by tucking it back under the strings. It's surprisingly easy.
Sorry I don't have any pictures from the trip, I forgot to bring a camera. I brought:
- shirt (forgot to leave it behind), shorts, boxers, socks, shoes
- sweater, hat
- pack frame
- blanket
- twine
- cookpot, spork, sparker, alcohol stove, bandana
- knife, iodine, salt, bandana, emergency bivy
- fishing kit
- "emergency kit" (needle, twine, knife sharpener, pills, keys, etc.)
- medication
- 3 meals and some snacks
I changed gear slightly, but based on when I weighed it I believe this is ~10 lbs base, ~15 lbs total.
How'd it work?
Getting things in and out
This was surprisingly not annoying. The flap isn't much harder to open than many backpacks are. This is what we usually did when getting water bottles, knives, or other smaller items. When we had to get out say, the food and cookpots, it was usually easier to undo it and retie it. This takes a minute or two to tie and untie, but really... 2 minutes isn't a big deal. From this perspective I would do it again.
Sleeping
The first night we arrived at a back entrance to Henry Coe after dark. We hiked in a short distance and went to sleep. We each curled up in our own blanket, lying on it and flopping it over us. It wasn't cold until later in the night, but it did get cold enough that we both put on our sweaters and hats. It was okay, but our feet were numb in the morning, that night we were kindof roughing it, as it were.
As an important side note, both nights we were careful to fold the blankets so that the side we slept against was on the inside on the first fold of the blanket, before bundling our gear up in it. This kept the burrs on the person side of the blanket to a reasonable level for sleeping.
The next night was a different story. We slept in a great little meadow near a lake. The meadow had tons of dry grass, mostly oats. We gathered a bunch of grass and made a huge cushy mattress for the two of us. We layed one blanket over the mattress, lay down on that, and lay the other blanket on top of us. THAT night was almost as good as sleeping at home on our expensive futon mattress. It was slightly harder on our hips, and it wasn't quite warm enough, but in many ways it was comfier than a normal sleeping-bag. Had it gotten colder we probably would've moved both blankets on top of us for warmth and gotten a bit more poked by straw. That night was *not* roughing it, it was wonderful (and cuddly).
Overall opinion
Surprisingly good. Overall we both decided that we really want to try this approach with tarps and sleepingbags/quilts. The blankets were usable, but basically either they aren't as warm as we'd like (when we can't have fires) or we haven't figured out some magic trick :). The diamond hitch itself was great though, and I really like not depending on an expensive backpack body.
Stop for a second... Look at the list of gear I brought and consider every time you've heard someone say "I can't backpack, it's too expensive". This backpack cost me ~$25.0. $20 for the blanket $4.0 for the frame $1 for the twine. I brought my favorite knife at $20. I made the stove that Friday from two soda cans that were in my recycle bin. I have an expensive sweater and cookpot, but any sweater and cookpot would do. The emergency bivy was backup because I was experimenting. The iodine (~$25, but no longer available) was only because we couldn't have fires, and water in Henry Coe was very scarce.
Future work
I really want to try this with a tarp. I also want to try making a pack frame from sticks. I've also seen people do a similar trick with no frame at all, just tying things up in a bundle. Many things to try!
I know diamond hitches used to be THE way to backpack... I'd love to hear about any tricks anyone else has discovered!
JMT trip report
2012-08-26
Jess and I throughhiked the JMT August 2'nd to August 18'th. So here's a bit of what happened.

Jess did the planning for this one, so there should be an article coming on that topic at some point. I'm going to focus on the results ;). Nick, Jess' friend from highschool joined us for the first part of the trip. As background, we loaned him an 8x10 tarp setup, and a thin sleeping pad.
In short, the trip was absolutely gorgeous, I still need to filter through the photos.
The hike starts at 4000 feet in Yosemite, and ends 210.4 miles later (according to wikipedia) at 14500 feet on top of mount Whitney. In between, most days go from ~9000 feet through a pass at ~12000 feet and back. We did ~16 miles most days. In contrast to previous trails there are relatively few trees (just in the valleys) and a lot of marmots. We were surprised at how few birds of prey that are up there. The high Sierra are rather striking in that you regularly can see ~20 miles to where you were or will be, but rarely can see much more than that due to other mountains obscuring the view.
Highlights
-
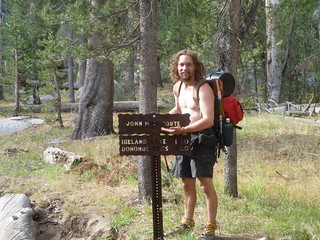
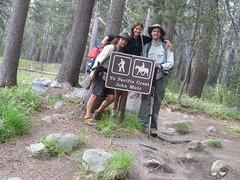
It's really the John Muir Route:
-
Goosberries can be found anywhere:
-
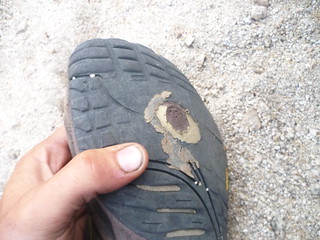
Shoes do wear out:
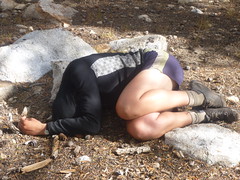
-
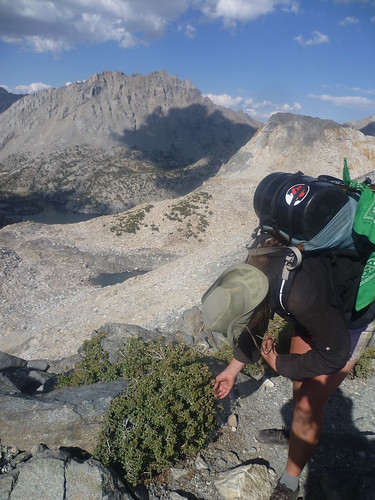
Anything is comfy if you're tired enough:
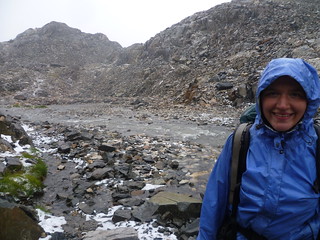
-
It rains in the Sierra in August:
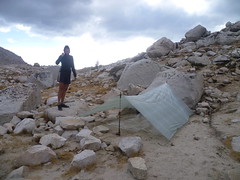
-
Tarps are clearly for mountaineering:
-
Fishes!

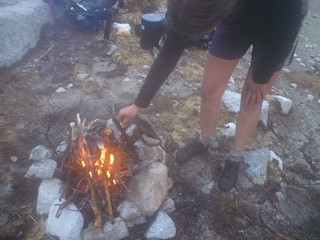
-
We can start fire in the rain!:
-
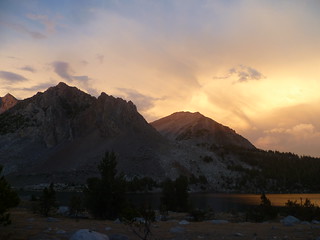
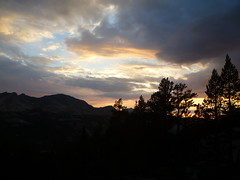
Sunsets combined with storms are amazing:
-
Good people:
-
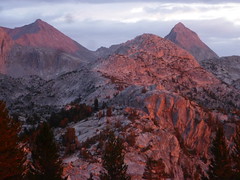
The Sierra are just incredibly gorgeous:
The whole story:
We really weren't sure how long we'd take, we had 3 mail drops, and Jess and I had off through the 23'rd. Nick had to get back a bit sooner, so figured he'd hitch or grab a bus (more on this is Jess' post). Suffice to say, we had no place to be for bit.
-
Day -1)
- Nick Arrives by plane, Jess picks him up and brings him home, we take 5 hours to get to San Francisco on Public transit and crash with Kempy (Thanks kempy!)
-
Day 0)
- We get up at 6:00 am, to catch a 6:30 BART train to Richmond where we got on amtrack to Merced. From Merced we got on bus from Merced to Yosemite. We get off at the visitors center and pick up our passes. Here we met a couple who'd been out for a while and said there was good water, hooray!
- We discovered Nick left his fleece at home, so we went to the gearshop in Yosemite so Nick can buy one.
- In the valley we did a tiny bushwhacked due to a rockslide. We'd ended up on wrong side of loop with a huge rockslide halfway around. I thought Jess knew about it so didn't comment and Jess was a bit spacier than normal and didn't see the signs (oops). Oh well, who doesn't like a good bushwhack?
- We hike out of valley, and sleep on rim. It was a bit of a hot hike.
- Nick got really sick that evening, dry-heaves and can't eat dinner. He appears to be suffering from heat exhaustion from climbing out of the valley to fast, and not drinking quite enough water and electrolytes... oops. At least Jess and I can finish his dinner for him.
-
Day 1)
- We met a guy who'd done the trail in 14 days with a 45 lb base-weight. He was starting a trip doing it slower... impressive!
- Reached Tuolumne Meadows. The last mile of trail was a sand-pit from mule-trains. Not unwalkable, but rather difficult walking.
- Resupplied from the store
- Camped in Tuolumne where a nice guy let us crash in his site. We also met a group of 4 women camped nearby that we'd later name the "blue-crew".
- A Bear woke up the camp in the middle of the night. Everyone was yelling at the bear, someone was slowly driving it saying "yah bear" and blowing an air horn. This seemed eminently stupid to us as it would desensitize the bear really quickly, but we didn't have a better answer really. The bear got treed and someone called bear patrol, though I think they didn't have much they could do either *shrug*.
-
Day 2)
- Nick lost his spoon (later to be found in his protein shake mix... oh well :P). He bought new spoon at the store
- We went through our first pass, and left Yosemite (end of map 1)!
- We met Mary Ellen who couldn't find her group at the time
- On the far side of the pass we met Susanne and her friend. Her friend had blown her knee (looked like a snapped MCL or something) and twisted her ankle going over the pass. We chatted with them but couldn't figure out how to help (despite Jess' EMT) so camped a bit further on, just a bit past Donohue pass.
- Thunder and lightning that night with pretty sparse tree cover it was a little exciting. That was Nick's first night in a tarp! Happily everyone stayed dry and safe :).
-
Day 3)
- We called 911 for Susanne's friend, but Susanne had beat us to it (happily), so the operator informed us.
- We hung out at Garnet lack for a while Jess rested her hip which was acting up a bit (she sometimes has trouble with it "crunching", something we're slowly figuring out, she's knock-kneed and it may be related.)
- We camped on shadow creek
- Brewer caught 3 small rainbow trout which we ate. We fried them in the pot with some difficulty, but they were still tasty. They were a bit small so the bones were annoying, oh well, food we didn't carry!
-
Day 4)
- We passed through Devil's Postpile where there was a huge stripe of downed trees. Someone told us that the best explanation anyone had was that the Jet-stream had dropped down. Apparently there had been sustained winds ~170 mph. Pretty incredible.
- We reached Red's meadow
- We met Marry Ellen again. She still hadn't found her crew and was missing a stove (she just had whitegas fuel). We tried to give her an alcohol stove, but just after that her friends turned up.
- We heard Susanne's friend got out by helicopter. Apparently they'd asked for just a mule to come in, but I guess the SAR team's mule didn't have the insurance set right on it or something?
- We ate burgers and I had a milkshake! Tasty!
- We got our first resupply! More fooooood!
- Red's also had a pretty good hiker bin.
- On our way out of Red's we got directions out from nice lady. As it turns out this was very good for us. We met several others who got lost leaving Red's Meadow, one went ~15 miles out of his way.
- We met lady doing the trail in 1 month going northbound, She told us about a good book for planning the trail, the type Jess had looked for forever and finally given up on finding. It exists!
- As we were thinking about stopping for the night a guy passed us doing the trail in 7 days. He talked to us a bit before running off, apparently he was going to be running late into the night.
- Nick wanted to do a bit more milage, hooray! He was excited about the idea of trying to hit Whitney before he had to head home.
- We camped near an awesome spring and slept under the stars next to a campfire in upper crater meadow. That spring was some of the best water I've had.
-
Day 5)
- We stopped early on and hung out at a lake where we did some laundry, ate, and had lazy lunch of mountainhouse chicken fajita we'd gotten in a hiker bin.
- Nick's knees started having some problems, so we stopped at Lake Virginia.
- Brewer caught 2 13" golden trout. These were absolutely delicious, the whole skeleton just pulled right out after they were cooked.
- Susan hung out with us that evening and we got to chat until it got dark. A beautiful storm rolled by but missed us.
-
Day 6)
- Nick's knees were really causing him problems today. We weren't not sure what the problem was, so there was fretting. He was taking a lot of IB profen, but we don't know if he could push it or not. We all decide he has to get out of the backcountry.
- So, we pull a 20 mile day to VVR (Vermilion Valley Ranch)... possibly not the best idea, but it's what happened.
- The Lake trail down to VVR is NOT FLAT. It's rocky tricky and surprisingly slow trail. Not a problem normally, but a bit frustrating when we're trying to get someone out.
- As we near VVR, we don't know how close we are yet. Brewer runs 2 miles to VVR to shuttle packs. By the time he gets back he meets Jess and Nick 1/2 mile from VVR and shuttles the pack that 1/2 mile.
- We have a free (good!) beer each, and eat some delicious pie and ice-cream. Hooray!
- A (knee specializing) physician's assistant who's also hiking the trail looks at Nick's knees. She says it's almost certainly tendinitis. That's a great thing to hear.
- We met more people! Delia, and Morgan and his mother (the physician's assistant).
-
Day 7)
- We eat a tasty breakfast at VVR. VVR has a bit of a bad rap for being too expensive. We concluded that it's really just psychological due to billing your credit-card just once for the whole time you stay. They were really friendly, and their prices were actually quite reasonable, but they have a lot of things you want :).
- During breakfast we chat with 2 guys who do a lot of trail maintenance. One of them also spends his whole summer in the high country. He was just visiting with his parents and resupplying when we saw him. Neat people!
- The free-bin was pretty uninteresting.
- This was not our planned resupply, so we had no drop here, we rejiggered food and decided Jess and I had enough (as it turned out plenty actually) to get to MTR.
- The store was nice store, though not great for resupply. Good food, good beer, good people, only a tiny store.
- There was no shuttle 'til saturday, so Jess and I left Nick to hitchhike back to our place. He'd hitched some before, so we knew he'd be fine :).
- Jess and I walked out to bear creek cuttoff. That was a pretty trail. We generally had a lazier day, bathed a bit and chilled out.
- At the trail intersection we met a group taking a break. They had a guitar which they offered to let me play. I wasn't about to pass that up, so we hung out for some time chatting. One of them, named Peter, it turned out lived in Palo Alto and had taken a course with BOSS! Cool!
- That night we camped next to bear creek (the creek) on the JMT. We were in a low spot as it turned out. There was a wildfire on the far-side of the ridge that had been burning for a while. We knew about it, and it was well under control at this point, but the smoke and CO settled in our campsite! Neither of us could sleep and ~3am we got up and moved up the hill. After moving we both realized we had pretty bad headaches and were REALLY glad we'd moved. We talked to several others and apparently it was just our specific site... oops! CO poisoning while on the JMT cowboy camping.
-
Day 8)
- Went over Seldon pass
- We saw a log cabin after the pass and checked it out. It said it was a snow survey shelter, neat! That could be a fun job.
- Reached Muir Trail Ranch
- Got our mail drop (a 5 gallon bucket packed with food for 3!). After consideration we decided we could skip going out to independence for the 3'rd food drop, we'd aim for 8 days to Whitney from here.
- We'd mailed ourselves potato chips and cookies. The cookies were pretty good, but the chips were awesome and we shared them around with the other hikers (Delia, Morgan and his mom, and a couple others). We also ran into the Blue-Crew again, and met a 14 and a 10 year old who were doing the trail with their dad.
- We *thought* we had sufficient fuel, so didn't get any more.
- Morgan and his mom got off trail here. Apparently Morgan had gotten into college, and he had to start soon!
- After refueling we forded the river to a hot spring, climbed in and chatted with Joey, who was hanging out there. He told us about lazy/simple forms of flyfishing which Jess got super excited. We also swam in a wonderful hotspring fed warm lake where I started teaching Jess the breast-stroke.
- We met a family hiking with 9 and 10 year old girls and chatted with them for a while. The girls had, by their choice, pulled an 18 mile day into Red's meadow so they could get hamburgers. Awesome! They also told us about a fire-ban that ran from Yosemite to, well, just about where we were now. Oops! The Yosemite ranger hadn't told us anything about this, though they had a huge handout they'd given this family. Oh well, we'd been careful and/or lucky with our fires at least
- That night we ate so much food! We'd raided the hiker bins for a bit of extra :D.
-
Day 9)
- We stop by MTR again to buy a couple of flies for Jess to fish with (Brewer had spin-casting gear). Brewer also grabbed some soap as he'd lost his bottle. We rolled out with ~30 lb packs, the scales said 25, but that simply wasn't possible (since we started ~24 and we had way more food this time), so we decided it was wrong.
- We ran into a lot of short-trippers on this section.
- We found the Muir memorial cabin... It was kind of falling apart.
- We entered Kings Canyon, which was very pretty.
- In Kings canyon we passed a ranger station. We decided to stop 'cause the cabin looked neat. There was a ranger there we chatted with, he told us the monsoons were coming in late this year and it'd be stormy the next few days.
- As we got close to evolution lake Jess got tired, but she wanted to fish. We passed up the last good campsite below 10k so she could fish. Later Jess wanted to stop, but Brewer's stubborn so we kept going. Eventually we ended up offtrail looking for a site... Well, we accidentally went up the wrong pass and into darwin's bench.
- It was gorgeous. We slept between 2 waterfalls in a lovely bed of duff. The weather looked stormy but stayed dry. The sunset was incredible with awesome Alpenglow.
-
Day 10)
- We started go upwards, this is when we realized we were in darwin's bench. We saw the lake we wanted over in a different pass... oops! Well, what to do now? We weighed our options and decided to go direct.
- That worked out pretty poorly. The going was just too rough. Eventually we bailed on that idea and decided to drop back, but not via the pseudo-trail we'd come up. Instead we'd just bushwhack it biasing the direction we wanted to go, but going downwards. That worked out pretty well and we hit the trail fast.
- Then we went through Muir Pass, it's LOONG and beautiful.
- Muir Shelter is really cool! It's a round all rock-structure.
- Someone had leaky containers with almond butter and jelly. They didn't want to deal with it and gave them to us at muir pass hut, at 12000 feet! Yay food I didn't carry!
- In the hut we chatted with some cool people who'd done a lot of crazy canoe trips as well. They had very-very light packs. We also met Jim again, someone we'd met earlier. He had a granite-gear pack that was modified with a home-made hoop-frame.
- After a while the hut was filling up. A storm had moved in and it started hailing. As the hut kept filling up I decided we really ought to go. There'd been no lightning and the hail showed no signs of letting up. So we pushed off
- Just a bit after we left we heard thunder and the hail picked up... CRAP! We ran down the mountain as fast as we could hearts beating. It was so pretty, all the waterfalls down off the peaks around us, but we were very happy when it started to let up and we got down lower where it was warmer. I'd been getting pretty badly chilled and finally gave in and put on my sweater under my poncho
- In the valley we saw some people with a fire, and as we walked by the offered to let us warm up. We weren't about to refuse that offer so we stopped and dried off, hooray!
- Their filter and broken and they were low on iodine. We told them we'd been drinking the water straight, but also gave them some tricks on using iodine more efficiently, like using half the dose but waiting longer. Hooray for being able to give *something* back for their hospitality :P.
- We found a nice campsite near the river. With a bit of doing we got a fire started using half of a "cheating stick" (that is some good commercial tinder we carry for such situations). We talked to some other groups later who'd failed, it was nice that, while we felt we were cheating, we could start a fire without worrying if it would work even after a heavy rain.
-
Day 11)
- We were still blown out from the run down Muir Pass and took it easy. We were both tired.
- We walked down the valley and camped next to mather pass.
- We ate dinner and went to sleep at 3. After that Jess tried to flyfish and we realized we should've checked the time and had to eat again before turning in for the night. It turns out watches ARE useful sometimes.
- Quite a few people camped at that lake, but all on the other side from us.
-
Day 12)
- We crossed Mather pass in the morning. Jess did not enjoy this pass.
- Someone we met on the top said Glenn was worse and dryer (it's not).
- We then Crossed pinchot pass as well in light rain. It was a crazy barren other world on other side, really neat.
- This was a 19 mile day, we were a bit tired but not bad! it was kind of an accident ;P
- We camped *just* below 10k so we could have a fire. This time Jess started a fire in the rain. The rain picked up as we cooked dinner and our fire had no problems. Our campsite on the other hand was a terrible choice, we'd picked a puddle on a slab of granite. To stake the tarp out I'd tied it out to rocks, and our site wouldn't drain. Ooops We did a little trenching in the shallow soil and hoped. Luckily the rain let up early that night and we only got a bit damp. Trenching is for crappy campsites... lesson learned.
-
Day 13)
- The trail down the valley that day was kindof terrible. It was beaten up with lose rock everywhere and very up and down on what amounted to flat terrain. Trail's trail but some is a lot easier walking.
- The trail got nice around Rae lakes area and stayed nice from then on
- We met someone we later dubbed shoe-goo. He had a pair of boots that were held together entirely by shoe-goo. He said he could repair the nearly worn-through spot on my shoe and we hung out and chatted. The group was fascinated by our packs and we sat down and showed them what we were carrying. Eventually we hiked on after the shoe-goo had hopefully set, sadly it tore right off again :(.
- We hiked through Glen pass. On the far side we slept in really established site. Again we got below 10k feet and could have a campfire (we're worried about our fuel by this point as we realized we were running low). We pitched the tarp just to dry it out and hung out a few other items.
-
Day 14)
- Went over Forester pass. This pass is truely epic; amazing barren landscape on the other side, and just no trees. It really messes with your sense of distance.
- Lots of menacing of clouds, but no real rain, yay!
- We passed a lot of bear boxes in this section. We had cans anyway, but they're nice to know about if we come back.
- We camped by tiny lake, and I tried fishing but there were no fish, oh well.
- Jess took a nap without even bothering to lay out a pad. I think she was kinda tired or something.
-
Day 15)
- This was intentionally a "lazy" day. The plan was a nice light day to set up for Whitney. We'd eat lots, sleep lots, and hike just a bit and be nice and fresh the next day early in the morning.
- Jess and I had a bit of emotional drama. Probably good overall, but I guess sometimes you have to change the stresses to get it all to come out.
- Talked to 2 rangers. One of them hadn't treated his water in 20 years. He'd spent 16 years at that location and been a ranger for 22. Neat! Both of the rangers commented on our tiny packs. We took this to mean they must actually be unusually small, cool!.
- Grabbed wag-bags at crab-tree. There was a bin on trail which was nice, no side-trip to the ranger station needed.
- Chatted with a trail maintenance guy. He said the prediction was for bad weather early the next day and we'd want to be up and down before too late.
- We slept next to Guitar lake. Went to sleep at 5:00pm after eating a huge dinner. We were both dehydrated and drank a lot that night to try and get ready for the next day
-
Day 16)
- Summited witney!
- Woke up at quarter to 6 and hit the trail by 7 after a huge 3x oatmeal breakfast. We felt like we'd be rolling to the summit. We hit the summit ~10:00, with weather menacing. On our way down there was some hail but happily no lightning.
- Jess had no problems with summiting this time. Hooray!
- Guy on top says there shouldn't be any lightning, as the thunderheads haven't built, the clouds were still thin. I'm not used enough to the Sierra so couldn't see it.
- Lots of people were trucking stuff up the mountain to repair the shelter. We chatted with several trail maintainers on way down. Neat people, and doing good work. It was great to hear that they felt respected by the hikers. Yay!
- At the portal we get food and a shower. I have a beer.
- Sitting around we met a guy who'd done it in 8 days, and he'd never backpacked before. He was a runner though. Interesting guy, we talked a lot about gear and such. The 9 and 10 year old girls came in just a bit behind us as well. We also re-met some people we'd met on the summit who say they'll give us a hitch clear back to the bay area from lone-pine if we can get to lone-pine like... leaving now'ish. Woot! Now we just needed a hitch there.
- We picked up a hitch down past the next campground, and from there picked up a second hitch to lone-pine where we found the hitch to SF waiting for us... hooray!
- We then drove all night! We pick up that group's other car in crescent meadow Seqoia. During the night Brewer took a driving shift as well.
-
Day 17)
- 7am we get home and SLEEEEEEEEP!
Review: Squeeze tubes
2012-08-26
This is going to be a quick review... don't buy them.
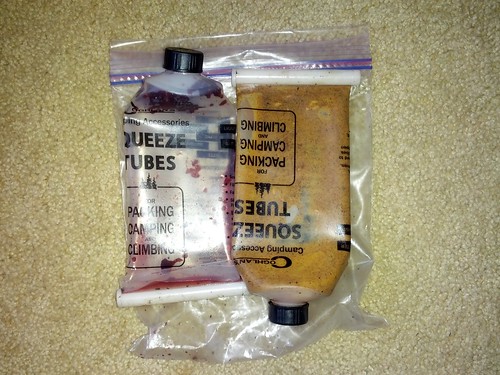
We were in Muir Pass Hut on the JMT at >12000 ft. Chatting about food, someone gifted us a pile of almond butter and Jelly... Let me say that again, someone gave us food they had carried to 12000 feet... As a backpacker this should seem surprising and odd.. Why did they do this?
Because they were leaking all over the place! We figured we didn't care, and in fact carried them a ways without them leaking much (after they weren't very full). That said, if you "overtightened" the lid of either (that is, if you got it even near tight) it would pop past the threads. The backs of the tubes surprisingly didn't seem to leak, but the threads at the front were just crappily made.
So, what should you use instead?... Anything else. How about a plastic jar from cheap peanutbutter?
Actually, On second thought... do use them, and give them to me at 12000 feet :D.
(These tubes have been safely disposed of in a trash can).
Backpacking computer: first attempt
2012-08-25
Why a backpacking computer
This may seem a bit out of charactor... but secretly (or maybe not so secretly) Jess and I are currently software engineers by day.
While we were hiking the JMT we got to chatting and came up with the idea. As I thought about it the idea of a backpacking computer got more and more enticing, here's some uses we came up with:
- Writing blog-posts while on the trail.
- Store piles of reference books. Think edible plant, tree guides, and bushcraft books.
- General reading for fun.
- Maybe do a little hacking for fun or profit.?
- I have a HAM radio license, so I was thinking about how cool it'd be to get a computer that speaks PSK31. PSK31 works at very low powers and can reach very long distances, so it could be really useful for contacting the outside world.
Of course, there are some requirements. To be useful we'd want wifi so we can upload when in towns, some good IO for things like radios, a good keyboard for typing, a display you can see in the sun, and most importantly incredible battery life.
Lastly, I'm a computer nerd, it has to run Gnu/Linux, or to me it just isn't useful.
My initial idea was to build something from scratch with a black/white passive segment display (you know, old-school style). After poking around a lot and looking at what devices *do* exist, what's easy to build these days, etc. I eventually decided before getting to crazy I should just start with my "cellphone". That is my Samsung Nexus Galaxy Android phone (basically a tiny tablet). I actually carried it on our last trip anyway in case we needed to look stuff while trying to hitchhike home.
Here's what I got:
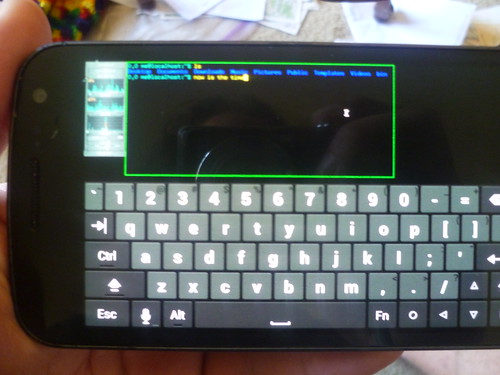
My cellphone is a gnu/linux box! (and still a cellphone).
How
First step was to unlock my phone and install CyanogenMOD. I simply followed the directions here: here . Cyanogen is just an open-source android, which I wanted anyway. It comes with a more feature-full Linux kernel and it's already rooted, both of which are needed for Gnu/Linux to work.
Next I tried a couple things, but the winner was the "The Android Complete Linux Installer" available on Google Play. This tells you how to set up a chroot environment, gives you a link to some system images, includes some nice scripts for starting things, and allows installation of Debian among other distros.
For some reason it installed Debian "Lenny", but whatever it's a starting place. Next step was to ssh in from my laptop (thus giving me a reasonable keyboard) remove a few bits of junk I don't want (dbus, xcfe, etc.) and upgrade the system to unstable. This took a bit of doing, I ran out of disk once, crashed the system a couple of times, a few freezes etc. Eventually it worked though and since I successfully upgraded everything's been stable.
The installer sets up a vnc server running xfce. It turned out just removing xfce and install fvwm was sufficient to swap the window manager. I prefer fvwm and it's plenty lightweight.
Next I did a bit more hacking to lock down root, switch to a modern sudo environment, install a proper vim, copy configs from my other machines for vim, bash, and generally set things up the way I like. And what I now have is a fully up to date proper debian install, with X support and all running on my phone. I simply vnc into it from the phone itself and I can swap to debian as a normal android app, no problem!
Note that before using debian you have to start it up, this is *good* because it means I won't burn any battery power when just carrying my phone around as... you know... a phone.
Future Work
I have a usb adapter on the way to see if I can get my old usb folding keyboard to work on the device. If not I can use bluetooth if I have to. I need a solar charger so I can keep the battery topped up while I'm out.
Once I have a basic computing device I can really use, I can try it in the backcountry.
If it all works out I may look into software controlled USB HAM radios so I can chat with people using hardly any power from the backwoods :P.
The Nook eink reader is android based and has already been rooted. I might be able to do the same thing to it and have a passive display eink reader that hardly burns any power at all, especially when being used for reference material. http://www.flickr.com/photos/smalladventures/sets/72157631243912642/
Caloric density of food
2012-08-25
I'll be honest. I've always bought backpacking food by wandering around the grocery store and grabbing anything that had a decent number of calories and a fast enough cook time. We did mail drops for the JMT though so for the first time ever I did a bunch of Kcal/oz calculations. The results were surprising enough that I made a spreadsheet of them for your enjoyment:
the data

General observations
- Breakfast flavorings have about the same caloric density as the breakfast itself. Looks like a great place to be decadent.
- Nuts are surprisingly calorically dense. Combine this with physical density and I finally understand why I always have extra gorp. Also oh goodness the peanut butter.
- The dinners are less dense than the lunch foods. I'd been under the impression that the weight of the cook set was justified by weight savings on food in the long run. Turns out hot dinners might be more about comfort and how much of what foods we're willing to eat in a sitting. That or dinner is secretly a conveyer of ghee.
- Ramen deserves its popularity outside of bear canister country
Caveats
- A lot of this data is from an online calorie counting website 'cause walking around the grocery store with a laptop sounded awkward
- Some of our favorite dinners are missing because I haven't been able to find numbers for them yet.
- None of these weights include packaging. This is an especially big hit for the oils.