
DIY: Alpenstock
2017-08-02
Recently I've done a lot of research in to mountaineering gear. First I wanted to figure out what modern gear is out there and what is best for what, and second I wanted to understand historical gear as possibly useful information in building a non-synthetic gearset for some basic mountaineering.
Not long ago I posted
http://www.blog.smalladventures.net/2017/07/crampons-what-to-buy.html
. But, this is only half the story, there's also the modern ice-axe.
Now, if you start reading you'll quickly learn that historically people actually carried 2 different tools: an axe, and an alpenstock. The modern ice-axe is actually a conglomeration of those 2 tools in to one. What people used as an axe varied a lot from what I've seen in photos, but basically it was something like a rock-hammer (often a one-handed sledge-hammer with a spike welded to it), or a literal axe.
Alpenstocks though were pretty consistent, It's really just a good strong pole with a metal spike at the bottom.
Alone the alpenstock could be used for normal walking. On steeper hills you'd plunge the spike in to the icy-snow and use it for stability and self-belay like a modern ice-axe. When things get really ice you could use the metal tip on the alpenstock to slowly chip out steps in the ice... it's slow, but it works (particularly before crampons were popular). The axe was carried for more serious mountaineering as it made this last process a lot faster.
Everyone carried an alpenstock in the mountains in Europe, to the point that I've seen historical jokes about people being unwilling to walk around town without them. Fundamentally they are very very similar to the modern collapsable hiking pole (which you also see people with walking down bike-paths today), but tougher and capable of taking significant side-loads (as in a self-belay).
As a result, when Alpenstocks had the ice-axe head added to them combining the two tools in to one for convenience, at first they were still long enough to use as a normal hiking pole. It wasn't until later when people started mostly storing the ice-axe on their pack, and only taking it out for the mountaineering bits that ice-axes got short. Improvements in crampons and the popularity of ice-climbing also helped drive this change.
All in all the alpenstock is really an in-between. It's better than a modern hiking pole for sketchy mountainsides, but it won't let you self-arrest like a modern ice-axe, only self-belay, and it's far slower for chopping steps. I feel like this makes it ideal for things like thru-hiking where it can be a hard call whether to carry an ice-axe at all or not... So I wanted to make one and give it a try.
Here's my first attempt:

Ideally the wood would probably be a touch hard-to-split hard-wood like hickory, but I really wasn't sure how this would work and wanted to just try something and see how it worked in practice. I forget exactly but I believe this is spruce, which is at least better than normal pine.

Step one was to re-inforce the shaft so it wouldn't split. The whole idea of this tool is to stick in to the ice and pull *sideways*, meaning the torque applied by the spike on the stick will be significant. I didn't have any of my favorite linen twine to spare, so I used some simple cotton button thread instead (we'll see how it holds up). I wrapped the shaft carefully, using a standard whipping tie-off (make a loop of thread, wrap around that towards the loop end of the thread, but leaving it sticking out, when you finished stick the end through the loop, pull the other end of the loop still sticking out the other side and tighten).
Then I drilled a hole as deep as I was able using the bits I had on hand. I used a bit notably smaller, trying to guess what would hold the steel well, but not put too much splitting force on wood shaft.

Next I took a 12" spike (a giant nail) and eyeballed how much I wanted to stick out. I decided on ~5", then added that to the depth of my hole by measuring against the drill. I then cut off the sharp end with a hacksaw.
Next I carefully filed the cut side of the spike rounding it so that it would start to slide in to the spike in to the wood shaft. Then, setting the top of the handle on the ground and against a backstop (so it tilted a bit), I hammered the spike in. This took a bit of effort.
I took a file and took off the flat spot I'd created at the tip of the spike. I didn't sharpen it yet, as for now I'm going to use it for normal hiking and not driving it through my foot if I slip would be nice. I may sharpen it a bit more before trying it on more technical terrain.
Lastly, looking at the thread I realized it would get busted up almost immediately as soon as I hit a rock with the side of the pole. So, I figured I'd try and reinforce this a bit. I took some normal elmers glue (basically hide-glue) and rubbed it in to the threads, let it dry, then repeated this 5 or so times, building up a tough layer over the threads that I hope will protect them.
I'm really not sure how well this will work. I don't usually use hiking poles when I just go hiking, I'd rather work on strengthening my knees and sometimes Angie and I decide to run (as we did off of Mt. Shavana recently); so, this will have to wait until our next backpacking trip to get a proper test. I'll update this post of course with the results.
UPDATE:
I recently used this on a 20 mile hike to cross a fairly serious and steep snowfield with no crampons in the Grand Tetons.
It worked, but not ideally. I think I'm going to round the base of the wooden shaft a little bit to help it slide in to the snow more easily, as how well it works in softer snow is decided mostly by how deep it will sink in to the snow.
I used 2 techniques depending on the snow. Sometimes I stuck it in on the downhill side for balance directly in line with gravity, allowing 2 steps before stopping to move the alpenstock. At other times I stuck it in perpendicular to the slope on the uphill side. The second felt more secure, as I could swing it in with both arms and sink it deep in to the hillside, but I could only take one step at a time, as two put me too far off balance backwards, as the shaft was in my way. The second is the technique I would use if I was really nervous, and on a really steep incline, but not slipping is often most useful and the first sometimes felt better for that.
Of course, please do not take this as an endorsement of a safety device, you are responsible for your own safety out there, this is just me experimenting and sharing what I've found. If you make one, and dye using it, that's on you. Be careful out there.
UPDATE
I've used it a couple of other times, but I used this again on this trip http://www.blog.smalladventures.net/2018/05/early-spring-in-sierra.html . A 5 day trip involving some pretty intense snow crossings. The wrapping failed entirely and slowly fell off from wet snow, but the tip held up anyway and got me down safely.
There's no question it would be better to cover the entire tip with metal, but despite that this held up well enough and it's only made of douglass fir. I'm toying with making a new one using a denser wood like oak. I haven't yet decided whether I'll re-wrap the tip or not.
plasticless backpack, try 2
2017-07-14
This is an update to an older post
http://www.blog.smalladventures.net/2017/02/myog-plasticless-backpack.html
. In this post I wrote about taking an old kelty frame (with the top part of the bars hacksawed off), and replacing all the plastic components as a way to figure out how to make something without plastic work.
After using this on several backpacking trips I decided, while the shoulder straps had worked okay and held up okay, they weren't robust enough for a longer trip (like a thru-hike). So I decided to follow a friend of mine's suggestion and remake the shoulder straps in a slightly tougher way.
The idea is simple, sew the leather over, cut a notch at the end where it's rolled over, stick a stick through it, and tie a rope to the stick. It's easier to see than it is to explain, notice the stick just poking out on the left side. It's literally just a tree-branch.

Here's the lower part of the strap. Another problem I ran in to was that the thin hemp rope I was using was not tough enough. It was *strong* enough, but it couldn't stand up to the abraision, so I replaced it with some 1/4" cotton rope I got off of amazon; NOT the braided type. This stuff is much stronger. Note the constrictor hitch at the bottom, with an extra hitch to make sure it doesn't walk, and the taughtline hitch I use to make the strap adjustable.

After I did this I was re-tightening the upper back panel of the frame. And *RRRIIIIPPP*... crap...

I actually didn't get back to this for a bit... but recently I tried replacing this back panel with the neck section of a deer hide I brain tanned myself (sorry, I forgot to take photos). Since it's buckskin I skipped making any grommets (saving me a TON of time). I wetted it and tightened the strings in the same manner as the canvas backpannel. I then used this on the last backpacking trip, and while it held up, it kept going slack on me... I'm hoping it will stop stretching eventually, and will hold up better than the canvas (if so I'll replace the lower panel as well, which looks like it might fail in the not too distance future), we'll see.
I also decided on this last trip that I need to add a water-bottle holder. I can hang the waterbottle over my shoulder for short trips, but it gets pretty annoying, particularly on more technical terrain (like snowy passes), so that's been added to the to-do list as well.
And lastly, for your amusment, here's a WWI (according to the label) era pack frame I saw in a store recently. I thought it was neat, but couldn't figure out how you would use it as it's currently set up, clearly something is missing or set up wrong.

Crampons: what to buy
2017-07-14
Alright... Let me say at the start of this article, I'm NOT an expert in this field. That being said, when I started researching what crampons to get I got really frustrated. Most of the articles out there are clearly written by people who don't know what they are talking about, AND don't actually know what's available. So I wanted to write something that least talks about ALL of the options, and what they are good for.
Nothing
A good shoe does a lot... don't neglect this option by any means. Mountaineers did a lot of mountaineering before crampons existed. Look up the "french method" and learn some of the techniques like chopping footsteps using an ice-axe. You should know these methods regardless, as they are still useful with crampons on, and might save your ass if a crampon fails or is lost somehow. You can also kick in steps in a lot of conditions. Now, just because someone experience can do something without crampons doesn't mean you can or should. Play it safe at first. A lot of people do die doing this kind of thing (including a friend of mine a few years ago actually). Judging what is dangerous is not intuitive initially. As you learn more you'll find that when you try and glissade (slide on your butt down) some hills that look terrifying when going up... you won't be able to. Clearly you could've done that hill without crampons.
So, play it safe at first, but keep this option in mind.
Yak-Traks etc.

Microspikes (and similar products)
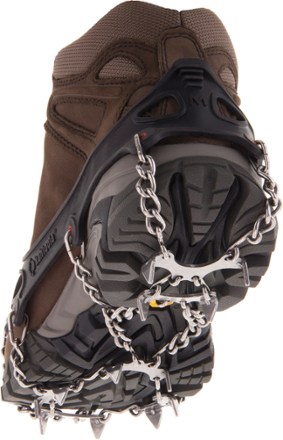
These are right on the line between something just for around town or running on ice, and something that you might use for safety while mountaineering. They are extremely popular with thru-hikers who want to be able to go up/down snowy passes on the PCT/CDT in the early morning when the passes are still frozen over. They are super easy to slip on and off, which can be really nice in edge seasons. Notice that these can be worn on ANY shoe.
The thing to remember about microspikes is that the spikes are in fact quite small as the name implies. This means while they help on ice, they only dig in so far, they won't help at all on slightly soft snow or crumbly ice.
Instep crampons
From what I gather, don't buy these. After doing a lot of reading it seems that these have basically been replaced by Microspikes and their brethren.
This is like a partial crampon that goes on the instep of the shoe, the problem is that they are massively uncomfortable (pushing on the arch), make you unstable since you can't use your toes and heals for balance, and usually only have 4 or so smallish points. Overall microspikes give you more points, and better balance, and particularly give you points on the toe and the heal helping immensely while going up-hill and downhill respectively.
Snowshoes
Modern snowshoes usually have a crampon on the toe with pretty beefy spikes. Many, such as the MSR Lightning series also have some teeth on the bars. These can accomplish much that a crampon does, and often if you have snowshoes you can skip the crampons in moderate conditions. The trick is that while they usually work very well for keeping you from sliding while going up, they typically do a poor job going sideways and often worse than a simple shoe (with which you would post-hole and thus could make a flat platform) when going down. I've "skied" down more than one hill in snowshoes. These can usually be worn with any shoe, but can put uncomfortable pressure on the top of more minimal shoes.
Kahtoola KTS (and similar products)
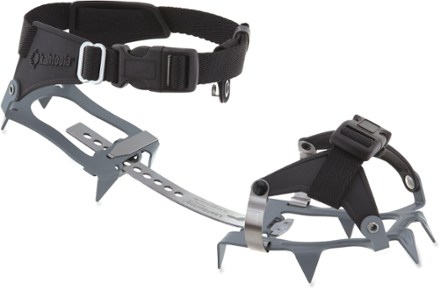
Kahtoola KTS and a couple of other crampons are really in a class of their own. These are similar to hiking crampons of type 1 (that is, they fit any shoe), with one special caveat. These work on *flexible* soled shoes. They also have a strap system designed for the minimal uppers of running shoes making them a lot more comfortable with minimal shoes.
These are what Angie just purchased actually. For hikers (not mountaineers) who want a "do-everything" crampon that's light-weight, beefy enough for light mountaineering duty, and fit on lightweight shoes (like what thru-hikers wear), these are basically the only option. The tips are large enough to work in a softer conditions (but not super-soft).
This class of crampons can be further divided in to two subtypes, steel and aluminum. Aluminum are lighter, but dull quickly when used on rocks, and tend to have shorter points. This comes up when crossing short bits of rocks between snowy sections, or when rocks get iced over due to freezing rain (not something I personally have experienced yet).
Note that these crampons do not usually have front points. This means you are stuck walking sideways up steep slopes and when the going gets steeper than that, you'll have to turn around. This is particularly an issue on harder ice. As you start to move towards ice-climbing "toe pointing" techniques you are in over your head... time for something beefier (and probably to get a friend who knows how to ice-climb teach you). On the other hand, you can't stab the back of your other leg when you slip, having those front points is a mixed bag. Angie points out that the points are also a bit easier to deal with in or on your pack (I nearly stabbed her a couple times with my hiking crampons tied to my pack on our last trip).
Hiking crampons (types 1-3)
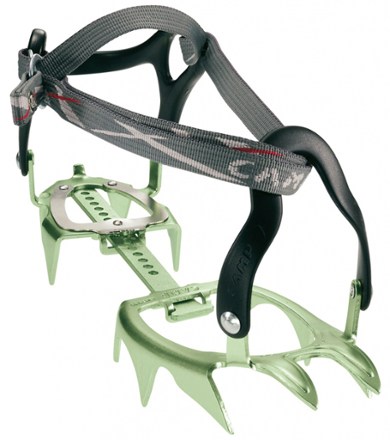
Similarly to the Kahtoola KTS class of crampons hiking crampons can be further divided in to 2 categories... aluminum and steel.
The biggest difference between these and Kahtoola KTS is that the bar between the toe and heal is not flexible, as a result if you wear them with flexible soled shoes that bar can apparently snap in half... This is really not what you want while hanging half-way up an ice-slope that you *needed* your crampons for in the first place.
Hiking Crampons are further divided in to 3 more categories though. Types 1 through 3.
Type 1) crampons fit "any shoe"... by this they mean any stiff soled (not very flexible) shoe with a heavy-weight upper and a sufficiently pointed toe. This means not running shoes, but stiffer hiking boots (not light hikers) will generally work well.
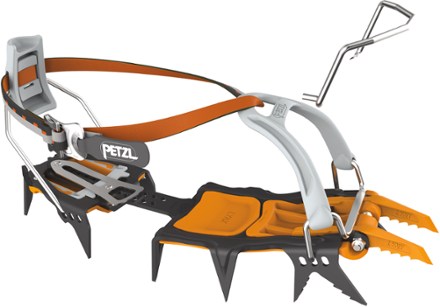
Type 2) fit "type 2" boots, these are boots with a special heal attachment point, but no such special attachment point on the toe. These are more secure and less likely to pop off while doing something more intense.
Type 3) fit "type 3" boots, these are boots with special attachments on both the toe and heal, these are the most secure, and also the fastest to pop on and off (short of microspikes).
For more on difference between types 1-3 see
https://www.rei.com/learn/expert-advice/crampons-snow-ice-climbing.html
Note that some of these crampons have front points, and some do not. Particularly down in the type 1 aluminum crampons... basically the ones for the least difficult conditions crampons tend not to have the front points, because they aren't meant for conditions where those are needed anyway.
Front points, as mentioned in above under the KTS crampons, are used for "front pointing". This is a technique used for extremely steep slopes when side-stepping no longer works well, particularly in harder icier conditions. At this point you are basically doing low-angle ice-climbing... so to be useful your crampon had better hold really well to your boot. Also, keep in mind that it's easy to stab your other leg with these front points, so be careful!
Climbing Crampons
If you are reading this article, you don't want these. These are for ice-climbing only, which is something I've never done, and completely outside the scope of this article.
Suffice to say that these usually fit specialized type 3 boots (though the ones above fit type 2 boots apparently), and they come in 2 major flavors, 1 and 2 front-points which I gather are used for different types of ice. Once again, this isn't my wheelhouse, if you are looking for these you hopefully already know what you are doing.
Conclusion
There's a reason for virtually every type of crampon to exist (possibly modulo instep crampons, which seem to just be cheap, and predate microspikes). It's a continuum and in most conditions a range of different options will be a reasonable choice.
No crampon is a substitute for knowing what you are doing. Knowledge will win out over gear virtually every time. But, that said, you have to start somewhere, and you need to buy something to get started. My first pair of crampons were a type 1 cro-moly (cross between steel and aluminum) hiking crampon with front points. Angie's first crampons were Kahtoola KTS... largely due to what I'd learned since I bought my first pair.
As a note, don't forget that you're feet aren't the only part that matters. If you are looking at anything past microspikes, you are probably also looking at hiking ice-axes (rather than technical ice-axes, which would go with climbing crampons). Often you can get away with only an ice-axe *or* crampons, for example.
People who are in these conditions a lot will usually end up owning more than one thing. I also own snowshoes, because they are useful for different conditions, and many people own climbing crampons, type 1 hiking crampons, AND microspikes for different conditions.
Repairing a Tire Valve Stem
2017-07-14
We were on our way through Leadville and decided to take a look around town. As we walked away from the car I looked back and realized our right front tire was mostly flat! I'd noticed funny handling on the road, but thought maybe it was my imagination or the rain, or something else. Stupidly, I hadn't stopped.
Anyway, on closer inspection the tip of the valve stem (where the cap screws on) had been crushed and shattered. We decided maybe we should swing by a shop, it was late but *maybe* they'd be open. We pulled in to a shop AS it was closing. The two guys there were really sweet though, and fiddling around managed to put some more air in the tire so we could be on our way.

Next day, first thing after breakfast I took a look. Tire was flatter than I wanted to drive on, and when I poked the stem I realized it wasn't just the tip, the base was cracked and split clean open. Aaaalright then. I quickly swapped to the spare, and we drove in to town.


I've been thinking that I should really try more repairs than I've been attempting, and this was a good opportunity, so we went down to O'Rielly's. After a search on Google I found I needed a "Valve stem puller" tool. I found one in the shop which was also a core removal tool, and tire deflator, great. I asked the clerk how to tell which valve stem to get, she said she didn't know, so I figured I'd just pull it and compare visually.
The plan was to pop the tire inwards off the rim, unseating it on one side, pull the valve, and pop the new one in from the backside, then reseat the tire.
I pulled the stem straight out actually, turns out you can just pull sideways and work at it and it'll come out eventually. There wasn't a lot of thread left, but enough to make that work.
Next we tried to break the bead. First I tried hitting it with a hammer (backside of an axe actually), as suggested on various websites, but that didn't work. I tried combining that with a tire iron (the one on the back-side of the lug-wrench that came with the truck). No luck. A guy stopped and suggested we go across the road to a shop and get them to break the bead, but I wanted to do it myself.
Next I tried a bottle-jack against the bumper, but the jack ran out of length before it popped the bead. Then, Angie suggested (based on an internet search), driving over the tire... It sounded like a good idea.
I threw the truck in 4L and Angie aligned the tire. First attempt I ended up on the rim, but the second try popped the bead right off! Great! Now we could slip the new valve stem in to the hole, screw on the puller, and with a quick pull pop it in to place.
Now comes what is generally considered the hardest part, and the reason you "can't do this at home"... reseating the tire. You have to get the bead close enough to the rim that it'll hold air until the air pressure builds up and pops the bead on. There are a couple of tricks for this, but the best known (explosions), isn't terribly safe. I'd read of a trick a while back where you surround the tire with a ratchet-strap and crank it down. This helps push that bead against the rim... So we gave that a try.

Aaaand, magic, it seated right on! Of course, now there's pressure in the tire, and you have to break the ratchet-strap free...

We ran the pressure up to what our crappy compressor could handle (enough to drive for sure), but the compressor started making kind of awful noises so we finished at a nearby gas station.... and off we went!
Seriously, if you can change a tire, this is only a bit harder. Tools needed (besides the normal tire-change tools):
- Valve stem puller ($5 from O'rielly's)
- Spare valve stem ($3 from O'rielly's)
- 12v air compressor (~$25 from Amazon, but you should have one anyway)
- Ratchet strap (~$10 from any hardware store, but you probably have one, a rope with creative knot work should work as well)
- Car that can drive a little (probably using the spare)
Trip Report: 4 Pass Loop
2017-07-14
Angie and I have been having a blast in Colorado. We were hanging out near Aspen, just checking out the area, and Angie found this great backpacking route that was supposed to be really pretty called the "4 Pass Loop". The route is variously reported to be 23,25,or 28 miles long, and goes over 4 passes, each at about 12,500 feet.

As it happened we'd peaked 2 14'ers (mountains over 14,000 feet) in the prior week. Both Longs and Mt Elbert, so we weren't worried about the elevation at all. When we talked to the local Forest Rangers though they said there was snow up there, and we'd want *something* for that. Angie didn't have either an Ice-Axe or crampons, so we ran down to the local outfitter and got her some Kahtoola KTS crampons, which are about the burliest crampon you can wear on a running shoe. We also rented a bear canister (BV450 if you're curious) for 3 days.

Well armed, we packed for the trip. We expected it to be sunny, so went somewhat minimal. Angie had just ordered some new waterproof running shoes, as although she loves her waterproof boots they're a bit heavy, and she wanted something good for snowy passes, but we hadn't picked them up yet. So she went with mesh shoes. My normal minimal leather runamocks wore out and we hadn't picked up my new ones yet either, so I wore my vivo-barefoot waterproof hiking boots... which meant I could use my crampons (which are intended for heavy boots).

I've decided I need to make a new shelter and ground-cloth after http://www.blog.smalladventures.net/2017/06/trip-report-zerkel-wilderness.html . I want an untreated shelter, and a treated ground-cloth. So, I decided I'd cheat, and Angie carried her 8x10 silnylon tarp and polycro groundcloth for the two of us. This meant my pack was lighter than it's been in a while. Otherwise I just had my alpaca sleepingbag, wool poncho, wool sweater, treated canvas shirt, hat, water bottle, cookpot/bottle, stove and fuel, spare pair of socks, puttees, ice-axe, crampons, and the normal various and sundry (repair kit, knife, etc.).
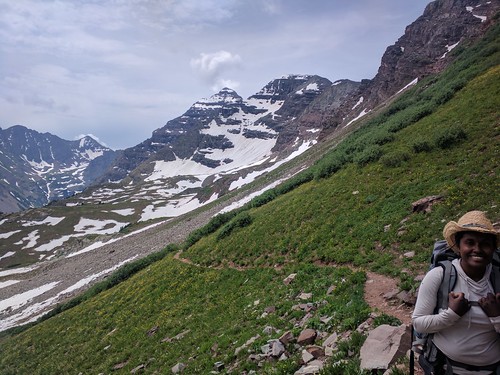
On our way up the first pass, called Buckskin Pass.

At the top we saw MOUNTAIN GOATS! There were 2 adults, a juvenile, and a baby, you can see 3 of the 4 here. Amazingly they came within probably 50 feet of us, they just didn't seem to care. This despite that there were two other people on top of the pass with a (very well behavaved) dog. I'd never seen mountain goats in the wild before. The adult and juvenile actually played at butting heads at one point, super cute.

This ground-squirrel really liked my hat. It came up within a few feet of us and kept *licking* it! At first we thought it was going to chew on it, but no, it just licked it. Clearly it was after the salt from my sweat, but we were just dying laughing watching this squirrel lick and lick at my hat.

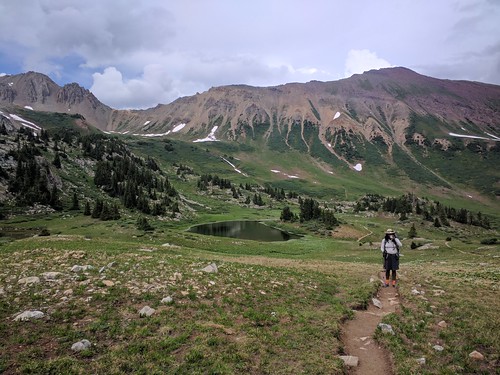
View from Buckskin Pass.

Panoramic shot of Snowmass lake, a lot of folks camp here before continuing, but we were worried about our 3 day timeline. We weren't sure if we'd get fair weather afternoons to be able to cross 2 passes in the same day, so watching the sky carefully we pushed on.
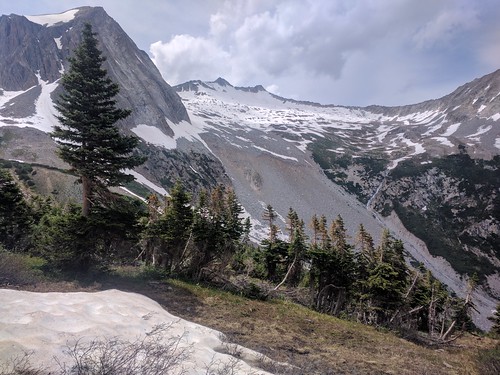
This is a shot upwards at Trail Rider pass, this was the trickiest pass. Sadly, I didn't get any photos of the tricky bits (it's hard to remember to take photos when you're so focused). Lower down on the pass, just a little above Snowmass lake there was a tricky traverse of a steep snowfield. I used my ice-axe for balance, and self-belay or rescue if needed, but skipped the crampons. Angie not having an ice-axe put her crampons on and used a single hiking pole (set short).
Farther up the pass I did use my crampons though. It wasn't steep, but the crampons made walking in the soft snow a lot easier. Near the top Angie chose to go on the rocks, as her feet were getting cold in her mesh shoes. I decided to try cramponing up the steep snow, since I had all the gear for it, and it was a safe spot, it seemed a good opportunity to practice. It was too soft to toe up, so side-stepped french-style and that worked pretty well.

Shot from the top of the pass, Angie is stretching out her knee on the right of the photo. She has some mild trouble with ITBS, similar to what I had on my AT section hike back on '09... no surprise as I think we'd done ~5000 feet of climbing in one day by this point, and ~2500 of descent.
Dropping over the very very steep switchpacks on the back side it was still gorgeous as ever. We were getting a bit tired though, and it started sprinkling a little. The thunder was threatening so we started hunting for a campsite.

I pointed out a campsite in a small copse of trees. It was near enough to the river to get water, but well away from flood risk. Open enough to discourage mosquitos but still giving a little extra shelter from a storm. Angie noticed a deer at about the same time, which was standing in the middle of it. We decided this must be the spot.
Angie went to get water and I set the tarp, then as we cooked dinner we realized the deer was still hanging around. The whole time we were eating it hung out maybe 30' away. It looked a little gaunt. At first I thought maybe it had chronic wasting, but then I realized it looked really healthy otherwise, and that it was still early spring up at that altitude... It was probably just still fattening up after a long winter. The deer hung out for quite some time, but finally left when a group came down the trail yelling "Heeeeeeyyyyy BEEEaaaaarrr!" over and over again (I guess they were nervous about bears?).
It rained that night, and we got up a bit late, hoping things would clear up. They did for the most part, but the sky stayed grey, and nothing dried out.

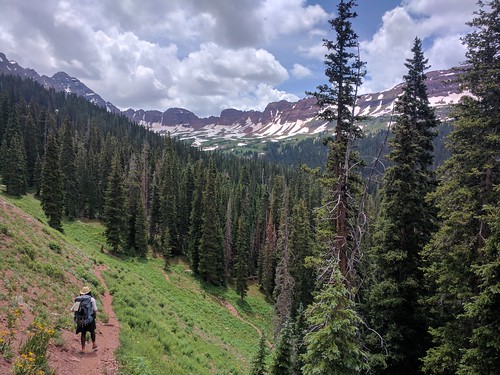
Next day we set out over gorgeous fields of wild-flowers

The trail followed a river up the valley, in the middle there's a huge waterfall, the trail goes up the hill via the trees to the right of it.

And upwards in to the pass. The trail actually bounces through 2 passes in quick succession (Frigid Air and West Maroon), with just a couple of miles in between it only drops maybe 800 feet between the two making these very easy to do in the same day. The shot above is one of the few spots of blue-sky all day. It sprinkled on us on and off, but never badly... In fact, I stayed shirtless for virtually the entire trip.
After crossing the last pass we realized we were only 6 miles from the trailhead! Since it was supposed to keep raining we figured to heck with it, why not finish in 2 days? So off we went. The exit was VERY muddy, and I was really glad to have waterproof boots and sorry for Angie and her mesh shoes, but she was fine. We even had one river crossing everyone was talking about up and down the trial, but with our experience it wasn't bad at all. I did it barefoot actually and we just went together. Angie loaned me her pole to lean on and I took the upstream spot so Angie could walk in my eddy and help hold me up :). We went right across.
This is a shot of Crater lake which we passed on our way out. This is where the loop meets and you hit the ~2 mile long entrance/exit trail out to Maroon lake.
Angie's mesh shoes didn't work out quite as well as we expected, due to being cloudy and rainy, but it wasn't a problem. Her crampons worked great. I only used my sweater in the morning and evening in camp, and wore my treated overshirt for maybe a mile total. Overall we were very comfy, despite carrying way less gear than anyone else we saw (excepting the runners who were doing the loop in one day).
It's a busy trail for sure, that was the only downside, but at least when we were there (early july), not so busy as to be annoying. We still had a very private campsite. The views are absolutely worth it too, on par with the JMT.