
Review: Merrell Tough Glove
2012-03-12
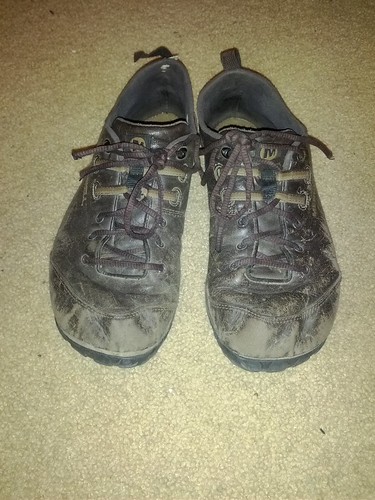
I've had these shoes for 7 months now.
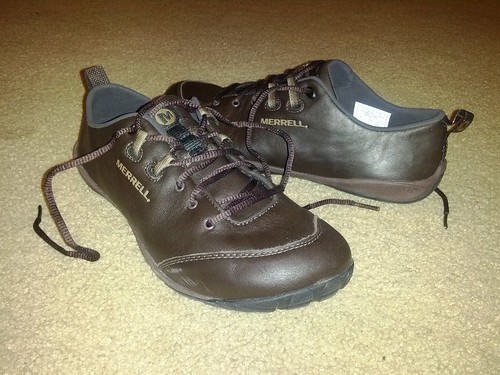
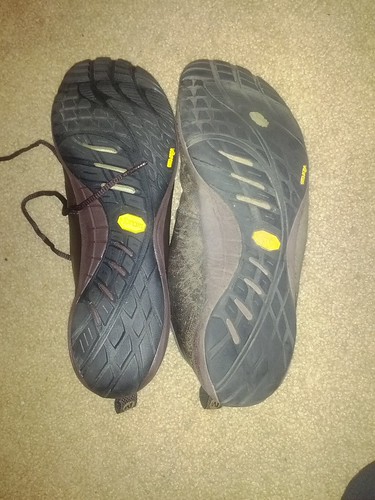
Here's a new pair:
Since purchasing these
they've been my primary shoe - though for some time I was wearing
huaraches
around the office, until I lost them.
In any case, this is some pretty serious wear. I recently wore through the outer sole of the right shoe into the midsole, and so felt it was time for a review. For comparison, in the past I've done this in 2 months to an entirely reasonable pair of shoes, in more recent years it's taken me 3-4 months for my primary shoe. Translation: these shoes don't have wear problems.
I currently use these for all of my running, walking, and backpacking, excepting one special case for which they simply are not suitable, which I'll explain shortly. As someone who's wanted a simple, flat thin and flexible soled, leather shoe for years, I have to say this is the single best shoe I've tried by an order of magnitude. This shoe has kept me buying shoes instead of making my own (for good or for ill :P).
Before we dive into the details, a few quick notes. The Merrell Glove was designed as a competitor to the Vibram 5-fingers. It DOES have a slightly padded midsole. It is shoe shaped. It has an unusually large and widely shaped toe-box so your toes can spread kindof like 5-fingers or huaraches, but it doesn't quite achieve the same affect. To a barefoot walker it providers arch-support because it laces tightly around the foot, but no normal-shoe wearer would say it has arch-support.
In other words, the Merrell Glove is basically half-way between huaraches or 5-fingers, and a "normal" shoe. If you loved the old puma trail racers, but thought they were a bit too much shoe, or a bit too weird shaped a sole, these are the shoes for you.
Awesome things:
-
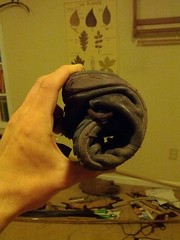
Super flexible: In the picture I'm applying very little pressure.
-
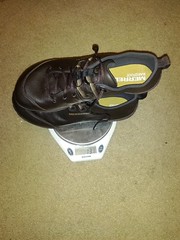
Super light: 13 3/4 ounces for the pair. Yes, you minimal shoe weenies might call that heavy, but remember, these are LEATHER. Jess' gillies she made herself weigh 1 lb 3/8 ounce, that's with no rubber sole.
- Leather: This is hard to express to people who haven't had trouble, but grass seed is an evil menace to us hikers. If you hike rarely traveled trails, or bushwhack across fields in the lowlands in the right season, then you'll hit this stuff. If you are wearing mesh shoes you'll find hundreds of seeds bristling out of your shoe, slowly worming their way in to stab your foot. If you don't do something about them they will stab your foot, and then work their way into THAT too! Because of several trips where I had to take off my shoes every 2 miles and spend 10 minutes pulling seeds to keep them out of my feet I've become a huge proponent of non-grass-permeable shoes. Leather breathes, and can also be made very water-resistant (I mean, usefully water-resistant, not just afraid of water) with a wax treatment. So it's my and Jess' preferred material.
-
Tough: I bushwhack, I run, I do parkour sometimes, I rock hop, I slide down hillsides regularly, I'm VERY hard on my shoes. I get tired of replacing them, and I need to trust them for a trip. I once wore a brand new pair of street racing shoes on a trip, and destroyed them in just 9 days. I threw them out when I got home. Optimally a shoe should wear out everywhere at once. If you look at the picture below, you can see that the top of the heal cup on my shoe has been stitched back together. That occurred within a week or two of wearing through the sole. The sole is also coming unglued, but the leather itself hasn't torn or cracked anywhere, thanks ironically to it's thinness and flexibility.

- Good traction: As just mentioned, I bushwhack, rock-hop, and slide down hills. I rock-hop in pouring rain if that's what's going on. I cross streams dynamically usually, nearly running across. Having a shoe slip when you don't expect it is a great way to split your noggin open when on rocks if you hike like I do. So far these are second only to 5-fingers KSO trek soles. Those things stick to rocks like nothing else. I did a good chunk of the AT in Merrell Moab's, which are a "traditional" trail running shoe. Those were unusually good for that class of shoe, but it just doesn't compare to being able to wrap your whole foot around a rock and grab it with your toes.
- Nearly neutral: They are basically flat. No support, no nothing. They don't *quite* feel like walking on a flat surface, but it's not far off and is pretty much the closest I've yet found in a commercial shoe. I usually throw away shoes due to the mid-sole collapsing. As it collapses unevenly it causes my ankle to roll inwards, which stresses my knees and aggravates my ITBS... it's also just biomechanically wrong. Having little padding, being close to the ground, and being basically level, means shoes are more comfortable, better for my ankles, better for my knees, and wear longer.
- Almost minimal: See above, being close to the ground and having little extra support I find to be by far the most comfortable for shoes. My feet are GREAT springs, they do the job super well. Shoes mostly just get in the way. To me, shoes are so I can walk and jump on broken chert or obsidean without cutting my feet, and run crushed rock without being in pain. The rest my feet are better at than shoes.
- "Barefoot" shoe. This is an odd term, and I'm stealing the terminology as used by leming footwear. What I mean by this is that it has a large toe-box and allows your toes to spread out a lot more like walking barefoot. It's not "barefoot" of course, but it's the best standing term to describe this.
Bad things:
-
Thin, non-insulating sole. So they can't be my only hiking shoes:
Sadly, thin soles have a downside. While they are wonderful for not rolling ankles and all those things, they aren't nearly as insulating as a thicker sole (surprise surprise). I do not recommend hiking in cold weather in the gloves, because they simply don't insulate you from the ground enough. So, for now I'm still using a more normal pair of trail runners or my pair of winter hiking boots for truly cold weather. I'm hoping I can find a magical insulating insole, I believe some were invented recently, but I've yet to find/test this. - Pick up grass seed: Despite being leather, and quite tough, they lack a gusset down he tongue. In one of the first major commercial "barefoot" shoes this is not exactly surprising. But... it allows an avenue of entry for that pesky grass seed. It slides in over the tongue and under the shoe, and works it's way down the side. I have a number of seeds perminantly embedded in the inside sides of the shoe because of this.
- Sole is still slightly shaped: Sadly, although it's "nearly" neutral, it's not entirely neutral. The sole also has some padding, though not much, allowing for a small amount of collapse. Because of both of these they are ever-so-slightly off level , and thus I cannot say they are completely neutral. My knees are still slightly happier with no shoes than with these.
Weird things:
-
Primary traction wears out fast: The part of the shoe that you most need traction on, right under the ball of the foot, has very small bumps. This means they wear out rather quickly and then the shoe becomes a bit slick on the ball. You won't notice on rocks or that sort of thing, but on a steep descent I find myself sliding a fair amount on a well-worn shoe.
- Shoe wears through faster than they should: Although they wear well, the thinnest part of the entire shoe is the spot that you'll wear through first. Right under the ball of your foot. This is directly related to the above point, but I consider a different failing of the shoe because it could be caused by a different flaw.
FYI, if you don't care about the leather property, check out http://www.lemingfootwear.com/ , as his shoes are somewhat cheaper, and look to be more minimal, more barefoot, and more neutral. I haven't tried them yet, as they aren't leather, but I've put in a uh... feature request?.. for them to make leather ones in the future. Cross your fingers, and if you agree maybe send them a note yourself!
Ski bumming in the Sierra
2012-03-04
On friday Jess and I decided we should go skiing this weekend.
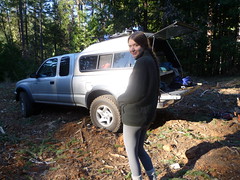
So, we drove up on friday, found an untraveled road up near where we were headed and slept in the truck that night. Next day we grabbed breakfast and rented ski's from the village at bear valley. They were super friendly. Then, we headed up to bear valley ski area. In general everyone at and around Bear Valley were friendly and happy and would joke back and forth with us. It was a great atmosphere.
I'd never ski'd before, I'd been on a real mountain on a snowboard once, and cross-country ski'd once. Jess was a great teacher (I.E. she explained the basics, ski'd behind me, etc. :P). After 4 green runs I decided it was time for blues, we did several blue runs, then ended up somewhere we couldn't see another way down, so came down a black.
I actually never fell until the black. On the black, despite it being short, I fell a lot, but I made it down! :D.
It was super warm, so we were wearing ran pants, short-sleeved shirts (Jess was in a tanktop), and sunglasses. I only wore gloves part of the time. The lifts weren't even cold.
We stopped for lunch and heated up some clam chowder at the (surprisingly nearby) car, then went back for a bit more. As it turned out we could've even brought in a picnic lunch. After a couple of runs though I realized my knees were out of juice - it turns out skiing when you don't know how to ski uses a LOT of knee muscle. By then I had decent control, but my muscles were starting to max out, and I was losing control of my skis. So, we called it a day before either of us got damaged.
We still had some day left, so we drove back to the village and returned the skis. Then, after a few U-turns, we stopped by the sherrif's office to get fire permits, then to the cross-country place to get a sno-pass. Then, it was off to the end of 4 where the road is closed. We parked here and after some repacking walked off down a snowmobile trail for the night with our packs and snowshoes.
We ended up camping in what is actually an established campground! It was closed though, and it's on national forest land, so we figured no problem. Our spot was on the edge of a beautiful lake with a view off to the mountains. We spent some time stomping down a spot to sleep, and then hunted up a bit of firewood.
One tree obliged me greatly when I found a very dead limb and tugged at it slightly, the tree let go. I thanked the tree and carried it back to camp. We bemoaned the irony greatly and kept considering, but decided we really shouldn't cut enough pine boughs to support a fire on top of the snow. So, we gave in and cooked dinner (ramen) on my woodstove. That worked fine. A bit of rum and chatting until after dark, then sleep.
It got *much* colder than we expected that night, we both woke up quite chilly, and didn't sleep terribly well. Our water-bottles froze enough that we couldn't get water out of some. Oh well, so it goes. Because of the warmth the previous day there was tons of hoar frost everywhere! Our sleepingbags were a bit damp. If I was on my side the shoulder that was up would get cold, despite having shifted all of the down to the top side of the bag. Overall we were certainly fine though, and it was so pretty we both agreed it was absolutely worth it. So much better than a hotel.
Next day we wandered our way home stopping at a couple of parks, including mount diablo. After some searching we found a way in on the backside. Walking around we marveled at the biome there. Beautiful pine nuts and oak trees. Tons of nice open space with grass and some water. We saw a lot of dug up ground where pigs had clearly been rooting about. The greenery was fresh and tasty looking. We sampled the stalk of what we believe was a wild artichoke (it was definitly a huge flowered teasel). It had an interesting flavor, pretty good though a bit strong.
So... total recurring costs to go skiing: Ski passes, gas to get there, food. In addition we had to purchase a snow park pass for this winter. Overall, pretty awesome, and WAY more fun than any hotel. This was a great use of boondocking.
quick and dirty knife sheath
2012-02-20
While at Wintercount this year I bought myself I new knife from Mike.
It's beautiful, and I want to use it for bushcraft stuff, to do that though it needs a sheath, something it didn't come with.
Well, this is a quickly solved problem. I've made one sheath before, but wasn't super happy with the result.
I'm calling this a "quick and dirty" knife sheath because the "right" way to do it would be to use full-grain leather and harden it, getting it wet repeatedly. Instead I wanted something I could make in a couple of hours from stuff I had on hand. So here's the result:
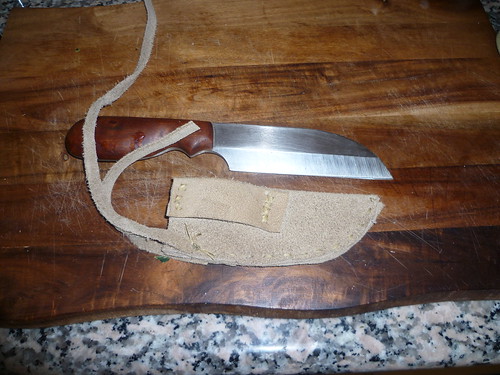
This was made from a chunk of leather I got a while back from a frabric shop on super sale. As you can see it's not super-nice stuff, but it was cheap, and it's pretty tough. It's a simple welted knife sheath with a belt loop and a leather thong to tie the knife in place.
The welt is an extra layer of leather that goes between the first two layers to help protect the stitching, it runs just around the stitched edge, and is stitched directly through, so the stitching is running through 3 layers of leather. Note that my knife has the blade on the flat side, this simplified the process slightly, as I didn't have to be picky about ensuring the welt would stop the blade from cutting the stitching.
Process:
I started by taking a piece of leather and folding it over my knife, then cutting about 3/8" from the blade. This gave me the basic chunk of leather for the sheath.
Next, to make the welt I took one side of the remnants and cut a second curve along my original cut, about 3/8" wide. This made a nearly identical curved piece, which I cut to size to fit properly on the edge of the folded piece of leather
I then cut out a piece of leather for the belt loop. If I stitched it the sheath together first, adding the belt loop would be extremely difficult. doing it first, on the other hand, makes it pretty simple.
For all of the stitching I used a metal sewing awl to punch the holes and stitched it with a large needle and waxed linen twine. I missed the hole one time actually, tried to use a sewing palm to force it, and snapped the needle (which, unfortunately, was borrowed from Jess... oops!)
Next I did a straight running stitch down the side of the sheath, going through the welt in the middle. This step is where you really need a very strong awl and strong hands, since you're punching through 3 layers of leather at once.
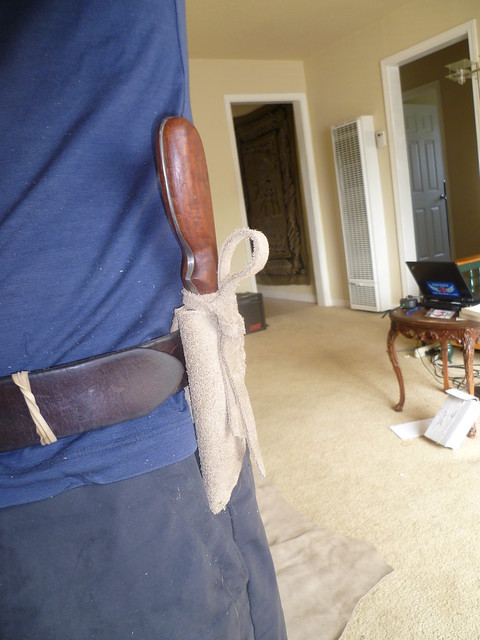
Once that was done I stitched on thin strips of leather to tie the knife in place. I'd considered a single strap going over with a snap instead (which would've been added before sewing up the sheath), but I decided I liked the idea of something I could make myself, rather than using a commercial snap. For these strings I simply punched two holes in each, and, using the holes already used to stitch up the side of the sheath I attached both strips of leather on at once with a doubled loop of twine and a surgeons knot. I made them a bit longer than needed and cut them after figuring out how I'd want to tie it.
We'll see how it holds up, but I'm pretty happy with the result. Now I get to try this gorgeous knife out in the field!
more photos
http://www.flickr.com/photos/smalladventures/sets/72157629405206083/
Trip to Henry Coe (A.K.A testing tarps in a hurricane)
2012-01-21
Our backpacking trip turned into one night car-camping, sleeping in what was probably the biggest storm of the year here, while testing brand new tarps, in annoying soil that wouldn't hold stakes.
There was wind, there was rain, there was soil we were trying to stake into washing down the hill. Apparently it was 1.21" rain in the last 24 hours (not THAT much). It was barely raining when we arrived, and stopped before we left, so most of that 1.21" was probably in 12 hours ~8pm to 8am. The bigger issue was wind. It's hard to find past weather, but I'd say that it was gusting well over 40mph. It turned out one of Jess and my tarp poles was aluminum. Well, it's now permanently curved. The pole that bent was from my tarp-tent. I've used it through several major storms before, and I've read of the same poles being used in storms at the foot of Everest and bending nearly 90 degrees without problems. This time the tarp poles were bending badly enough that we switched to hiking poles to keep the shelter up enough that we could be under it.
Well, this resulted in some histerical laughter and was definitely fun - just in a very cold and wet sort of way. Jess and I made it through the night resetting up the tarp regularly, coming out fine but damp. Chris and Zoe more intelligently availed themselves of the back of our pickup, abandoning their brand-new tarp rig for the evening. In the morning, after packing up the wet gear we decided what we really wanted was nice hot food and cocoa.
The trip was not exactly a success, but it was not exactly a failure either. We learned that bendable poles don't work in serious storms. We learned my pole was aluminum. We learned that groundhogs are still the best stakes (Chris' Ti stakes pulled out even more easily). We learned that even the best stakes won't hold in soil when the soil turns to mush - although a full toolbox put on top of the stake sure does help :P.
This was Jess and my first trip with Jess' new Cuben tarp. It doesn't stretch at all, which was interesting. I think it means it shocks the stakes harder, but it also means it doesn't sag through the night. Jess found it meant you had to pitch slightly differently because it doesn't have spring to it and your not aiming to overtension the same way. Her tarp is 10' by 8.5', so very roomy, that wasn't an issue. We had tons of space to be away from the edges. It also stayed almost entirely dry on the underside, I'm not positive that the dryness isn't caused by this tarps lack of tiny holes yet, but I think it's actually that it doesn't have good nucleation points. basically, water doesn't condense on it easilly.
Our biggest mistake was probably flying the tarp. Jess has tie-outs on 6 points (each corner and one on each side) with knots set up so we could tension them. Using these leaves the tarp flying about 6" off the ground. This is *great* in downfalling rain where it gives you a bit more headroom and helps with airflow. It's terrible in side-blown rain. Oops. Additionally we set the peak a bit too high, which probably caused it to catch too much wind. We should've been aiming for the lowest pitch we could stand. One last thought is that possibly a lower angle on the end stakes would've helped reduce tension.
In any case, much was learned. We made it through the night. Now all our gear (including our damp sleepingbags) is drying. Jess is curled on the couch taking a nap.
4-wheeling at Carnegie SVRA
2012-01-09
Jess and I like to get pretty far into the back-country, yet we often don't have time to walk there (I mean, it's a long walk from the bay area to the Sierras). As a result we sometimes find ourselves in a vehicle on dicey trails. With the ability to carry gear, sleep in it, and be migratory in the modern era, a vehicle is surprisingly tempting as part of an outdoors lifestyle. Anyway, that's my excuse, it's also possible that 4-wheeling is just fun.
A while ago I created a mailing list at work for 4-wheeling. The other day someone posted that they'd just gotten a new jeep and wanted to play with it. My friends who wheel aren't in the area, so I haven't been able to try anything where I might get stuck. I'd been to Hollister off-road park before (with a friend who's rig was too small to pull me out), and have tidbits of experience here and there, but nothing very intense. Carnegie SVRA is nearby, and neither of us had been there, so it sounded like a good option.
Some quick terminology
-
A "rig" is a vehicle, whatever it is you've got.
-
4-wheeling refers to driving a "rig" in an area that would be very difficult or impossible to traverse in a vehicle that isn't built for the task, down ruddy dirt roads, up rocky trails, through mudholes and up and down steep hills.
-
A Transfer case, or T-case, is the component in a vehicle which transfers energy from the transmission to all sets of wheels. Often these are switchable 2-wheel to 4-wheel drive. Some, like the one on our truck, also act as a second transmission, letting you go to gears far below "first". Most such vehicles have only 2 gears in the T-case, "high" and "low". High is for normal driving, low is for the tricky stuff.
-
Ground clearance (often just clearance) is the distance between the ground and your vehicle when sitting on flat ground. This is a very relevant property if your vehicle is on a road with big rocks for example.
-
Breakover angle: Consider a wedge sitting on the ground point up, imagine driving a wheeled vehicle over that wedge. A vehicle can drive over a very shallow angled wedge, but if the point is sharp it will get stuck or "high-centered" sitting on the point with one set of wheels off the ground. The sharpest angle at which a vehicle can still drive over the wedge is called the breakover angle.
-
Entrance angle: Imagine a car coming down an incline towards a flat surface. At some angle of incline the vehicle will just sit on it's bumper when it reaches the flat surface, instead of sitting on it's wheels. The maximum angle where it's wheels hit instead is called the entrance angle
-
Exit angle is the same concept as entrance angle, but the vehicle is transitioning from a flat surface to the incline (driving forwards still)
So, that's some quick 4-wheeling jargon. Now for the story.
Story
Manish brought his wife (apologies, I'm not going to try to spell her name, but she is the excellent photographer who took all the photos in this post) and their dog, as well as a couple of handheld GMRS radios (I haven't gotten any of my radios speaking GMRS yet). Jess was feeling tired so didn't come along. We met near our abodes and caravaned up to Carnegie for the day.
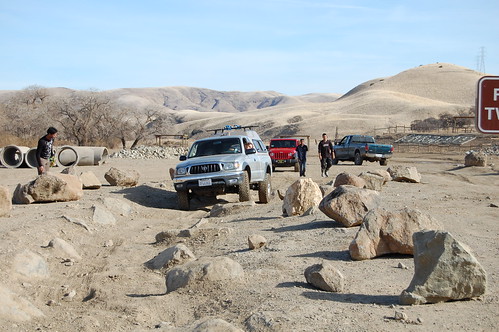
Well, it turns out Carnegie SVRA (unlike Hollister) has no trails at all for 4x4. On the other hand, they do have a pretty amusing "play area" for 4x4s. Being relatively new anyway this satisfied our appetites for a while, though I probably wouldn't go back.
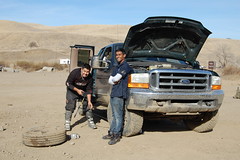
Here's our vehicles:
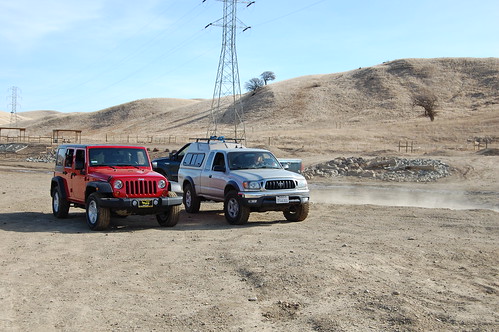
Manish's Jeep (red) is 100% stock, automatic transmission 2012 4d jeep wrangler sport, about 2 weeks old. My pickup (silver) is a nearly stock 2002, manual trans, 2.7L, extended cab, tacoma TRD (no locker), but I swapped the tires to 265/75 BFGs instead of 265/70. Jess and I call our truck "Jane". Overall I had a bit more clearance and better offroad tires than Manish, but he had a bit better skids and entrance/exit angles, making the rigs about equally capable. If you didn't follow all the adjectives don't worry, I threw it them in case someone cares.
After a quick run through the sand-pit, playing a bit on the bumps, and realizing our breakover angles were not sufficient for the harder "bumps", we decided to try going *down* the "steps". Up was a bit above our levels still. I went first:
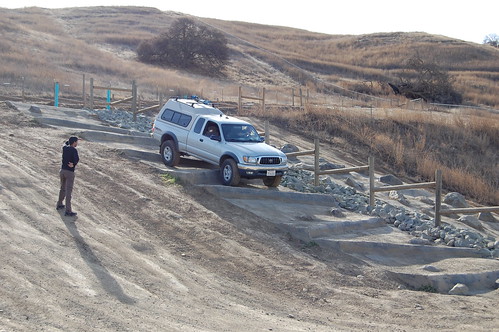
I scraped the tail-pipe once, and at the bottom I bottomed out due to entrance angle.

Luckily, the tacoma comes stock with a lightweight skid up front, so no damage was done (people will say it's just for looks, but it's better than that - just don't try and sit the whole car on it and slide over a rock). The plate hit pretty hard, but after suspension rebound my front wheels were on the ground, so I could drive out without a problem. The suspension on Jane is pretty shot, so if I let her drop a bit too hard off an edge she'll bounce pretty badly. This meant I bottomed out the suspension several times when I came off the brake a bit too much - I kept thinking I'd kissed a rock when I hadn't.
During this descent I tried a couple of techniques (Manish used descent control on his jeep - cheater :P). I tried putting it in gear and leaving the clutch in, but that never worked out well. I wanted to go too slowly for my crawl ratio (slower than the lowest gear on the truck with the engine spinning ~200 rpm, below that it dies). I also kept wanting to stop, which required working the clutch anyway. Thus I kept killing the engine. Instead I found using just the brakes worked better when I wanted to move THIS slowly. I found it surprisingly easy to do it with just the brakes - though lower crawl ratio is clearly the way to go if you have the time and capital.
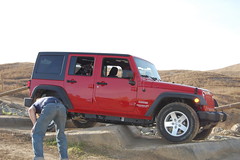
Here's Manish doing the same.

He dragged his skids pretty badly once or twice, but made it down safe.
Any time manish got 2 tires coming off a drop at the same time his rig would slide. This is the downside to more street'ish tires. He had traditional stock streety A/T SUV/truck tire (think AT dueler). The larger lugs, softer rubber, and larger diameter on my BFGs let me avoid sliding a lot more often.
We took a look at the main mud-pit, but after talking to someone who'd tried it and gotten stuck we decided it was way too much for our rigs. Next we decided to try the "frame-twister" which was a set or rock and log obstacles. This is relatively tame in the greater scheme of things. A more heavily modded rig could go relatively fast, for a good stock rig it's a slow but doable crawl.

We watched a stock land-rover do it as well, and a kid in a larger truck do it several times quite quickly. Unsurprisingly he ended up blowing a tire - presumably just from the pressure of running direct up against a rock at speed. He was running A/T Revo 2's, and his rig was enourmous. Extended bed, extended cab, pickup with a V10. We helped them change their tire
My main take-aways from this trip:
1) These vehicles, even stock, are both massively capable. I was vaguely aware of this, but I still keep being surprised.
2) Going slowly and smoothly in a stock auto is a lot easier than going slowly and smoothly in a stock manual. Even with the low range on the transfer case, it's just not as low as you want. Don't get me wrong, I'm not giving up manual any day soon. I love using it for steep descents and for general driving, but for anything crazier than what we were doing I'd want a second T-case to raise the crawl ratio. Surprisingly, I DIDN'T burn the clutch at all! Despite floating the clutch a bit to crawl slowly over a number of the rocks (Idle was insufficient torque, that's what I get for driving a 2.7L I4).
3) While Jane's clearance is sufficient for a lot of somewhat crazy stuff, another inch or two would be amazing. Good thing I have a lift kit in the garage just waiting to be installed :). This is an all suspension kit (bought largely in parts), so it should increase suspension travel and flex as well. Most importantly it'll replace our blown springs and dampers.
More photos here http://www.flickr.com/photos/smalladventures/sets/72157628817096551/ (courtesy of Manish Jain's wife)