
Mussel Foray
2012-01-08
One of the meetup groups I follow had a mussel collecting foray this weekend, so we departed from our usual loner ways and tagged along. The five of us met up in Half Moon bay with our buckets and boots and hiked out across the beach and the eel grass to towards the mussel rocks. It was an extra low tide (-.6) due to the full moon, so travel was easy. Almost immediately someone found sea snails. They don't hold on tightly, so it's easy to just scoop a handfull at a time out of the shallow water pockets left behind as the tide went out.

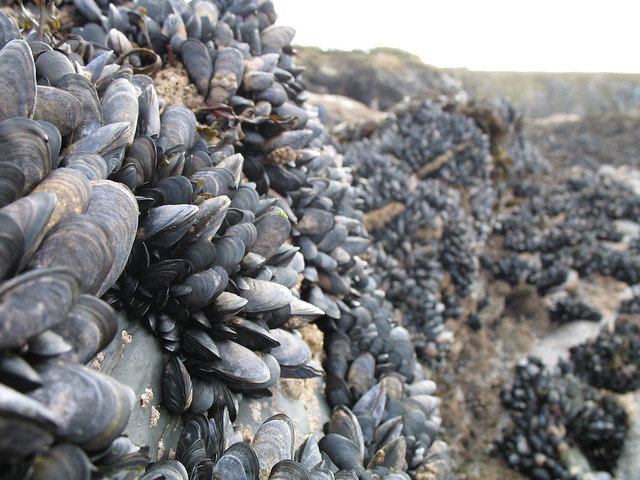
After hopping across several little water ways we got to the mussel rocks. They looked pretty much like mussel rocks always look - encrusted up and down with mussels of various sizes. Only this time we were going to eat them. :) We took a quick detour first though and collected a few sea urchins. They were a bit of a challenge, but if you can get a good hold on the far side of them then quickly tilt them towards you they pop of the rocks pretty easily. There weren't too many though, so we only took a few.
Then it was time for the main attraction! Mussel harvesting went even faster than the sea urchin harvesting. I just put on some gloves, grabbed a big one and levered and twisted it off. Ones in the center of a tight community are almost impossible to budge, but if you can find some large ones near the edge they're pretty easy to lever off. Everyone else was harvesting without gloves, which worked though resulted in a few cuts.
Brewer and I quickly gathered as many as we thought we'd need for dinner and helped some of the other people get up to their limit. It was too much fun to want to stop harvesting. On the way back we wandered around peeking in at the sea anemones (for giggles try trowing on some food) and various sea weeds. Unfortunately none of us knew anything about the seaweeds, so we let those be.
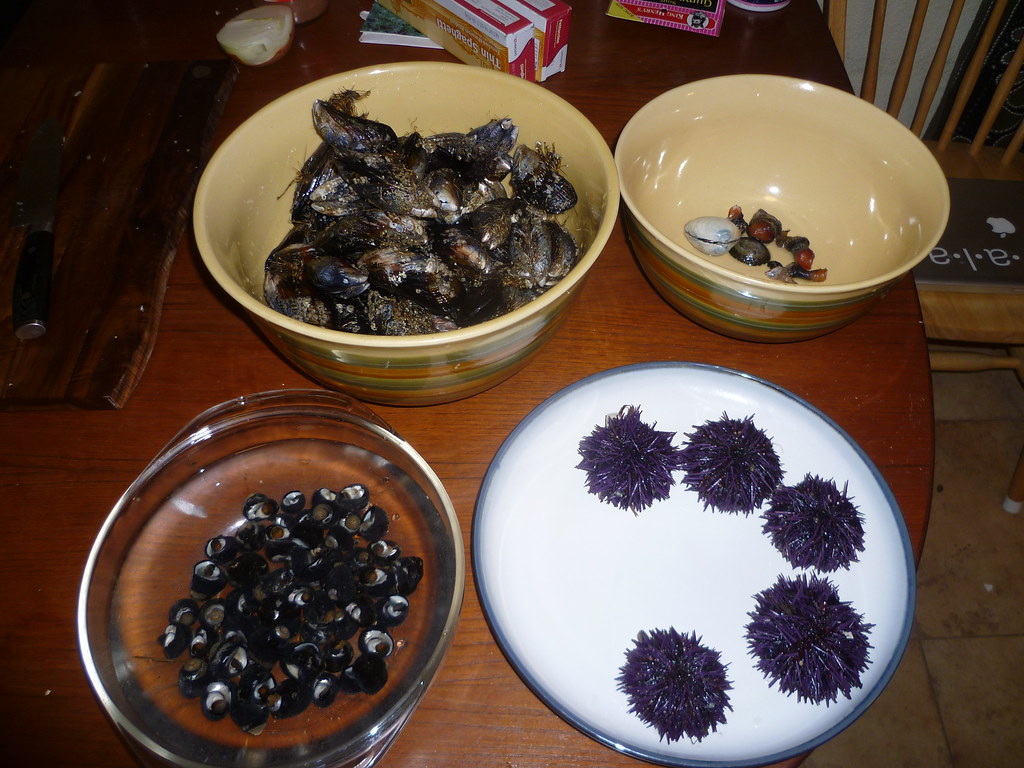
The catch!

Back at home we rallied the troops and started in on making dinner. The sea urchins we prepared by tapping them solidly on the mouth side until you can lift out the mouth. Then I used my finger to detach all the black bits from the inside of the urchin and poured them out, leaving only the orange gonads. We ate this uni both straight and after rinsing them off in fresh water.
Unwashed they start quite salty and then transition to sweet. It's an interesting flavor, but a bit too intense to eat straight, which is what we were doing. I'll definitely try and cut them with some other food next time, maybe spread them on bread.
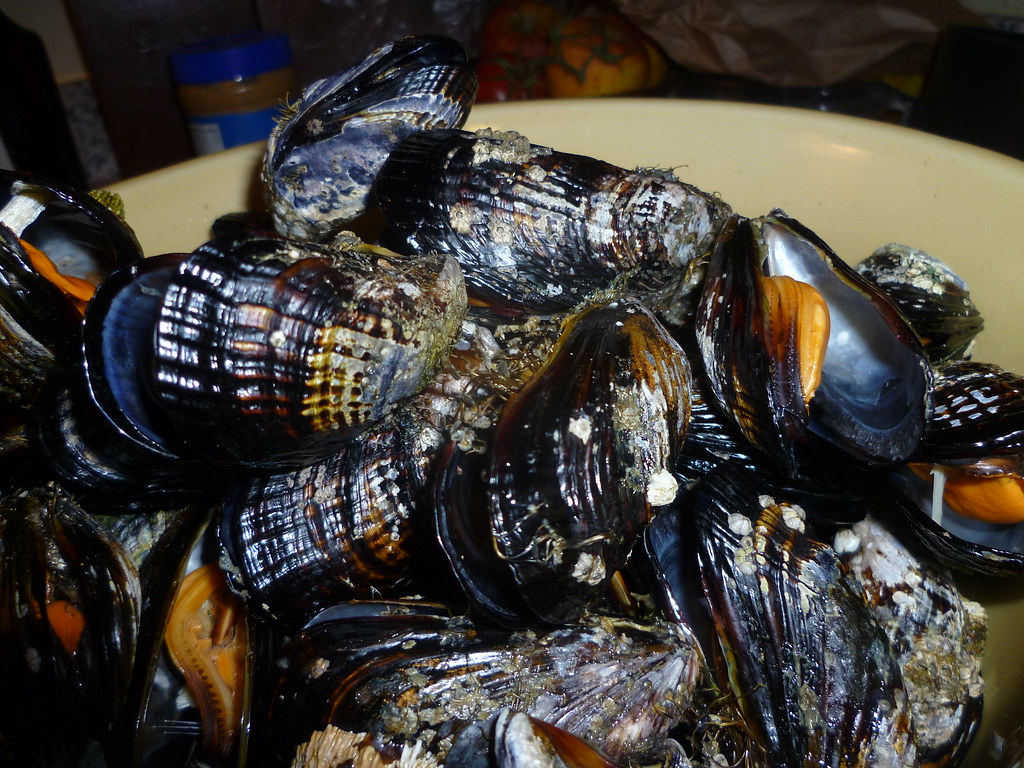
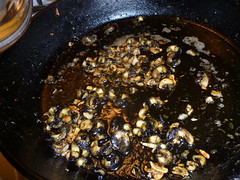
We rinsed and scrubbed the mussels (leaving the beards on) and then steamed them in some white wine, garlic and onion. After all the mussels were steamed we poured off most of the liquid from the steaming pot, being careful to leave the grit behind, and poured it over a pot of spagetti with some more butter. We did the same thing for the few odd ball sea life that we'd also picked up (some of it accidentally). The spagetti and mussels were amazing. The beards pull off the cooked mussels easily, and there was almost no grit. Everything tasted sooo good. We couldn't even come close to finishing all the mussels and had to give them away to several neighbors. Eight mussels a person turns out to be about as much as anyone can eat with a bit of pasta.
I used
this recipe
for making the sea snails. Getting them out of their shells wasn't too bad - we mostly used small screw drivers and finishing nails to poke them out due to a lack of toothpicks, but that just added to the amusement. The snails had two main sections internally. A mostly black foot, and a white/brown tail part. The two pieces detach easily. We decided to try and use both. The snails came out tasty, a bit tough, and more gritty than I would have liked. We at them up, but next time I think I'll wash the snails again after getting them out of their shells, and I might cook the tails separately from the feet 'cause I think they may have been causing some of the grit. We ate this over the spagetti as well.
In the end we were stuffed and happy with wine. I call it a success.
More pictures
here
A note on legality
In California all you need to legally collect mussels is a fishing license and a scale (you need a way to ensure you aren't exceeding the bag limit). According to this site the bag limit is ten pounds. Determining where you can collect is tricky, and at this point I'm considering calling to determine if some other spots I'd like to try are legal. Also it's not safe to collect filter feeders around San Francisco in the summer months as they can harbor toxins. To prevent accidental poisonings California has a mussel quarantine from May 1st to October 31st, so get out before then.
Trip report, sierra forests
2011-12-24
We wanted to get out and into the woods, practice firestarting, anmd do a bit of hiking.
Jess picked a spot by looking at Google maps satellite imagery. She made sure that it was in a national forest, so we could do fires and stuff without worrying about park rules. On the map it was on a dirt forest road, but with nothing nearby and we could see that there were other dirt roads spidering the area.
I decided it was more fun not to look at the weather :). I didn't check altitude or anything else. So instead we packed *everything*. We had snowshoes, ice-axes, the whole shebang. I also brought a machete, and we brought buckeye and saguaro sticks for fire drill.
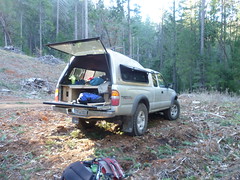
We headed up friday evening, and with a couple of delays still got there ~11:00pm. The dirt road was rough'ish, making for a bit of fun in the truck :D. I used the low gear just for safety on descents, especially with the low-light and tiredness. We parked up off the road and went to sleep in the back.
The next day we drove a bit farther down the road, parked, and after a quick sighting, walked off down towards the joint of the valley we were in and another one. Having no maps I was a bit nervous about getting back to the car. We considered it on our way down and figured we could follow the river back up the valley, then cut right and intentionally hit the road a bit back from where we'd parked. That was the plan anyway.
The woods were interesting. It was mostly conifers, surprisingly brushy for an area that gets logged. The hills were relatively steep, but passable. Compared to mendocino it was almost easy, compared to nearly anything else... not so much. The forest didn't seem terribly healthy sadly. The trees were mostly young, large amounts of deadwood lay in heaps (not randomly like an untouched old-growth forest). The undergrowth trended towards sticky brushy stuff with little space for pot herbs and such.
When we hit the stream Jess had the presence of mind to look around and find some markers. She pointed out a redwood and an oak tree overhanging the river.
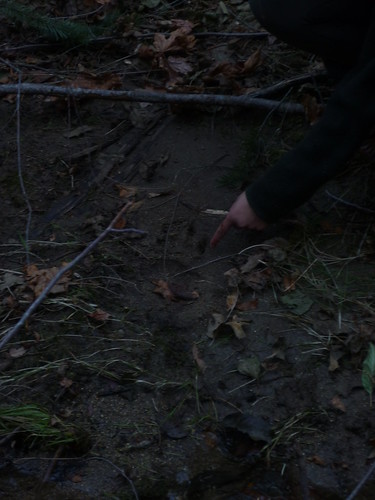
A bit down the stream I noticed there were marks on the rocks that looked like boots had slid on them. I found that pretty interesting. When I told Jess she pointed out bear markings on a tree next to me that she had just noticed. I had thought it was a boot because what I saw was moss scraped off by a what appeared to be a hard surface.
Not far down the stream we found more bear markings on trees, but also more boot prints. Sure enough, we were both right!
Right around there we also found this print in the mud, just in case we weren't sure about the bear yet:
We found a downed tree that we thought was redwood. Jess noticed that the inner cambium looked pretty interesting, so we stopped to poke at it. Jess quickly made a few feet of cordage and I slowly made about a bit over a foot :P. It was about the same resultant quality as unprocessed yucca, but a bit easier (and with no pounding). VERY encouraging. We didn't try it, but it felt like you could use it for spinning up fire. For trapping you could probably use the strips even before twining.
Eventually we got cold so after a snack we continued down to the valley. Our hope was that where the valleys joined we might have a bit of a wider valley and maybe some meadow where the rivers might delta a bit into each other. We were kindof looking for an area with wide diversity, the area we'd parked in was cool, but if we could find meadows or other types of areas as well, bushcraft would be a lot easier here.
As it turned out there was some almost meadow, but not flat and still under trees. As we got into the more open forest we started seeing more deer trails and the travel got MUCH easier. In the valley we found quite a beautiful river.

After sliding on the ice for a while and generally enjoying the river we headed back. With it being winter it was already getting somewhat late. The trip back was complicated somewhat as we hit the wrong swale a couple of times on the way back. It didn't look right and the compass bearing gave us a nice double-check. We used a combination of jumping swales and heading downhill to get back to the main stream we'd followed. This worked beautifully and we quickly found our way back.
When we got there it was already getting dark. I took a quick try at spinning up a fire with a hand-drill using buckeye on saguaro, and Jess lit up an a fire with a sparker so we could actually cook up dinner. We had tasty lentil soup with cheese. Jess thought to gather up boughs of whatever tree it was (fir I think?). Someone had cut a bunch and left them lying around, likely loggers or similar? Anyway, we gathered them up as a seat for use while we cooked and ate dinner. When bedtime came Jess decided she wanted to try sleeping on them.
There was a lot of deadwood left from logging. So we burned a fair bit of wood with no guilt (we actually cleaned up the area some). We kept the fire going most of the night, but at some point I went to sleep and it petered out. I was a bit cold after it went out due to my sleepingbag being worn out. Jess also got a bit cold due to a hole in the boughs where her hip sat. We slept fine though overall.
The next morning we decided we really wanted to spin up some fire, so after breakfast (cooked on a fire restarted from the coals of the previous night) we gave it a try. We both got pretty close, but neither of us succeeded. My closest was buckeye on buckeye, though buckeye on saguaro was clearly a good combo (if hard to find in the wild :P). We only had the gear for hand-drills so that's what we were using. I got good dust buildup relatively tightly packed and good heat, and I got plumes of smoke, but it didn't ignite.
Amazingly our hands didn't blister. Nathan, someone I met at earthdance several years ago, taught me a trick that I think was responsible. You clap your hands until they're red before you start, which helps give the same protection that blisters would.
Eventually ours hands were sore and tired (if not blistered). So we cooked up some split pea soup with salami for lunch on the existing fire, put the fire out, and went on a hike up the road. It quickly turned into a pretty tricksy road (had we been in the truck) and then into a trail. Up there it was a lot more open with fields and such. We heard some hunters not far away who fired at something (presumably deer).
The night before we'd actually heard dogs that appeared to be for hunting - they'd bark a lot in one location for a while so I suspect they were treeing something. Not sure.
Anyway - we drove home contented, full, and generally in much better moods than when we left on friday :). Our conclusion about the area is interesting, not bad, not terribly healthy, and we need to find a south facing slope.
More photos
http://www.flickr.com/photos/smalladventures/sets/72157628707645353/
Link farm
2011-12-22
Been doing some primitive skills reading lately so I thought I'd share.
http://paleotool.wordpress.com/
- A well written blog by the guy who taught me how to make ghillie shoes. Lots about gypsy caravans, shoes and just general neat stuff.
Two interesting sites I found from his blog:
http://www.cd3wd.com/cd3wd_40/cd3wd/index.htm
- A collection of articles on how to do almost anything. Seriously, webpage design to nut oil extraction to livestock management. You name it, it's probably there.
http://trackerofplants.com/
- A blog by a lady in Oregon who does a lot of gathering
http://www.primitiveways.com/fire_materials.html
- Woods to use for friction fires in the bay area. I managed to get smoke with a hand drill from buckeye on buckeye last weekend. It's an impressive wood. I got a little closer with buckeye on saguaro, but that'd be hard to find without a long drive.
More huaraches!
2011-12-08
Back in
this post
we gave an overview of several types of minimal shoes. Since then I've been wearing huaraches almost exclusively.

The longest day of backpacking I've done in them was
17 miles
(established trails, very light pack). The balls of my feet were a little raw by the end, but that was mostly from the friction between my foot and the top of the rubber sole. You could probably decrease that by gluing a piece of garment leather to the top of the sole, but I haven't bothered. I like having tough feet. :)
Recently I went for a six mile hike on sand and small pebbles in Joshua Tree and didn't have any issues with rocks after the first half mile or so. Somehow it seems like you learn to walk a bit differently after a while so you don't pick up as much junk. Initially I strongly recommend carrying a different type of shoe to switch to if you're planning to do a long wilderness walk. Well, that or just wear five fingers, or Merrell's trail glove. That way you can get used to a thin sole before battling the pebbles. I wore my five fingers backpacking until I wore through the sole.
Mostly I wear my huaraches for normal day to day wear. Short runs, hanging around in the office, biking... just normal life. One surprising side effect of always wearing them is that lots of interesting strangers have started conversations with me on public transit. Also a shocking number of people think they're really "cute." Go figure.
Pros:
- Cheap. ~$20 a pair if you buy a kit. Less if you're creative.
- Easy to make and repair. It took me about twenty minutes to make my first pair, and I've repaired them several times with a pen or pocketknife.
- Pack small
- They also seem surprisingly good for running, though I'll admit I haven't run much distance in anything else as I'm just getting into running now.
- Closest to barefoot you can get and still be fed at restaurants.
Cons:
- Pebbles! They sneak in and poke and you have to clear them out fairly often until you get the hang of walking without scooping them all up.
- No socks. Because of the string between the toes in the standard lacing setup you really can't wear standard socks with them. On cold mornings I wear my
ghillies
instead to keep my feet warm.
- Not great for side hilling and parkour. When applying force 90 degrees off from the direction you walk in the sandals try to rotate around your foot and it can hurt a little bit.
Tying method
People have been going crazy coming up with new lacing methods for these things, but I've mostly only used two: slip on and traditional. I prefer the slip on method for walking. Because all the strings in this tying method are doubled none of them end up digging in quite as much, especially on the back of the foot. Unfortunately I find it difficult to keep this method a just the perfect tension for running, so my shoes end up a bit loose. It makes it more awkward to run and the slack allows everything to slide more creating more chafing.
So lately I've been using the traditional style. Ironically when I went looking for directions I seem to have accidentally made this style up. I start with the basic setup where the string goes from between the toes, to the outside, then around the heel and to the inside. If you watched the video he talks about wrapping the string back around right after you go through a hole to "lock it" in place. I've found that I enjoy doing that several times at the inside hole. This raises the string on the back of the heel, so it's less likely to fall off. It also allows so play in tension between the back of the heel and the part you re-tension and tie every day making it a lot less fiddley.
After doing the wraps around the hole I wrap the remaining string around my ankle and lower leg until there's just enough to tie off. Then I tie off to the string coming from between the toes to the outside with an overhand knot and slipped overhand knot (make the knot like usual, but don't pull all the tail through, so you end up with a little loop). One overhand doesn't seem to be enough to hold it, but the second one being slipped makes them easier to get off again. It also lets you eat up a bit of slack in the loop so you don't have a long tail dangling around.
This tying style is what I've been wearing almost exclusively lately, though mostly it's because I'm too lazy to switch between them every time I switch between walking and running. Feel free to experiment though. Fundamentally you're just tying a piece of sole to your foot. There's lots of room for experimentation.
Sole Material
There are several different choices for sole material. My first pair was a leather sole (fairly thick cow hide). Those lasted me about three months and were super comfy. They are floppy though, so it takes a bit more skill to keep small stones out of your shoes. I suspect they'd last a lot longer if I wasn't mostly walking on pavement though.
Hoping for a longer wearing sole I bought a sheet of Vibram Cherry Outsole from invisible shoes and used it to make a pile of shoes (huaraches for Brewer and I, new soles for Brewer's Ghillies, and fancy sandals for a friend). Those soles wore quite well, though were a little floppy. The holes on the sides eventually ripped out, but that's pretty trivial to fix even in the backcountry. I wore these soles for about a year.
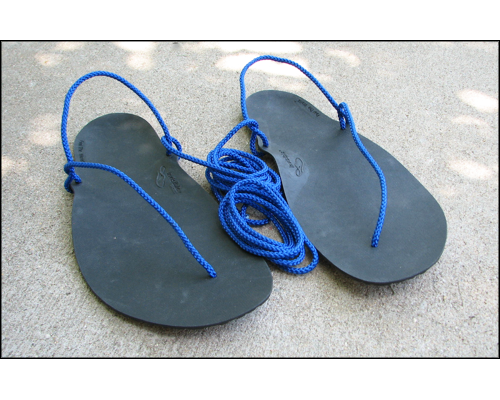
I eventually retired those and have a new pair with the 4mm Connect soles. They're pretty similar, though the side holes are pre-formed so they shouldn't rip out as easily. They're also shaped slightly so it's a touch easier to keep rocks out. I am using their laces this time instead of random string from the hardware store, and while it's comfier it also wears out way faster, which I find annoying. When I get around to it I'll switch back to a leather lace. Leather laces are a little harder to get your hands on, but have a really nice amount of give for walking and the knot on the bottom wears pretty well.
I've also seen people using mountain bike tires, but I haven't tried that. If I was spending less time on pavement I'd probably just use leather soles, but the various rubber soles are a nice compromise for city living. Ideally however I'd like to use the cherry material and make myself some moccasins for the winter so I can wear socks and keep the rocks out. It'd probably also make it easier to keep dry feet. So far my ghillies are doing okay for wimpy California winters though.
Update: The connect soles have lasted wonderfully. I've been wearing them as my primary shoe for at least fix months now, and unlike the cherry sole the side holes haven't made any signs of ripping out. The string also stopped wearing out as quickly once the sole warped to my foot. It just took a bit longer than it had for the other soles. I also found an old un-belted car tire so I'll probably try that next.
A cutting board
2011-12-05
After our trip to Joshua Tree, Jess and I decided that we really ought to have a cutting board in the truck. We already have pots and a stove that live in the car, I just purchased a couple of Mora knives to live there as well (they're on their way).
So, we wanted a specific sized cutting board that would fit nicely into some nook or cranny in the truck boxes that's otherwise hard to use anyway. We were running out to a large hardware store (Lowes) this weekend to grab some things the local one didn't have and Jess asserted that such stores always have planks of good hardwood for reasonable prices. So, (me not believing her) we poked around and sure enough, for $12.00 we found a good sized piece of oak plank, maybe 1" thick, just a bit larger than we needed.
That afternoon I took out our roughcut saw (we have that and a just purchased coping saw, so I figured I'd make it work). I gently sawed through the wood trying to avoid snarls and rough edges as best I could. I cut it such that it would drop behind the left wheel-well (on the camping side of the boxes - the other side is car repair and recovery gear) and slide backwards just a bit locking behind a supporting pillar in the box, so it's totally out of the way.
I then took out a sanding block (we had a couple of foam sanding blocks from cleaning up after moving out of our last place). I sanded the plank for a while until it was starting to feel pretty smooth. Then I switched to a finer grit and did it again. Since it's a cutting board I figured it wasn't worth *really* getting it perfect, so left it at that. By this point it felt and seemed just a bit shiny, but still had some very small pits in it where the grain stuck out.
Next I put on some flax seed oil and spread it about with a rag. It soaked up a huge amount on the first pass, presumably because oak is not a very oily wood (I did this on alligator juniper and it only took in a little). On the second pass that evening it wasn't totally dry yet but close, I added a bit and re-spread what hadn't soaked in. It was totally dry this morning, so I added another coat this evening.
And here's the result:

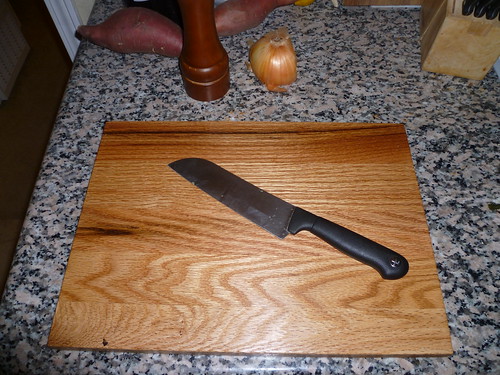
The last coat of oil isn't dry yet, but I'm pretty happy with it. When it's dry it will look exactly as it does now. Based on the last thing I treated this way it should darken a bit over the next couple of months as it develops that patina wood does (presumably some bit of it oxidizes). When I was treating alligator juniper I was making more of a piece of art, also it didn't take in the oil quickly so I did many many coats. With the oak I feel that the couple of coats I did should be fine - if it starts to look dry some time from now I can just add more.
Anyway - this entire project was a total of a $12.00 plank of wood and between probably about an hour total of work. The result is *exactly* what I wanted in terms of dimensions, since I chose. A cutting board of this size made of wood starts at ~$40 based on the one I got for the kitchen, so saving ~$28 for one hour work is pretty good. Owning something you made always has a different feel to it to.
My only warning is... that much sanding is a pain in the shoulder. If you have a belt-sander this is just a trivial project. Doing it by hand is good exercise though! :D.
I'll try and report back on how well it holds up to chopping some actual vegetables!
Edit:
Tried it last night when chopping apples for apple sauce. It seemed to get less scratched than our commercial cutting board gets.
It's not nearly as smooth as I thought it would be, once the oil dried it feels rough again in some areas - but it IS going in the truck. If it was for the house I'd simply sand it a bunch more.