
Shoe Repair, on and off trail
2017-03-28
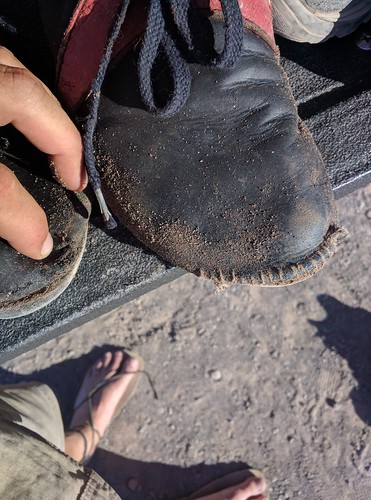
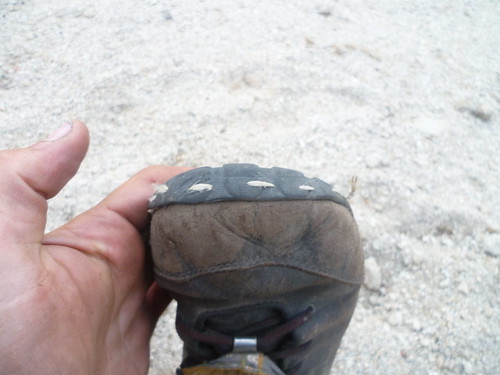
Angie and I just both blew out another pair of shoes. Here's a picture of mine (with a repair)
And here's one of Angie's with a hole clear through the heal
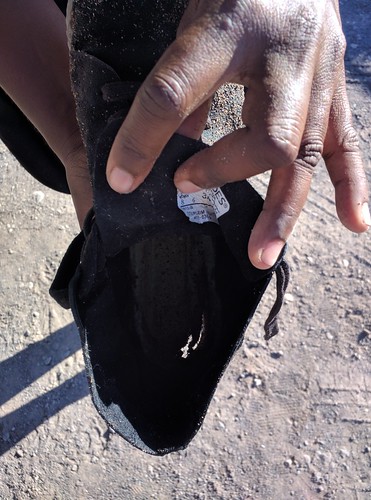
Anyway, this made me realize just how many times I've blown out shoes on the trail, and that I'm using a number of tricks to deal with this that I got from esoteric sources, experience, or face-to-face conversations... so I thought I'd share them here. These two pairs of shoes were dropped in a nearby trashcan. Here's another of my shoes:
On trail repairs: Torn shoes
Here's a picture just after a quick trail repair on the presidential traverse in the White Mountains.
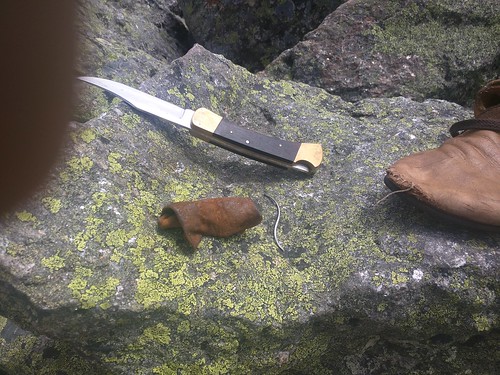
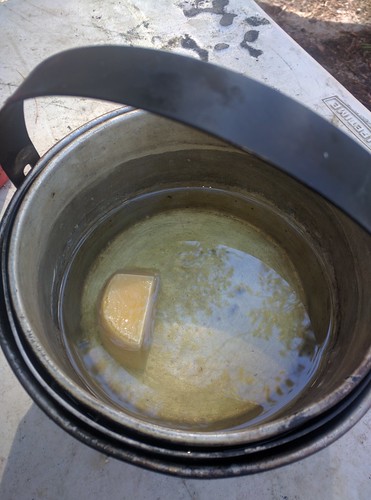
See the thing that looks like a metal worm in the middle of the picture? That's what's called an "S-needle". This is the single biggest secret to on-trail shoe repair. I prefer to use a waxed linen twine to do my repairs (partly because I use it for everything, but also 'cause it holds up pretty well). Another good alternative is tooth-floss (the old style, rather than the ribon stuff). That's what I used here, when I blew out a shoe on the JMT:
That last repair was actually done with a straight needle- but with great difficulty. The curve of the S-needle gives you something to get a grip on and really shove, so you can do things like shove it straight through the sole of a shoe.
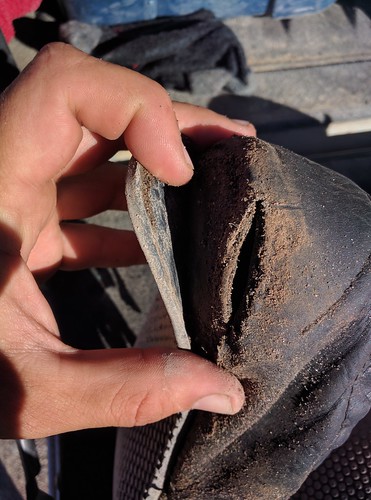
Note that the first two are repairing worn out leather, where the last is actually repairing the sole coming unglued from the shoe. For the last repair, to maximize milage before the shoe fails completely you want to stall until the sole is really pealed back a little, with maybe 3/4" unglued , but not until you catch it on something and separate it further. The thread on the toe will bust through fairly quickly (maybe 100 miles), but that's 100 miles farther than you would've gotten, and you can keep doing this repair until the shoe-sole or leather uses structural integrity.
Too make things a little easier I have a leatherman squirt PS4 on my keychain (the PS2 is even better, but no longer made). The pliers are really helpful if trying to repair heavier boots, which they have been used for on more than one occasion.
On trail repairs: Uneven soles
There is one other on-trail repair I will perform, and it can gain you a lot of milage. Many people, like myself, do not wear shoes evenly. If you wear more traditional shoes than I do these days (as I did on the AT), you may find that your shoe has worn, or the EVA midsole has collapsed such that it's hurting your knees, or such that it's created a ridge between your toes and the ball of your foot and is giving you blisters.
My solution to this is duct-tape. Take your insole out, and layer duct-tape on to the insole to "shim" the low spots back up level. If you do it right, graduating the sizes of the duct-tape you can get the shoe back to level. I've gotten an extra 200 miles out of a pair of shoe at least using this trick, and saved my knees some injury to boot.
Off trail repairs
On trail I pretty much restrict my repairs to sewing. Shoe Goo is useless in my experience, pealing off within just a few miles usually, even if you let it sit. If I wear through a shoe-sole I just hike on it (as I did on the JMT). My belief is that this is because you can't get the two surfaces clean enough... At home though, you can do this right.
For shoe sole seperation here's the trick:
1) Clean the top of the sole, and bottom of the shoe as well as you can with water, let it dry completely
2) Clean them *again* with mineral spirits, keep cleaning until your rag or paper-towel comes away CLEAN. Again let it dry...
3) Use "barge" cement, preferably original formula. I've heard the new "the fumes won't kill you as fast" formula does not bind as well. Put it on fairly liberally
4) Clamp the shoe as best you can, bar clamps or c-clamps work well. Particularly make sure you clamp near the tip of the toe, and that a little glue gooshes out as you do so.
And there you go! If you are used to repairing your shoes, especially on the trail, you can stretch them a lot farther before throwing them away. "Oh this shoe might blow out while I'm out" stops being a reason to replace them immediately... and with the average shoe lasting between 600 and 800 miles, the extra 200 you squeak out of each pair really add up.
Why I'm avoiding plastic
2017-03-12
Some time in 2016 I started working on my no plastic backpacking kit:
http://www.blog.smalladventures.net/2017/03/less-plastic-backpacking-trip.html

I started backpacking when I was a kid, and got in to ultralight backpacking around when I graduated from highschool in 2002. Through college I built up my ultraight kit. My college graduation gift from my parents was an ultralight ULA pack
http://www.blog.smalladventures.net/2010/02/gear-review-ula-circuit.html
(to this day one of the most read articles on this blog).
Anyway, around 2009 I hiked the AT with a base weight of ~14 lbs. Though not strictly ultralight (variously defined as <12 or <10 lbs base weight), I was getting in to that ballpark, particularly as I was carrying gear sufficient for comfortable edge-seasons, and below 0 survival temps.
All of that was fine and dandy, but at some point, making my gear lighter just involved spending more money, and it got boring. On a thru-hike you're rarely carrying over 4 days food (~4-8 lbs), and as I got better at managing water consumption, 1 liter of water ~2 lbs. That means ~14 lbs, you have a total *max* weight of 24 lbs, and an average weight of ~18 or so... really, at that point my pack just doesn't bug me.
At the same time I got more and more interested in bushcraft and primitive skills. I started experimenting with more minimal gear, ponchos instead of tarps, building shelters, cooking on fires, finding some portion of my food while I'm out, etc. Those who've been reading for a while know what I'm talking about. Some of my gear wore out, and I looked at replacing it, and it was expensive. I got more and more interested in the history of outdoor pursuits and wanted to try older techniques whether settler, trapper, or native. Also... I discovered that what I loved about being outdoors was the connection with nature, and that the less I carried with me the more of that feeling I got. There is nothing like the feeling of waking up in a shelter you built, walking over to a lake in the cool morning as you shiver out the cold from the night before, and taking a deep drink directly from the lake... It's spiritual and amazing, and I craved more of it.
My now ex girlfriend Jess Mink did a stone-age backpacking trip, where she made all of her gear herself from "wild" things, and all the food had to be wild gathered food as well. While really cool as an effort, it was less comfortable than I wanted... I wasn't interested in going all the way back to dropping metal. That said, on that trip she realized that anything they left in the woods basically wasn't litter. If they forgot a pot, it was just pot shards... stone really. If they left an arrow, just a rock and a stick. If they left clothing, just animal hide or wool. I thought that was cool.
Anyway, eventually I decided I needed an interesting goal to chase, to drive my experimentation and keep me moving forward in a cohesive direction. I wanted to play with making more of my own gear, carrying fewer items (not less weight). I considered historical recreation, but recreation didn't interest me. I like seeing how people did things, but mostly so I can see how I could do things... I see no reason to drop things we've learned in the meantime for "purity" along these lines. This level also allowed me to use canvas, which allows for pretty comfortable backpacking.
So, eventually I settled on avoiding plastic in my kit. Really, I'm trying to avoid modern materials, or something like that, but "no plastic" is an easy way to summarize it. This gives me something like the "anything I leave behind isn't really liter" property, which is neat. It's just sticks, rocks, plant fibers, animal hide, or maybe a chunk of metal (not that I'd leave anything behind intentionally, particularly a chunk of metal). All things that are approximately naturally occurring, if not quite in that shape. It also pushes me towards making more and more of my gear, which I like.
Now... that's why I got started. A little while ago I started thinking about Koche industries, and all of the horrible things they do to the environment. Many people hate the Koche brothers due to politics (they support republicans generally), but lets set that aside for this discussion. If you read this blog, I'm sure you like the outdoors. Whatever your political affiliation, You like to drink water and breathe air. If you like the outdoors, clean rivers you can drink from being a prime example, the Koche brothers are not your friends. If you're thinking "I filter my water anyway"... well, firstly, why should you have to? And secondly, most filters are designed for biologicals, and don't filter out things like heavy metals or dioxins.
The Koche brothers use their money to oppose keeping rivers clean, pushing for lowering standards on things like how much mercury is allowed in rivers (which is now well over what is known to be healthy by the way, as of the Bush administration). Fundamentally Koche industries is a chemical company, and not poisoning rivers costs them money... but I want clean rivers, so our goals are at odds. You can call it politics, but this isn't about right/left-wing, this is about loving our outdoor places.
Now, look up some products made by Koche.
https://www.dailykos.com/story/2014/4/1/1288957/-Sign-the-pledge-Don-t-buy-these-Koch-products
Lycra, Coolmax, Cordura, and Dacron are all manufactured by Koche. In practice it is very difficult to buy commercial products made with synthetics and NOT support the Koche brother's efforts to lower clean water standards. In fact, just today I learned that Darn Tough socks have lycra in them.
As a result I've added an additional reason for my project. I want to stop buying these products, and to prove that I can backpack comfortably without these products... because I'm tired of supporting lowering clean water standards. For this reason I've been slowly extending my project to other aspects of my life, trying to avoid Koche products in particular, but plastics in general across the board more and more, in an attempt to stop giving my money to folks who use it to ruin the very places I'm backpacking to be in.
Less plastic backpacking trip
2017-03-12
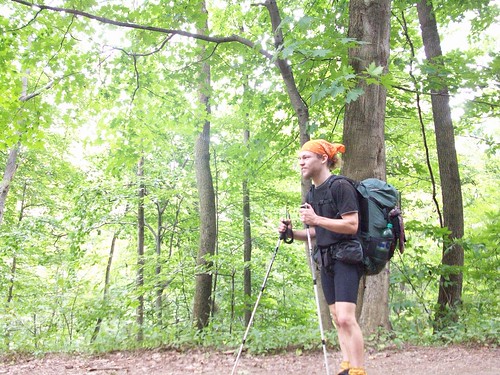
I keep getting closer! We went for a 3 day trip, covering about 35 miles, down the Wild Azalea trail in Louisiana in March. We planned for ~40F night, ~60F day, but got ~60F night ~80F day... and rain.
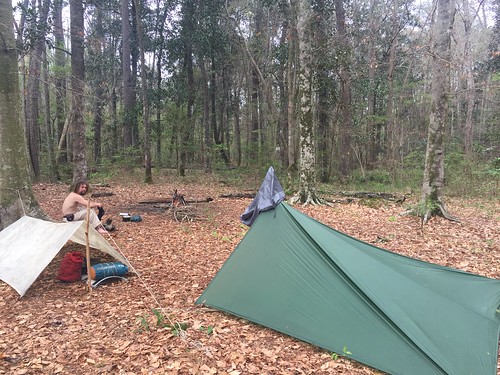
(Left: My treated-cotton poncho shelter. Right: Angie's silnylon tarp shelter)
There are only a couple of major things left on the "still plastic" list.
Plastic gear used
- Backpack frame end caps
- Shoes
- 3 dry sacks
- Food packaging (ziplocks and prepackaged)
- albutorol inhaler
- wool tights had elastic waist
- plastic zipper on pants
- plastic buttons on canvas shirt
Food packaging has always been out of scope for this project. It's interesting, and very relevent, but for something like an AT hike it's not possible with the style of hiking I like (shoot from the hip, buy from grocery stores as you go). Similarly drugs to keep my alive are off the list.
I'm not sure if I'll ever move away from using plastic soled shoes. Nothing has as good a grip... but maybe. Originally I didn't think I'd ditch the sleepingbag either when I set about this, and that's long gone.
Next is some futzy stuff... buttons and zippers... Maybe I'll get to that eventually too, but that doesn't lead to interesting experimentation or learning about new or old ways to backpack, so I might do it just for completeness, but meh.
The big obvious one left is the dry sacks. That will be interesting to figure out for sure. No treatment of canvas I've tried so far keeps things completely dry. Leather would, but it's really heavy. My plan right now is to try canvas and see if it's good enough, but I'm also considering options like only vaguely waterproof sacks, and a canvas pack cover, which by not being tight against the sacks would keep rain off. This is the idea with the poncho as well, another possible option.
(Note: linen/cotton pants, knife in leather sheath on my belt, no hipbelt, and pack uses leather shoulder-straps with hemp string for the bottom adjustable attachment. The string is tied to the pack frame with a rolling hitch and a half-hitch, and I'm using a double-taughtline hitch for adjustability)
All Gear:
Base weight: ~19.5 lbs
Skin out weight: ~21.5 lbs
- Worn
- Linen/cotton blend suit pants (from goodwill)
- Lem Boots
- Darn tough marino Socks
- Tilly hat
- 40oz Kleene kanteen with hemp twine for hanging over shoulder, or tying to pack
- Belt knife in leather sheath
- Belt pouch containing sparker, tinder, lighter, compass, sewing kit, and keys http://www.blog.smalladventures.net/2015/12/dyi-leather-belt-pouch.html
- Albutorol Inhaler in pocket
- Carried
- Pack
- Backpack (kelty frame, with leather and hemp shoulder straps), DIY: http://www.blog.smalladventures.net/2017/02/myog-plasticless-backpack.html
- Hemp twine to tie sacks to frame
- plastic dry sack for gear
- eVent dry sack for food
- eVent dry sack for sleepingbag
- sleeping
- Alpaca fur sleepingbag, DIY: http://www.blog.smalladventures.net/2016/09/alpaca-fur-sleeping-bag.html
- cooking
- Antique aluminum cookpot (My dad acquired in the 60's)
- Bush Buddy wood stove, http://www.blog.smalladventures.net/2010/06/review-bushbuddy-woodstove.html
- Folding titanium spork
- Cotton bandana
- 50 ft hemp cord for bearbag
- mini titanium beaner for bearbag
- light
- folding brass candle lantern, http://www.blog.smalladventures.net/2016/12/antique-lanterns-and-stoves.html
- candle for lantern
- cotton bag for lantern, DIY
- Shelter
- Poncho, DIY: http://www.blog.smalladventures.net/2017/02/waterproofing-cotton-poncho-experiment-2.html
- 2 15ft sections hemp cord
- 4 aluminum groundhog stakes
- 1 titanium stake
- clothing
- Additional pair darn tough socks
- wool tights (smartwool)
- Marino wool sweater (goodwill)
- Marino wool sweater (Icebreaker)
- oil-cloth Cotton canvas shirt (details below)
- wool hat (icebreaker)
- Ditty
- Buckskin wallet, DIY (no writeup, sorry)
- Spare albutorol inhaler
- cotton bandana
- tin containing benadryl and IB profen
- Tin full of found tinder
The treated canvas shirt is a canvas shirt from cabellas, treated using methods from http://www.blog.smalladventures.net/2017/02/waterproofing-cotton-poncho-experiment-2.html , 1 whole small can of mineral spirits, 3 handfulls of wax pellets, and maybe 2 ounces of pure food-quality linseed oil, applied in 2 coatings, with extra applies to shoulders and sleeves. All wax was absorbed by the fabric, and none is on the outside to flake off. I think I could get it to take more wax and be even more waterproof.
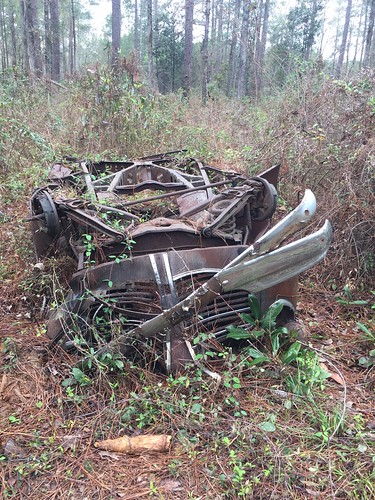
(A rusting antique car we passed on the trail, I found a tiny geocache capsule stuck in the frame actually)
The Trip
It was very warm for this trip, I didn't need the sweaters, tights, or hat. It rained a fair bit, particularly the first day, so I did get a chance to spend some time wet. I never used the poncho, finding the treated canvas shirt basically sufficient. In fact... I've been thinking and I've been on numerous trips with not-really-waterproof raincoats (say, they wore out, or whatever), and I've always been comfortable and fine. Jess did the AT with a windbreaker as a rain-coat, not waterproof at all. With all of this I'm now thinking I don't need perfect waterproofness, meaning I don't need the poncho. The effort I spent on it though has payed off. The treated canvas shirt I made using those techniques worked well. It worked far better than my old experiment with a poly/cotton mix shirt http://www.blog.smalladventures.net/2015/12/diy-raincoat.html .
So, in the future I could drop ~1 lb by going to an untreated tarp instead of the poncho. I could drop another almost pound by swapping to a lighter lantern. That'll help make up for weight added when I replace the stuff-sacks.
One great find this trip was the hemp cord, bought at Michael's. It's rated to 120 lbs and is about the size of paracord... this was a huge improvement and brought down my expected weight enormously. I used it for everything, as you can see in the gearlist.
Biggest failing on this trip was the pants. They worked okay, but I got chaffing after only 3 days and 36 miles covered... that won't do. I'm now looking in to switching to a kilt of some kind and maybe greasing my thighs with lard/fat on hot days. We'll see!
All in all it was a fun trip, and I'm excited to be at such a light weight with hardly any plastic.
Waterproofing Cotton: Poncho experiment #2
2017-02-14
This post has been a long time in coming... but I've finally finished and tested another homemade poncho.

To review
- I tried a linseed oil poncho, made from a cotton sheet, which ended poorly: http://www.blog.smalladventures.net/2015/11/linseed-oil-for-homemade-oil-cloth.html
- I tried a commercial treatment (otter wax), on a cotton poly blend shirt from 5.11, which worked okay but not quite well enough: http://www.blog.smalladventures.net/2015/12/diy-raincoat.html
- I've been using an 800 threadcount sheet as a tarp for months in all sorts of weather, and it works great: http://www.blog.smalladventures.net/2016/10/first-run-non-plastic-sleeping-kit.html
Based on that experiment my theory was that the polyester was keeping the cotton from really taking in the treatment the way I'd like and binding well in to the fabric. So, I decided I had to try it with pure cotton. I still had the bottom sheet of the 800 threadcount sheet-set, so I decided to give that a try, figuring that it's properties of shedding water once the fibers swelled might help as well. I really wasn't satisfied with my first couple of attempts at treatment though, The wax wouldn't go on evenly and it kept cracking off, so kept trying. Finally I think I figured it out.

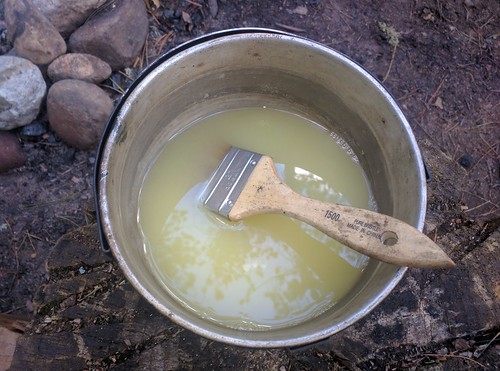
Here's my recipe:
1) A bunch of beeswax (maybe a lb), dots are easiest (and cheapest), but a block will work. I did not use toilet-rings despite their cheaper price because I couldn't find any that said they were specifically beeswax and didn't have other things in them, and I wanted to get this to work with the old materials.
2) Some normal unboiled linseed oil (maybe 8 ounces)
3) A can or more of mineral spirits (turpentine should work fine too)
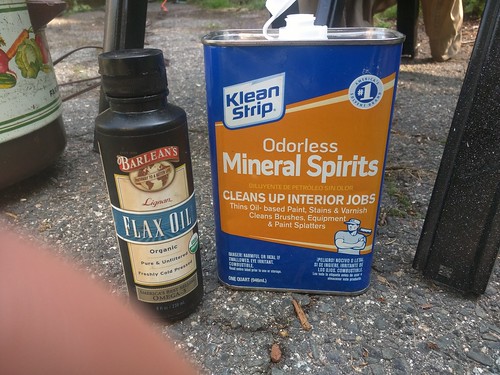
Pour all three in the top of a double boiler (I use two cooking pots that nest, with some sticks in the outer one), with water in the lower pot. Heat until the wax melts, mixture will get cloudy first, and then comparatively clear. Let cool to room temperature. This is the key, at room temperature it should still be liquid! Lay out your fabric, and paint the stuff on with a brush. The fabric should look like it's soaking wet, this means you got the mixture all of the way through the fabric. Let it dry, flip it over, and do it again... this is just to be sure it got all the way through, and get some extra was on it. Finally, let this hang in the sun a couple of days so the linseed can oxidize, the stickiness will go away and the smell fade as well.
One more bit of info. From reading it seems that Linseed oil is pliable after it "dries", but beeswax is way more waterproof. Thus, as you add more linseed oil you make the final treatment less brittle (it doesn't crack off as much), but it gets a little less waterproof. My mixture above leans heavily on the waterproof side, because that's what I wanted to test first. If you want to read more about this, go read about "spar varnish" this recipe with less mineral spirits can actually be used as a spar varnish, and from what I've gathered is pretty much the original mixture called with that name (probably using turpentine instead) historically.
Note that I do NOT use "boiled linseed oil". True boiled linseed would be very interesting to try, but the product sold at the store as "boiled linseed oil" is not, it's actually linseed oil with hardeners and such in it. When I tried this on my first tarp it never dried properly and stayed sticky and stank to high heaven eve after drying for over a month on the sun.
How well does it work?
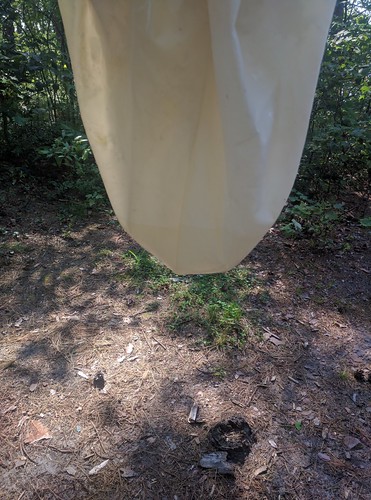
I just went for a walk for 1:15 in a moderate rain, and my shoulders are damp. Everything else that was under the poncho is bone dry, meaning also my legs down to my knees. An important other factor (given my last tarp experiment), no residue was left on my shoulders except a few crumbs of cracked off wax. If you look at classic riding coats these had a lifted shoulder panel for this reason...
There is only so much waterproofness you can expect from a thin layer of cotton, even treated. Overall, I'd say this is not good enough for a cowboy roll (for that I think you'd need a thicker cotton), but I think it will be good enough for my purposes as a rain poncho. I plan to treat my over-shirt in the same manner which is thicker and thus hopefully even more waterproof. The two together I expect to work very well even in long rains. Here's the poncho holding some water, add more though, or touch the fabric, and it starts running out.
There's always more testing to do, but overall I think I'm happy with the poncho. It's a lot lighter than 10 ounce would be, and I suspect I've managed to emulate the waterproofness of a classic old (thin) tincloth. I'd be fascinated if someone has evidence to the contrary.
I've also slept out in it wrapping my alpaca fur sleepingbag, and it worked great for warding off dew. In mist, very light rain, or snow it would work fine in this capacity as well... even though I think I'd get too wet in a full-out downpour. Obviously it still works as a tarp, it worked even before it was treated for that. I've used it several times as a groundcloth and it's also plenty good enough for that.
How I made the poncho
The poncho is 8x6, so a little big as a wearable tarp. The width I just deal with, it's nice while walking and a little annoying while doing things. Tying a rope around the waist makes it far more manageable though. I think this will be okay since I'll have a wind-shirt to wear for short spurts around camp or say, if I need to do some climbing, anyway.
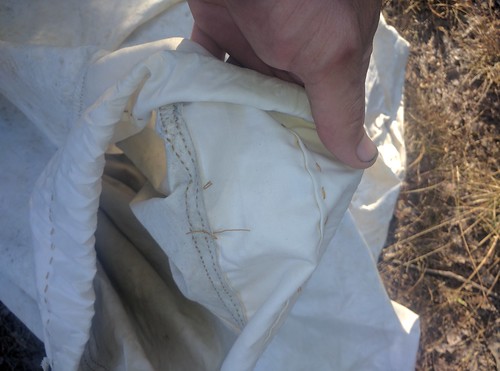
Clearly though, even with the rope, 8' is too long for a poncho, so it has a button-up flap in the back taking up maybe 18" of fabric. This is like a classic nylon poncho, you can open it up to cover a pack, or when using the poncho as a tarp say, as a shelter or ground-cloth (all uses I have planned). The buttons are simple stick buttons cut around the middle and tied on. The hems I did by hand.
The neck is the most interesting component. This is a separate piece of fabric that was sewn such that water would run off. I decided that full-felled seams were a PITA, so this is just a normal seam layered properly. This design allows me to cinch the neck tight so there's only a small hole while using the poncho as a tarp, or I can cinch it around my neck while using it as a poncho to help keep drips from going down it. The plan is to combine this with a hat (as in my first picture), which I often wear in the rain anyway.

Conclusion: This recipe seems pretty decent, and a huge improvement on any other recipe I've tried. I think my final product is usable for my overall "no cotton backpacking" gear. I'm curious to try the treatment on my canvas shirt as well, and find out if a thicker fabric helps.
Lastly, here's another old post relevent to the safety of this gear
http://www.blog.smalladventures.net/2016/10/fire-safety-and-cotton-backpacking-gear.html
UPDATE:
I've added grommets to this, using the methods from http://www.blog.smalladventures.net/2017/02/myog-plasticless-backpack.html , and I'm finding it far superior to sewing on tieouts.
More pot hanging methods
2017-02-14
Here's another interesting cooking method. Really a followup to:
http://www.blog.smalladventures.net/2016/07/pot-hanging-methods.html
After we rolled the truck I ditched the wooden poles in the snow while trying to get everything back in the truck in below-zero whether after dark so it could be towed off, and we haven't replaced them yet.
But, we had twine and some trees!
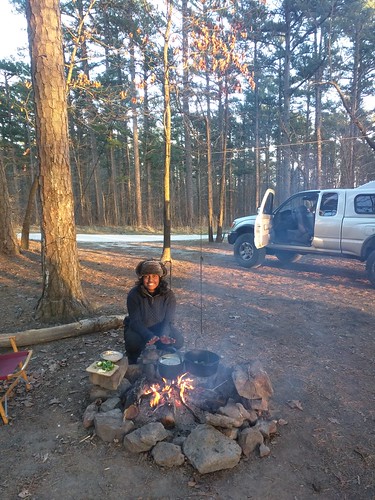
This setup uses one main rope strung between two trees (our ropes were two short, so I joined them using carrick bends). Then a third running to another tree and tied to the first with a double-half-hitch (clove-hitch, but on rope). This third rope lets us adjust the position left-right over the fire.
Lastly a rope was tied using a bowline over the first rope, so it could easily be slid along it. Then the pot-hook tied to that rope with the usual taught-line hitch, so you can adjust the height.
It worked so well, when we wanted to make pasta at the same time we just added another pot-hanging rope!