
Technical Ropes Rescue - Technician Level
2013-05-01
Author: mbrewer
Last Thursday through Sunday I took a Technical Ropes Rescue course up in Hopland from Ron Roysum.
We went over some of the basic stuff too, but I'm going to start with the super shiny stuff :P.
The Cool Stuff
 That's me, being the rescuer on an offset. This was the last setup we did, and one of the more complex ones. We were using a tree as a high directional (meaning something to have the rope come off above the ground). The total setup was >300 ft long, so we had ropes strung together and had to pass knots on the belay and mainlines. I was rigged to a pulley riding the offset line. I lifted the "patient" up to the pulley using a "set of 4's" that is, a set of 4 pullies resulting in a 4:1, and a prussick for progress capture. The offset line the pulley is on could also be lowered and raised by changing the tension at the bottom using another pulley system, allowing us to drop the rescuer down to the patient anywhere along the hill.
We got to play with all Ron's cool toys:
 This is a "Vortex". Here it's set up as an easel tripod. You can see here that I'm working "edge" (or trying anyway). I'm helping the rescuer off of the side, watching the ropes as he goes down and adding edge protection where needed (to keep the ropes from getting damaged). That pulley system I'm messing (once I get it on the rope) lets the belay stay taught even before the rescuer gets down below the edge. Yet once he's below the edge it doesn't depend on the fancy tripod because I can lower it down to the ground. This way the belay acts as a proper redundant backup if the rest of the system goes once the rescuer is down over the edge.
We're using the tripod as a high directional to make crossing the edge easier on the rescuer. It's quite helpful when you've got 2 people or a litter you're trying to get over the edge. You can see the hobbling in the photo where we tied the feet together so they couldn't splay. You can also see where we pulled the back leg down hard into an anchor, holding the whole thing in place so it doesn't fall over the edge.
Below is the same Vortex system but rigged as an Sideways A frame and separate gin pole:
 The side-ways A-frame gets used just like the tripod did, but needs a touch more guying. You can see the guy anchors coming out to the sides, carefully placed so they land about halfway between the legs thus pulling the frame hard down into the ground. In the image the rescuer is testing the system while edge helps him get everything set up. In this image it's easy to see the green rope leading out to the edge person. He has a Purcell prussic cord tied onto that rope, so he has some backup in case he falls off the edge by accident.
Then we had our Gin pole:
 You can see here a bit of how it's rigged, and it's a fair bit of rigging. We were aiming for 3 guy lines but messed up the angles and had to do 4. Two of the guy-lines you can see are tripled, while 2 are not. The tripled guy lines are for tensioning, they are basically just 3:1 pulley systems, but with just beaners and no pulleys. The 3:1 is then then muled off like a radium release hitch. We placed these so they'd be the guys that get heavily loaded. The 3 lines will help reduce stretch. The single guy-lines run down to prussic cords at the anchor, this makes getting the length right a lot easier since we can pull the rope through the prussic. The rope is then muled off for security. Note that the entirety of the gin pole rigging is done with one (long) length of rope.
We were using the gin pole as a redirect just so it was easier for the person operating the mainline. They get to stand up this way. I should note that a lot of the rigging here is excessive. We were doing fancy rigging for super comfy work so we could practise doing it all. You might do this on a body recovery, but probably not on a normal rescue. Setting this all up takes a little while. On the other hand, you might *need* it for a complex rescue, and that's why we were doing it here.
And just because I had no idea how this would really work out in practise, I have to include at least one picture of a litter scoop. I'm playing the idiot who screwed up his rappel and apparently is sufficiently injured he needs a litter :P (rather than a pickoff like I did as rescuer on the offset line).
 Here the rescuer is attached to the anchor point of the litter via a set of 4s again. This pulley system lets him go up and down relative to the basket. This was especially important for my rescuer who had quite short legs and needed to drop down a bit to be able to hold the litter out from the wall as we were raised back up. You can also see a second set of 4s being used to change the angle of the litter, the litter was brought nearly vertical to get me in, then pulled up horizontal.
This brings up an interesting question, who do we raise the rescuer and patient back up?:
 In this photo we're raising a single person on a simple 3:1 system. When we had a 2 person load we generally did a bat-wing 9:1 system. A 9:1 batwing is really just 2 stacked 3:1 systems with a redirect in the middle (In the system I showed with the gin pole, the gin-pole was the redirect). The second 3:1 system needs a really long haul field (distance to the anchor), otherwise you collapse that system (use up all the rope so the pulleys hit) 3 times for every one time of the other system - this makes for lots of resetting the system, which is slow.
Here you can see a simple 3:1 system. The line running back toward us is the "tail", that is the end you'd tie to your load to. The line the man is holding is the end you haul on. The device tied to the tree in the photo is an "MPD" (multipurpose device) which is just a super-fancy pulley and progress-capture system (think ratchet, it's not but that's the idea). On haul it fills the same roll as a pulley and prussic. Note that the pulley closest the camera is attached to the tail or load line via a prussic hitch. When the system collapses and we run out of rope, we just stop. The progress capture holds the load, and we run that prussic back out down the line again.

Other stuff
Some of the less sexy stuff we learned and practised were various ways to tie anchors. Lots of knots. Rappelling and swapping to an ascend and back. Swapping a lower system to a raise and back again. Placing rock pro. Angles and the forces those imply, which is something you always have to keep in mind. Safety margins and the like. Calls to make to cross-check things. We always had someone in charge of safety, and we all practised the common roles involved in a vertical rescue (IC, edge, rescuer, belay, mainline, haul team, and safety).I keep saying the word "belay", I should probably explain what that means. A "belay" is a *backup*. So, usually in rescue you have your mainline. This mainline may go through a high directional, you might have crazy pulley systems on it, and all sorts of stuff. The belay line on the other hand is generally simple. The idea is to be fully redundant if we can be. It's often on a separate anchor, uses a separate line, and depending on the harness may even tie into a different loop on the harness. In rescue there are a lot of tradeoffs and massive redundancy isn't always the right choice. Expediency can really matter and all the redundancy costs. So you don't *always* have an entirely independent belay line. Sometimes a rescuer might simply rappel down on a single "fixed line" even, if the goal is to get a rescuer to the patient as fast as possible. We talked a lot about these tradeoffs.
Ron was awesome, as was Dwayne the other teacher. I ended up camping on Ron's land for 2 of the nights. We had beers and spaghetti at his house on Saturday. It was generally a ton of fun. Lots of joking about during breaks so it felt comfortable, but didn't interrupt the learning at all. We had folks down from the Yukon and up from Arizona. Incredibly knowledgeable people who were just a blast to hang out with. The first 2 nights I practised my boondocking skills and found a campsite myself up on a hill down a dirt road about 20 minutes from the original meeting location. It was absolutely gorgeous. Sadly, I didn't take any pictures of it, but suffice to say that laying up there and reading a book in the evening I was very happy that I would be spending a lot more time outdoors in the near future.
This field is *enormous*. I learned a lot, but I'm still only scratching the surface of complex ropework. Having done some somewhat more complex stuff I'm now pretty confident I can do the simple stuff. But there is always tons more to learn.
Just an update
2013-04-24
First, some blog-related stuff
What's up now
Jess is gone to Washington on her own adventure for a while. We'll meet up again in a few months. I'll miss her a ton, but what she's doing is super exciting and I can't wait to learn from her when she gets back.On my end things are pretty busy right now.
- We've both basically completed training with CalESAR (just one training left, that I can't make it too). Assuming missing that training is okay we should both soon be certified as type 2 rescuers (meaning we can be out overnight and that sort of thing). We've got a ton to write about the various trainings for this, philosophies of being out, risk handling, etc.
- I'm going to take a 4 day class in rope rescue called TRR-TL. If I pass I'll get a certification for doing rescues involving cliffs and such. I'll be writing more about that soon hopefully.
- I'm trying to empty the apartment and garage of everything Jess and I own. We made some good progress before Jess left but there's still quite a ways to go.
- I started going barefoot basically all of the time, again more coming soon
- In moving out of the house last night I did my first test-pack of the truck to see if my stuff will fit. I want to write some about what I have.
Quiting my job to live outdoors
2013-04-01
It's official. I just emailed my manager today with the dates I'll be leaving. As of May 17'th I'll quit working in tech to live outdoors.
I'm going to spend the next year taking classes in various outdoor skills, going to primitive skills gatherings, and hanging out and sharing with as many outdoors and bush-craft enthusiasts as I can. I'm slowly building up an itinerary, though I also want to play it by ear some. My goal is to find out what's out there, and experiment with ways to live with the environment.
I'm really excited both about spending a lot more time sharing my love of this stuff with other people and learning from them, and spending a lot more time alone learning to understand the natural world better.
I've got a couple of cool classes scheduled for this summer. I plan to camp in National Forests, do some backpacking, definitely do some trips with almost no gear. I'll be taking some classes in various search and rescue skills as well as primitive survival skills. I want to train for ski patrol. I'm definitely going to try and get my California hunting license.
I'm planning to stay largely near California, though wandering farther a field at times (particularly towards the end of summer and into early fall), and playing things by ear. Now that I'm finally involved in a SAR team here in California I want to stick around and get more involved, not less.
The planning and prep for this, combined with a bit more load lately at work, is part of why I haven't been posting as often lately. Too much time prepping and not enough actually outdoors :). I definitely intend to keep posting, hopefully more than ever. My goal is to find a new balance between technology and living with/in the environment.
If you want to hang out and share skills, go on a trip with me, or have cool suggestions for ways to spend my time let me know!
DIY: Stove videos
2013-03-23
A couple nice videos for making soda can stoves (not by us):
The first is a soda can stove. This is what Jess and I have been using for years.
The process he here is the same, though we do it just a touch differently. We used utility knives rather than scissors. And, rather than pushing in directly with the needle, we clamped the needle in a pair of locking pliers. This is how Jess' is built. The stove I use the most is made with a small drill bit instead.
This is actually the type of stove my dad used on his last few trips, though he purchased his.
Truck platform: take 3
2013-01-20
See our first and second attempts at a truck platform:
- http://www.blog.smalladventures.net/2011/06/jack-camper.html
- http://www.blog.smalladventures.net/2013/01/truck-hammock-failed-experiment.html
As noted in the Hammock article, our first attempt was pretty successful, we really liked the platform, both in concept and in practice. It had some downsides though around bulk, weight, simplicity, removability, etc. It's pretty good, but we thought we could do better.
The Hammock fell through... well, luckily not literally, but it didn't work.
And thus comes, platform attempt #3. Here it is folks:
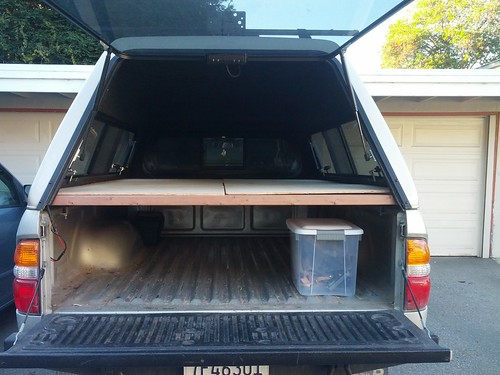
The idea is simple. Build a platform that sits on the lip of the truck bed and cap. This way we don't need any supporting structure. This saves weight, bulk, and construction effort. The platform also comes out a touch higher than our last one, giving us even more cargo space. The box in this picture just *barely* fit under the old platform.
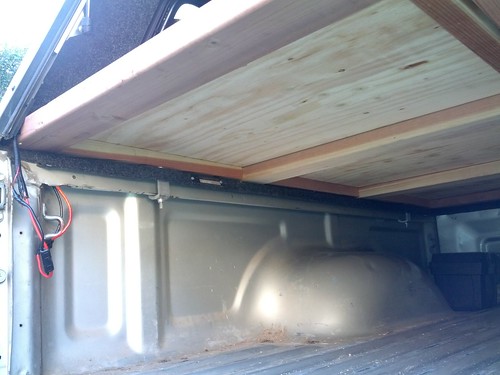
The tricky part is figuring out how to get the platform *in* there. If you make flat solid platforms the width that is needed to sit on the lip, they won't fit in through the door. Because of the angle of the sides of the cap, tilting the platform to slide it in doesn't help. In fact, the window's cause a slight inward bulge in the cap, such that the platform above is completely captive vertically... so what to do?
This platform is built out of 6 separate pieces of ply. Each piece has 2 2x2's screwed to it to add rigidity and as spacers. These then sit on 2x4's that span the width of the bed of the truck, from lip to lip.
The idea is simple, to get the platform in you take each 2x4 and spin it into place (around the vertical axis). Once they are in place you drop in the pieces of ply. The 2x2's attacked to the ply keep the 2x4's from spinning, thus locking the structure in place.
As it turns out this worked beautifully. I was able to get the ply to fit in a single 4x8 piece. The cross pieces are from 2 10ft 2x4's, and the spacers are from 3 8ft 2x2s (it would've been 2 10fts but they didn't have any at Lowes). The 2x2 and 2x4's are redwood. It was what they had, and it should have less trouble with bowing due to dampness then say fir would. One bonus is that being made of 6 pieces makes removing one of the back pieces while you're in there somewhat easier, making it easier to reach the stuff in the back.
It all worked beautifully and looked perfect. I took these pictures. Then I went to close the truck to go inside and....
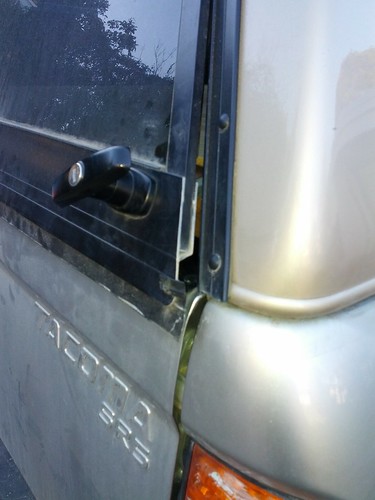 Oops! I completely forgot to save space for the latches! Luckily, Jess has a dremel and using that and my pull saw I cut out a space for the latches. Well, what's a project without a little hacking. Oh FYI: If you want one, I built this one, including purchasing materials, this afternoon. A good saw, square, measuring tape and screw-gun is all you need. Well... and a pencil and paper.